A fence garden works best when I keep three things in check: weight, sun/water, and mounting hardware. Wet vertical systems can weigh 25 to 150 pounds per square foot, so I need a solid fence first, not just a nice planting plan.
If I want this to last, I focus on the basics:
- Check fence strength first with a push test and post inspection
- Match the system to the fence: boxes, pockets, pots, trellises, or panels
- Use the right hardware like stainless lag screws, spacers, and proper anchors
- Pick plants by sun, heat, root depth, and water use
- Keep heavy containers low and leave space for airflow and access
- Plan for upkeep: morning watering, monthly hardware checks, and wood protection every 1–2 years
A few numbers matter most. I leave a 1-inch gap between planters and the fence, water pockets 2–3 times a week in warm weather, inspect mounts monthly, and recheck after winds over 30 mph. For deep-rooted plants like patio tomatoes, I use containers at least 12 inches deep.
This guide shows how I’d turn a fence into growing space without overloading it, rotting the wood, or making watering a chore.
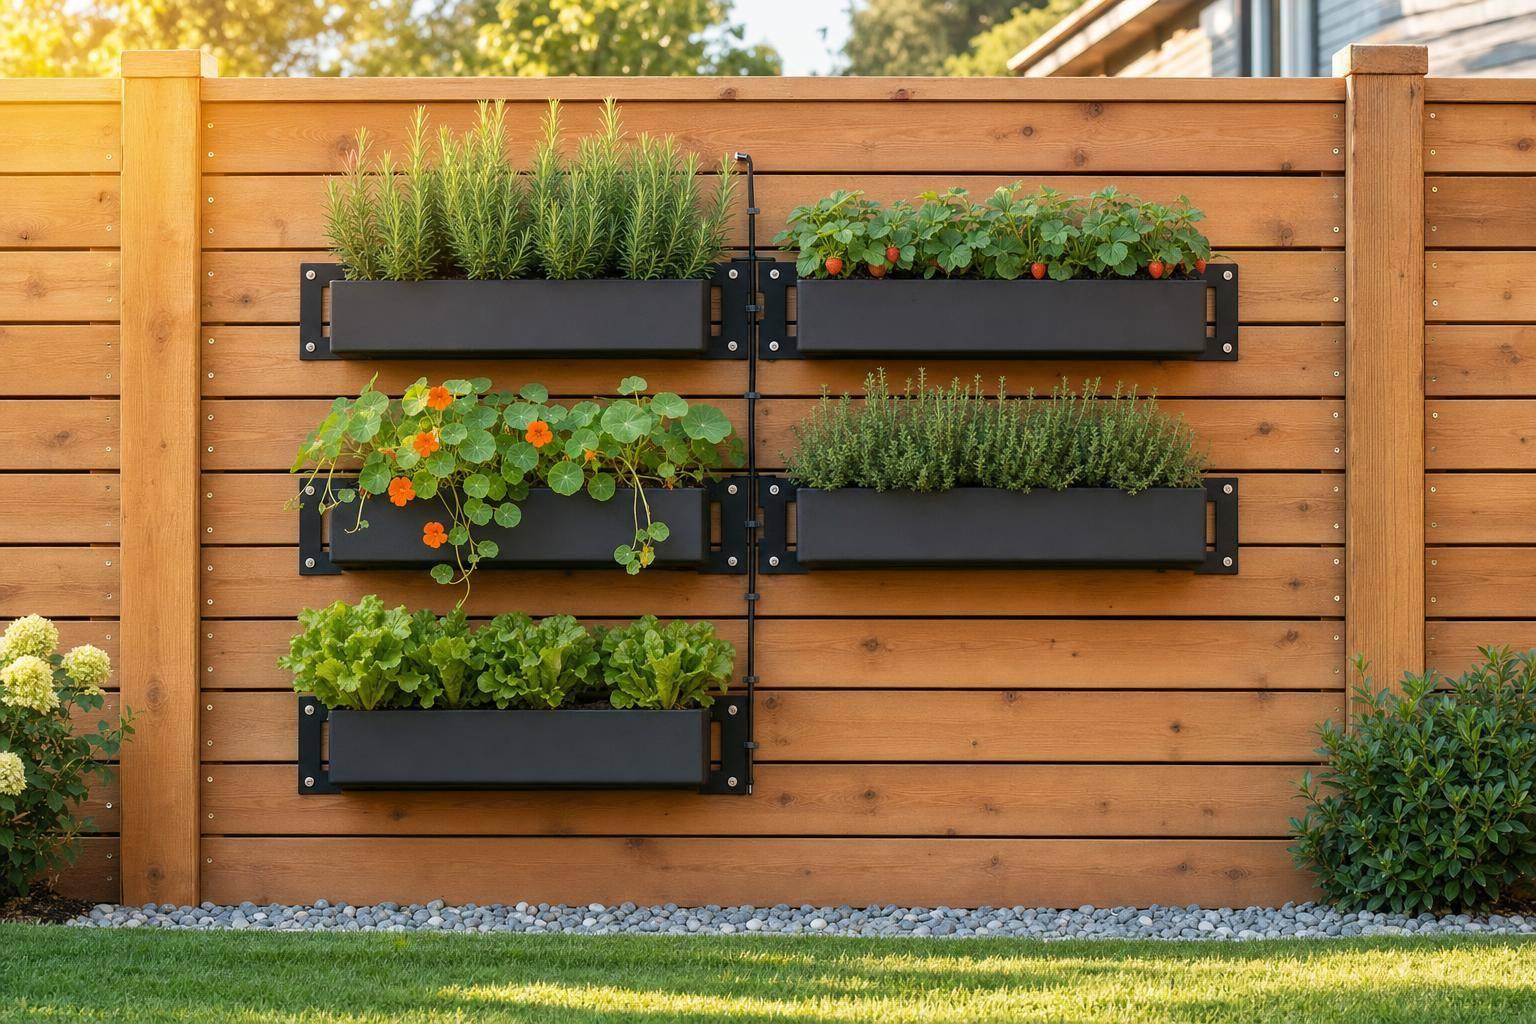
Small Yard, BIG Greenery! Genius Vertical Fence Garden Ideas for Privacy
sbb-itb-d1d0a96
Check Fence Strength, Site Conditions, and Load Limits Before You Start
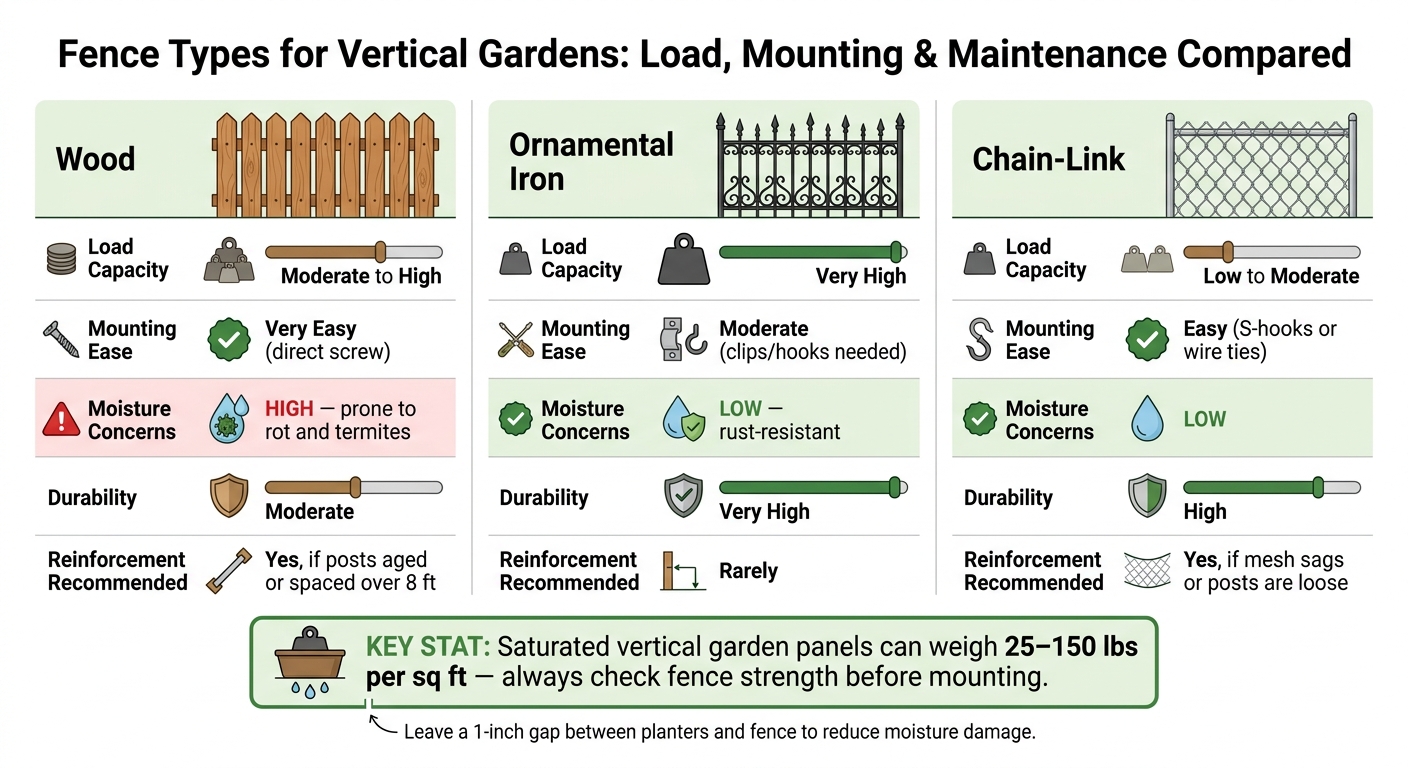
Fence Types for Vertical Gardens: Load, Mounting & Maintenance Compared
Vertical gardens get heavy fast, especially after watering and once plants fill out. Saturated living wall panels can weigh 25 to 150 pounds per square foot. That’s a lot of stress for a fence, so check the structure before you mount anything.
Start with a simple push test. Press on the fence firmly with both hands. If it wobbles or flexes, shore it up first. Add 2×4 or 2×6 vertical supports every 2 to 5 feet to help limit sagging. If you need new posts, set them at least 30 inches deep in holes 18 inches wide and fill them with concrete. And before you dig, call 811 to check for underground utility lines.
If the fence has older posts, wide spacing, or a visible lean, consider residential fence reinforcement before you build. Same goes for any fence that looks worn out or out of line. A little prep now can save you from a mess later.
Wood, Metal, and Chain-Link Fences: How They Compare for Vertical Garden Use
Not all fences handle a vertical garden the same way. Wood is usually the easiest option because you can screw right into it. The downside is moisture. Constant watering can speed up rot, and termites don’t help either. Leaving a small gap between planters and the fence, or adding a moisture barrier, can slow that damage.
Metal and chain-link fences deal with regular irrigation better, but they need different hardware. You’ll usually need clips, hooks, S-hooks, or wire ties instead of direct screws.
| Fence Type | Load Capacity | Mounting Ease | Moisture Concerns | Durability | Reinforcement Recommended |
|---|---|---|---|---|---|
| Wood | Moderate to High | Very Easy (direct screw) | High – prone to rot and termites | Moderate | Yes, if posts are aged or spaced over 8 ft |
| Ornamental Iron | Very High | Moderate (clips/hooks needed) | Low – rust-resistant | Very High | Rarely, if properly anchored in concrete |
| Chain-Link | Low to Moderate | Easy (S-hooks or wire ties) | Low | High | Yes, if mesh sags or posts are loose |
How to Measure Sun, Wind, Water Access, and Clearance Around Your Fence
Once the fence is solid, look at the site itself. Plant health and day-to-day upkeep depend on what’s happening around the fence, not just on the fence.
Walk the fence line at a few points during the day and track how much direct sun each area gets. South-facing fences get the most sun and dry out the fastest. That makes them a good fit for heat-loving plants, but small containers there may need more attention. North-facing spots stay cooler and shadier, which works better for plants that don’t like harsh sun.
Wind is easy to overlook, but it matters. A fence covered with planters and foliage can act like a sail. If the area gets hit by prevailing winds, the extra movement can loosen mounts over time.
Then check the practical stuff:
- Make sure a hose can reach the full garden.
- Plan to water vertical pockets 2 to 3 times a week in warm weather because they dry out faster than in-ground soil.
- Leave enough room for pruning, watering, and gate swing.
- Watch for trailing plants that can block access sooner than you’d think.
These checks make it easier to pick a setup and mounting system that fit the fence’s strength and the site’s exposure.
Choose a Vertical Garden Design and the Right Materials
Pick the lightest system that still works for your fence, sun conditions, and watering setup. Those three limits do most of the decision-making for you. Use them first, then use the table below to narrow your options before you spend money on hardware.
Planter Boxes, Pocket Planters, Hanging Pots, Trellises, and Modular Panels Compared
The setup you choose affects weight, watering needs, and how large your plants can get.
| System Type | Weight | Drainage | Maintenance | Planting Capacity | Visual Impact |
|---|---|---|---|---|---|
| Planter Boxes | High | Moderate | Medium | High (deep roots) | Traditional/Solid |
| Pocket Planters | Low | Excellent | High (dries fast) | Medium (herbs/small plants) | Modern/Textured |
| Hanging Pots | Moderate | Good | Medium | Low (single plants) | Casual/Floating |
| Trellises/Wire | Very Low | N/A | Low | High (climbers) | Airy/Natural |
| Modular Panels | Moderate | Integrated | Low–Medium | Medium | Professional/Lush |
One small detail matters a lot here: stagger stacked planters so runoff doesn’t drench the pockets below. If you skip that, the top row can soak the lower row day after day.
Hardware, Containers, and Irrigation Parts You Need for a Safe Build
Once you’ve picked a format, match your fasteners and irrigation parts to the fence material. That’s where a lot of DIY builds go wrong. Choosing a professional installer can prevent these issues, as seen in our customer reviews. A good planter system can still fail if the mounting hardware isn’t right.
For wood fences, use stainless steel lag screws that are at least 3.5 inches long, along with washer plates to spread the load and help stop the wood from splitting. Anchor into solid rail or post wood, not cut ends. Drill 1/8-inch pilot holes first.
For metal fences, use metal-rated drill bits when making pilot holes.
To figure out how much weight your mounts need to hold, add the weight of the container, saturated soil, and plant mass. Then apply a 2.5x safety factor when choosing anchors. That extra margin matters because wet soil gets heavy fast.
For the growing medium, use a light mix of compost, perlite, and coconut coir. It drains better and keeps the total load down. On the watering side, drip line kits can attach right to metal panels, and self-watering planters mounted to fence posts can cut down on hand-watering.
Skip standard drywall anchors, suction cups, and magnetic hooks entirely. They’re not made for outdoor loads, and they will fail.
Next, match plants to the light, heat, and moisture your chosen system will create.
Pick Your Plants and Install the Garden Step by Step
Once your system and hardware are set, plant choice comes down to two things: how much sun your fence gets and how deep your containers are.
A fence that gets full sun can dry out FAST, especially in peak summer. In those spots, you may need to water every day. Shadier areas are a better fit for plants that can handle less direct light.
Good Plants for Sun, Shade, Herbs, Flowers, and Small Edibles
Match each plant’s root depth and water needs to the sun, wind, and weight limits you already checked. Deep-rooted crops, like patio tomatoes, need containers that are at least 12 inches deep. Put lighter plants higher on the fence, and keep heavier containers lower.
| Plant | Sun Exposure | Watering | Container Depth | Notes |
|---|---|---|---|---|
| Sedum (Stonecrop) | Full Sun | Very Low | Shallow | Low mats or spikes |
| Wave Petunias | Full Sun | High | Shallow–Medium | Long, trailing |
| Fuchsias | Shade | High | Medium | Trailing |
| Thyme / Oregano | Full Sun | Low | Shallow | Low spreading/cascading |
| Lettuce / Mesclun | Sun to Part Shade | Medium–High | Shallow | Compact; rotate seasonally |
| Kale / Arugula | Part Sun (Fall) | Medium | Shallow | Tender baby greens |
| Sugar Snap Peas | Full Sun (Spring) | Medium | Shallow | Climbing/Compact |
| Patio Tomatoes | Full Sun | High | Deep (12"+) | Compact; keep low on the fence |
Space plants by their mature size, not by how small they look on planting day. That’s a common mistake. When plants are packed too tightly, airflow drops and upkeep gets harder.
Once you’ve settled on your plant list, put the heaviest containers low and keep the fence face open enough for airflow and easy access.
How to Install, Space, and Plant Without Damaging the Fence
Attach uprights to the fence’s structural, load-bearing parts, not the decorative slats. Before you install anything, mark your layout lines and make sure mounting supports are level. Leave a 1-inch gap between the planter and fence by using Z-clips or spacers.
A few placement rules matter here:
- Keep heavier containers, like deep tomato planters, at the bottom of the fence.
- Space planter units at least 3/4 inch apart, and hang individual pots about 10 inches apart vertically.
- Plant planter units on the ground first, then move the finished unit into place.
Also, make sure your layout doesn’t block gates or fence sections that need routine checks or repairs.
For watering, use the finger test. Check the soil to your second knuckle. If it feels cool and damp, wait before watering.
How to Maintain the Garden and Protect the Fence Over Time
Vertical planters dry out fast. That means morning watering is usually your best move, especially in summer. It also helps to check soil moisture often when temperatures climb. As daylight gets shorter in fall, start easing back on watering.
If you live in USDA Zone 7 or colder, take all containers off the fence for winter. That helps prevent freeze-heave damage to anchors and reduces strain on the fence itself. Fertilizer needs a little care too. Stop fertilizing when temperatures go above 85°F. And if you have a west-facing fence that gets hotter than 90°F, hang shade cloth to cut heat stress. Hot weather and fast drying can also loosen mounts more quickly, so check hardware on that same schedule.
During the growing season, inspect every bracket, fastener, and mount once a month. Do another check after winds above 30 mph. Sun exposure wears materials down over time. For example, UV exposure can reduce the tensile strength of nylon mounting straps by about 35% after 12 months. So take a close look at straps and clips, and swap out worn parts before they give out.
Wood fences need routine care too. Reapply a water-repellent preservative every 1–2 years, and keep an eye out for soft or discolored wood near mounting points. Once the structure stays secure, your attention can shift more toward pests and seasonal cleanup.
A simple rinse helps more than many people expect. Wash foliage every two weeks to slow spider mites and scale. If you notice sticky residue, small holes, or gray mold, treat it early with neem oil or mild soap, with extra attention to the undersides of leaves.
Here’s a simple seasonal maintenance reference to keep things on track:
| Season | Key Tasks |
|---|---|
| Spring | Inspect for frost damage, tighten fasteners, apply wood preserver, start slow-release organic fertilizer at half the label rate |
| Summer | Water in the morning, apply UV-resistant finish to wood, check for pests, stop fertilizing above 85°F |
| Fall | Reduce watering, clear debris from the fence base, tighten all screws and brackets |
| Winter | Remove containers in Zone 7 and colder, brush off snow buildup, keep salt away from wood and vinyl |
Conclusion: Build for Weight, Plant for Conditions, and Maintain Both Over Time
A fence garden holds up best when the weight, plant choice, and upkeep all fit the site. Start by making sure the fence can carry the load. Then match plants to your sun and wind exposure. After that, it comes down to steady care: check hardware, watch soil moisture, prune for airflow, and clear debris so both the garden and the fence stay in good shape over time.
FAQs
How do I know if my fence can hold a vertical garden?
Make sure your fence is solid, in good shape, and strong enough to handle the extra weight of the garden structure, especially if you’re adding a taller or heavier trellis.
If you plan to attach parts straight to the fence, check that the connection points are secure and that the fence doesn’t lean or wobble. With wooden fences, setting the trellis at least 12 inches into the soil or into a fence post can help it stay in place.
What is the lightest vertical garden option for a fence?
The lightest vertical garden option for a fence is shallow-rooted plants grown in lightweight planters.
That usually means plants like succulents, salad greens, or strawberries. They don’t need much soil, so the setup stays lighter and puts less strain on the fence.
Good planter choices include:
- Fabric pockets
- Gutters
- Hanging containers
These options work well in small spaces and are usually easy to install.
How can I keep a fence garden from damaging the fence?
Protect the fence posts and the rest of the structure from wear and damage. Post guards can help shield posts from early deterioration, while durable materials like vinyl, metal, or composite can lower the risk of rot, warping, and insect damage.
It also helps to check the fence on a regular basis and stay on top of basic upkeep. Sealing wood or applying rust-prevention treatments can help the fence last longer and stay in better shape over time.