If I had to sum it up in one line: dense, sealed, and tall barriers cut the most noise – and precast concrete and masonry usually lead on sound control, while composite, metal, and clear panels help when weight, cost, or visibility matter more.
If you’re comparing commercial fence materials for a station, rail edge, bus hub, or park-and-ride, here’s the short answer:
- Precast concrete: best fit when you want strong noise control and low upkeep, but it costs the most.
- Masonry block/brick: very strong sound blocking and long life, but it’s heavy, reflective, and hard to retrofit.
- Metal with absorptive panels: lighter than concrete, helps cut echo, but needs more upkeep.
- Transparent acrylic/polycarbonate: keeps sightlines open, but sound control is lower and cleaning is a bigger job.
- Composite / mass-loaded vinyl (MLV): lower installed cost, lighter weight, and good retrofit fit, but not the top pick for the highest noise loads.
A few numbers matter right away:
- Well-built noise barriers often cut sound by 8–15 dB(A).
- A 10 dB(A) drop is often heard as about half as loud.
- Even a 5–10 mm gap can hurt performance.
- Concrete walls can run about $722.54 per linear foot for a 14-foot wall.
- Composite systems often land around $40–$75 per linear foot.
- Metal systems often land around $50–$150 per linear foot.
- Clear barriers often land around $75–$200 per linear foot.
What matters most isn’t just the material. I’d focus on four things first:
- Noise reduction
- Height and full sealing
- Weight and retrofit limits
- Long-term maintenance and installed cost
Quick Comparison
| Material | Noise Reduction | Main Tradeoff | Cost Range |
|---|---|---|---|
| Precast Concrete | High | Heavy and expensive | ~$722.54/linear ft for 14-ft wall |
| Masonry Block/Brick | Very high | Heavy, reflective, labor-heavy | ~$619.32–$1,032.20/linear ft |
| Metal Absorptive Panels | Moderate to high | More upkeep, shorter life than concrete | $50–$150/linear ft |
| Transparent Acrylic/Polycarbonate | Moderate | Higher cleaning needs, lower sound control | $75–$200/linear ft |
| Composite / MLV | Moderate | Lower top-end blocking than concrete or masonry | $40–$75/linear ft |
So if I were choosing fast: use concrete or masonry for the strongest noise control, metal for lighter absorptive systems, clear panels where visibility matters, and composite/MLV where budget and retrofit ease matter most.
sbb-itb-d1d0a96
Key Factors to Consider Before Choosing a Noise-Reducing Fence
Mass is the first thing to look at. Heavier panels block more sound. As a rule of thumb, doubling a panel’s mass adds about 6 dB in transmission loss, and you generally need a surface density of at least 20 kg/m² before noise reduction starts to make a clear difference in transit settings.
But mass alone won’t save you. Height and placement matter just as much as the material. The barrier needs to break the line of sight between the noise source and the person hearing it. And the farther the fence sits from the noise source, the taller it usually needs to be. At about 16 feet (5 meters) from the source, an 8-foot barrier may be enough to shield ground-floor windows, but upper floors need more height. In rail corridors or station-side locations, fully enclosed barrier systems tend to do the best job of containing noise in dense areas.
There’s another issue people often miss: gaps. A fence can be heavy and well placed, then lose a lot of its sound-blocking ability because of small openings at the joints, posts, or along the base. That’s why the bottom edge should be sealed to the ground with a concrete strip or soil berm.
Long-term upkeep matters too. In busy transit zones, concrete and masonry usually hold up best and need very little maintenance. Timber can work, but it needs UC3 or UC4 pressure treatment to help resist rot.
Then there are the local rules. In many places, barriers above 2 meters – or above about 1 meter next to a highway – may need permits and an acoustic assessment.
Put together, these points push you toward one type of system: dense, sealed, and low-maintenance. That’s why precast concrete is often the starting point.
1. Precast Concrete Noise Walls
In rail and bus corridors where space is tight, precast concrete is often the default pick. Put simply, when the corridor is narrow, it’s usually the most practical noise-wall option.
Standard walls are usually 12 to 15 feet tall and can go up to 20 feet. In most cases, planners aim for about 10 dBA of noise reduction, while 7 dBA is often treated as the minimum acceptable improvement. That said, the payoff falls off fast beyond about 500 feet from the source.
The big downside is cost. Average construction comes in at about $51.61 per square foot, or around $722.54 per linear foot for a 14-foot wall. That works out to about $3.9 million per mile for a 14-foot wall.
| Metric | Value |
|---|---|
| Typical wall height | 12–15 ft |
| Max height | 20 ft |
| Design target noise reduction | 10 dBA |
| Estimated cost per linear foot (14-ft wall) | ~$722.54 |
| Estimated cost per mile (14-ft wall) | ~$3.9 million |
Its main advantage is performance. Its main weakness is price.
2. Masonry Block and Brick Barriers
When a corridor needs something more permanent than precast, masonry is the next step up. It fits best in places where mass, permanence, and low upkeep matter most.
Masonry is one of the top-performing transit noise barrier types. A standard 102.5 mm brick wall has a surface density of about 240 kg/m², which lines up with a laboratory sound reduction rating (Rw) of 38–45 dB. In transit settings, field performance is lower – but still strong – at about 20–30 dB(A) of insertion loss.
Performance doesn’t depend on height alone. Continuity matters just as much. Even a small break in the wall, especially at driveways or intersections, can cut performance fast . The barrier also needs to fully block the line of sight between the noise source and the receiver .
There is a trade-off, though. Masonry is a sound-reflective material. Instead of soaking up sound, it pushes sound back toward the source. That can increase noise on the far side by 1–3 dB(A).
Here’s the height-by-height cost picture:
| Wall Height | Est. Cost per Linear Foot | Est. Cost per Mile |
|---|---|---|
| 12 ft | ~$619.32 | ~$3.27 million |
| 14 ft | ~$722.54 | ~$3.82 million |
| 15 ft | ~$774.15 | ~$4.09 million |
| 20 ft | ~$1,032.20 | ~$5.45 million |
Durability is one of masonry’s big selling points. It’s a standard, practical choice for long-term transit infrastructure. That said, utility conflicts can push installed costs higher.
For sites that need less visual bulk or a lighter build, the next option turns to panels instead of full masonry mass.
3. Metal Sound Walls with Absorptive Panels
For stations, platforms, and corridors where the foundation can’t handle much weight, metal sound walls with absorptive panels can be a smart noise-control pick. They use perforated steel or aluminum faces with mineral wool to help absorb and block sound, with NRC up to 1.0 and STC up to 36.
Installed cost usually falls between $50 and $150 per linear foot. The catch is service life. Metal barriers last about 25 years, while concrete can last about 50 years. So even if metal helps upfront in weight-sensitive areas, it may end up costing more over time. For a large corridor, it’s worth running a life-cycle cost analysis before moving ahead.
Maintenance also adds up. Plan for 5% to 10% of installed cost each year for upkeep, mostly rust treatment and coating work. Rust and corrosion are the main trouble spots, especially in humid or coastal areas. Graffiti usually comes off without much trouble, but snow plows and other heavy equipment can dent the panels.
| Factor | Detail |
|---|---|
| Installed Cost | $50 to $150 per linear foot |
| Service Life | ~25 years |
| NRC Rating | Up to 1.0 |
| STC Rating | Up to 36 |
| Wind Resistance | Tested up to 140 mph |
| Primary Maintenance | Rust treatment, painting, protective coatings |
Another plus: metal-framed systems weigh less than masonry or concrete, so crews need less heavy equipment during fence installation. That’s a good fit for rooftop use or sites with weak soil that can’t take heavy foundation loads. If sightlines matter more than sound absorption, transparent acrylic or polycarbonate barriers are next.
4. Transparent Acrylic or Polycarbonate Noise Barriers
For bridges and elevated transit structures, transparent acrylic or polycarbonate barriers can be a lighter retrofit option that doesn’t call for major structural upgrades. That’s a big deal when a site has strict weight limits and clear visibility matters more than top-end sound blocking.
The sound reduction is modest, but it shows up in day-to-day transit use. In a Dallas IH-30 study, transparent acrylic or polycarbonate barriers were found effective over four years, with modest but measurable noise reduction.
Another plus is visibility. These barriers preserve sightlines and daylight, and they help avoid a tunnel effect for drivers. In dense urban corridors, that can make a noticeable difference.
Transparent acrylic or polycarbonate barriers usually cost $75 to $200 per linear foot installed and are often less expensive than concrete, though they can cost more than metal panels. Their typical service life is 20 to 30 years, with shorter lifespans in high-impact or severe-weather locations.
| Factor | Detail |
|---|---|
| Installed Cost | $75 to $200 per linear foot installed |
| Service Life | 20 to 30 years |
| Best Use Case | Elevated structures, bridges, sightline-sensitive sites |
| Primary Maintenance | Regular cleaning, scratch repair, graffiti removal |
In high-wind areas, installation costs can go up because these systems may need specialized anchoring and reinforced foundations.
If a project needs a different mix of flexibility and acoustic mass, the next option looks at composite systems.
5. Composite and Mass-Loaded Vinyl Acoustic Fence Systems
For transit hubs that need something lighter than concrete or masonry, composite and MLV systems offer a practical middle ground. Composite acoustic panels use dense, multi-layer construction, often with WPC. MLV adds flexible mass that helps block noise from trains, buses, and nearby traffic. Put together, they create a low-to-moderate mass acoustic fence option that fits transit edges near residential and mixed-use areas.
In transit settings, composite acoustic panels typically deliver 8–15 dB(A) of on-site noise reduction, with laboratory sound reduction (Rw) ratings of 24–32 dB. That’s enough to make a busy transit site feel noticeably quieter for people nearby.
One detail matters a lot here: seal all joints and edges. Even small gaps of 5–10 mm can weaken acoustic performance. It’s a simple point, but it can make or break the result.
Composite systems usually cost $40–$75 per linear foot installed and can last 25–30+ years. Upkeep is light, which helps over time. In most cases, maintenance comes down to occasional cleaning and joint resealing. That puts these systems among the more affordable long-term options in this list.
| Factor | Detail |
|---|---|
| Installed Cost | $40–$75 per linear foot |
| Service Life | 25–30+ years |
| On-Site Noise Reduction | 8–15 dB(A) |
| Best Use Case | Transit hubs near residential or mixed-use areas |
| Primary Maintenance | Occasional cleaning and joint resealing |
Absorptive composite panels can also reduce reflected noise in residential or mixed-use corridors.
Side-by-Side Comparison of All 5 Materials
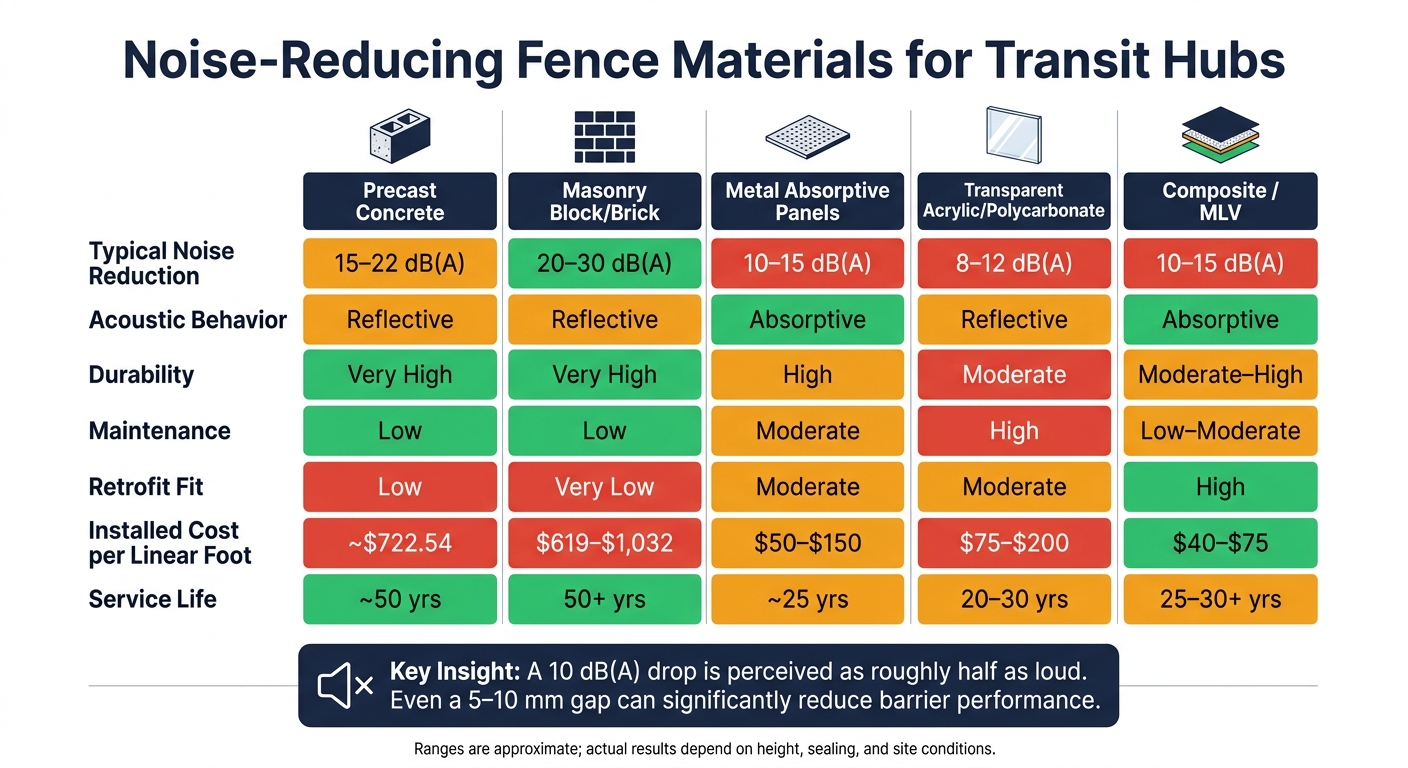
Noise-Reducing Fence Materials for Transit Hubs: Side-by-Side Comparison
The table below gives you a quick read on noise reduction, durability, upkeep, visibility, retrofit fit, and cost across all five materials. It’s a handy way to narrow your options before digging into the pros and cons.
| Material | Typical Noise Reduction (On-Site) | Acoustic Behavior | Durability | Maintenance | Visibility Impact | Retrofit Fit | Relative Cost |
|---|---|---|---|---|---|---|---|
| Precast Concrete | 15–22 dB(A) | Reflective | Very High | Low | Opaque | Low | High |
| Masonry Block/Brick | 20–30 dB(A) | Reflective | Very High | Low | Opaque | Very Low | Very High |
| Metal Absorptive Panels | 10–15 dB(A) | Absorptive | High | Moderate | Opaque | Moderate | Moderate |
| Transparent Acrylic/Polycarbonate | 8–12 dB(A) | Reflective | Moderate | High | Clear | Moderate | High |
| Composite / MLV | 10–15 dB(A) | Absorptive | Moderate–High | Low–Moderate | Opaque | High | Low |
Ranges are approximate; actual results depend on height, sealing, and site conditions.
Masonry and precast concrete tend to deliver the strongest on-site noise reduction. The tradeoff is pretty clear: they’re also the toughest to retrofit and put the most strain on the structure.
Composite and MLV systems sit at the other end of the range. They’re easier to retrofit and usually easier on the budget, but they don’t reach the same upper-end sound-blocking range as concrete.
One more point matters here. Absorptive systems help cut reflected noise, while reflective systems don’t. If nearby properties are a big concern, absorptive materials usually make more sense.
Transparent acrylic and polycarbonate keep sightlines open, which is why they’re often the go-to pick when visibility matters most. That said, they also come with the highest cost.
The next section breaks these same materials down by strengths and drawbacks.
Pros and Cons of Each Material
At transit hubs, the choice isn’t just about cutting noise. It’s about balancing sound blocking, weight, visibility, upkeep, and how fast a system can be retrofitted. That’s why one material can work well at a rail platform but be a poor fit for a bus terminal or pedestrian-heavy station.
The table below gives a quick side-by-side view of those trade-offs.
| Material | Key Pros for Transit Hubs | Key Cons for Transit Hubs |
|---|---|---|
| Precast Concrete | Strong sound blocking; impact- and graffiti-resistant; very low maintenance | Heavy (60–80 kg/m²); requires significant foundation work; specialist contractors needed |
| Masonry Block/Brick | Very high density (240 kg/m²); extremely long lifecycle; clean urban appearance | Labor-intensive to install; prone to cracking under ground vibration from rail traffic; difficult to repair if damaged by vehicles |
| Metal with Absorptive Panels | Lightweight; rust-resistant; tight-seal panel construction; easy to clean; absorptive facings can reduce reflected noise by 8–15 dB and work well in narrow transit corridors | Can be reflective without absorptive panels; moderate to high upfront cost |
| Transparent Acrylic/Polycarbonate | Preserves sightlines | Scratches, smudges, and graffiti show quickly |
| Composite / MLV | Fast retrofit onto existing chain-link fence installation; UV and mold resistant | Needs a supporting structure and does not reach the top STC range of masonry or concrete |
Masonry and precast concrete are the heaviest choices. That extra mass helps with sound control, but it also makes them tougher to use where the base structure can’t take the load.
Installation quality matters just as much as material choice. Any gap larger than 5–10 mm at joints, posts, or ground level can sharply cut performance. Composite and MLV systems with factory-sealed joints tend to handle this issue better than masonry or concrete, but they still need careful work at the base. A small opening may not look like much, but acoustically, it can act like a leak in a bucket.
Graffiti and day-to-day cleaning also shape the decision. Treated masonry and coated metal panels are the easiest to clean. Reinforced MLV can be printed with patterns that help deter tagging. Transparent panels keep sightlines open, which is a big plus in busy stations, but they also show every scratch, smudge, and mark almost right away. In a high-traffic hub, that can turn into a constant cleaning job.
Which Material Works Best for Each Transit Setting
The best material depends on three things: how much noise the site deals with, how visible the barrier will be, and how much upkeep the owner can handle.
For dense downtown stations: Brick and masonry work well because they block sound well in tight urban corridors. In spots where reflective surfaces can make noise bounce back and forth, metal absorptive panels help cut echo between parallel barriers.
For elevated rail corridors: These sites usually need lighter systems that don’t add too much weight to the structure. Metal sound walls with absorptive panels, along with transparent acrylic and polycarbonate barriers, tend to fit best because they can handle dynamic loads without putting too much extra stress on the corridor.
For suburban park-and-rides: These areas often lean toward the lowest-cost option that still reduces traffic noise. Composite and MLV systems are a practical fit here. They’re affordable, easy to retrofit, and work well enough in lower-noise settings.
For freight-adjacent corridors: Here, the main job is simple: block as much sound as possible. Precast concrete or masonry brings the density needed to deal with heavy engine noise.
For security-focused municipal sites: Precast concrete and masonry are a strong fit because they offer long service life, durability, and low upkeep. If weight is a limit, composite and MLV systems give you a lighter option with a 25–30+ year service life.
Across all five settings, place the barrier as close to the noise source as the site layout allows.
Conclusion
No single material works for every transit hub. The best pick comes down to sound control, durability, visibility, maintenance, and upfront cost at your site.
In most cases, heavier and denser barriers block more sound. That’s why the comparison above is the best way to narrow down the right fit.
That said, even the best material can fall short if the installation is sloppy. Height, sealing, and structural load all need to match the site. Use enough height to block sightlines, and seal every joint.
Before installation, bring in an acoustic specialist and a structural engineer. Pick the material that hits the site’s noise target with the least structural and maintenance burden.
FAQs
Which fence material blocks the most noise?
An acoustic wall built with masonry or 215 mm brick blocks tends to block the most noise. In most cases, it can cut sound by around 35–45 dB.
How tall should a noise-reducing fence be?
A noise-reducing fence should be at least 8 feet tall if you want it to do a good job of blocking traffic noise.
If local rules allow it, going up to 10 to 12 feet can cut much more of that noise. In plain terms, the extra height often makes a noticeable difference.
What matters more: material, height, or sealing?
All three matter, but material and height usually make the biggest difference in noise reduction.
Material affects how much sound gets through the fence. Height matters because taller fences tend to block more noise.
Sealing plays a big part too. If the fence has gaps or leaks, sound can slip through and cut down its performance.
Put simply, material and height do most of the heavy lifting, and sealing helps the fence do its job.