Want your fence to last longer and look great year-round? Seasonal fence painting is the answer. Regular maintenance protects your fence from weather damage, preventing warping, cracking, and rust. Here’s how to do it the right way:
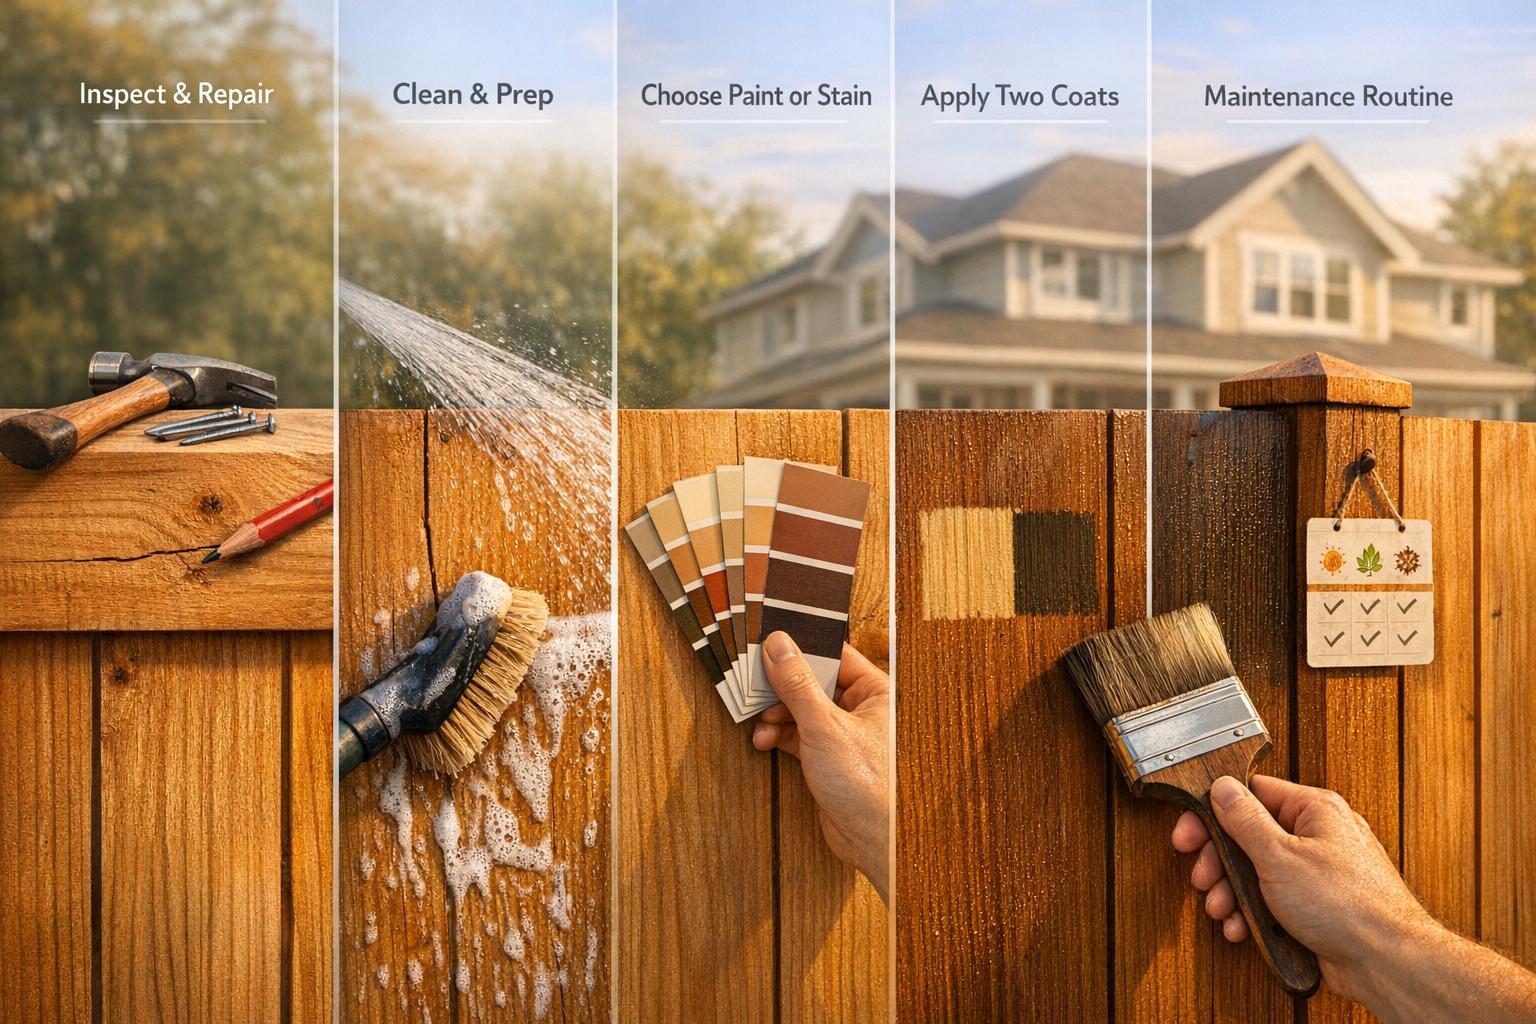
- Inspect and Repair: Check for rot, mold, cracks, and rust. Fix any damage before painting.
- Clean and Prep: Remove dirt, mold, and peeling paint. Sand the surface smooth for better adhesion.
- Protect the Area and Choose Products: Cover nearby areas and select the right paint or stain for wood, metal, or residential vinyl fences.
- Apply Paint or Stain: Use proper tools, follow the wood grain, and apply two coats for durability.
- Let It Dry and Maintain: Allow proper drying and curing time. Set up a seasonal maintenance routine to catch issues early.
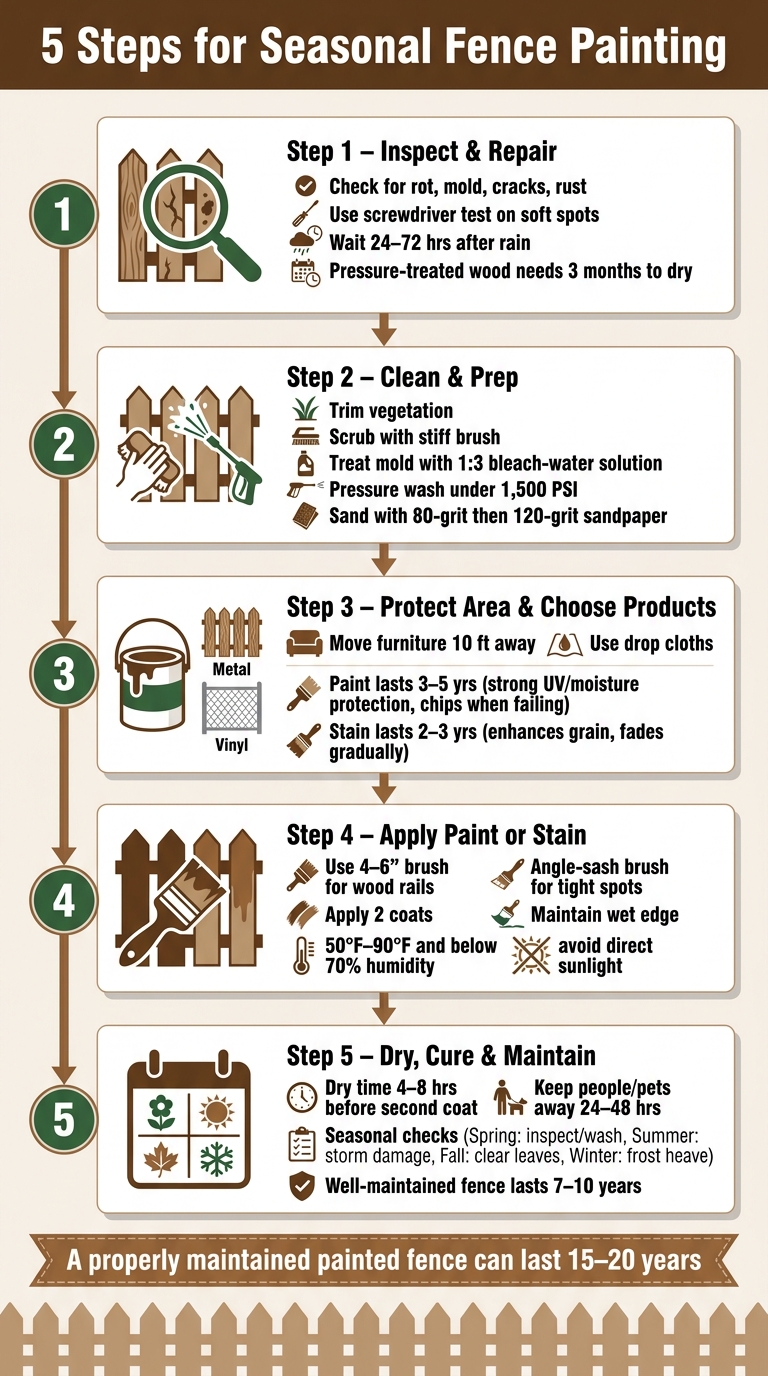
5 Steps for Seasonal Fence Painting: A Complete Visual Guide
Paint like a Pro – How to paint a fence
sbb-itb-d1d0a96
Step 1: Inspect and Repair Your Fence
Before you even think about painting, take a close look at your fence from end to end. A solid paint job starts with preparation – 90% of the work is in the prep. If there’s damage, don’t try to cover it up with paint. Fix it first.
Check for Damage
Start by examining the base of each post. This is where moisture from the ground and freeze-thaw cycles tend to weaken the wood. Keep an eye out for soft or spongy spots, grayed-out boards, or black and green discoloration, which could indicate mold or rot. Here’s a quick test: press a screwdriver into any suspect areas. If it sinks in easily, you’re dealing with rotten wood that needs replacing.
"Ground contact is where painted fences fail first as moisture wicks up from the soil and freeze-thaw cycles stress the wood." – John Neill Painting
Also, check for warped or cracked boards, loose nails or screws, and insect damage. If you spot termite activity, replace those boards entirely before moving forward. For metal parts like hinges or latches, look for rust – orange-brown stains or flaking are signs that corrosion has set in.
Fix What Needs Fixing
Once you’ve identified the issues, tackle the repairs before thinking about paint. Rotten pickets or rails should be swapped out completely – painting over damaged wood is a waste of time. Tighten loose fasteners, and if nails keep popping out, replace them with exterior-grade screws for a more secure hold. For smaller cracks or holes, use exterior wood filler. Apply it with a putty knife, let it dry as instructed, and then sand it smooth with 120- to 150-grit sandpaper. This step ensures the repairs blend seamlessly and the paint adheres properly.
If you’re dealing with rusted hardware, scrub away the loose rust with a wire brush and apply a rust-inhibiting primer before proceeding.
Once everything is fixed, it’s time to think about drying and timing.
When to Wait Before Painting
Timing is everything. If your fence has been recently cleaned or it rained, wait 24–72 hours for the wood to dry completely before painting. Even if the surface feels dry, moisture can linger deeper in the wood, and painting too soon could trap it, leading to blistering or peeling later.
Pressure-treated wood needs even more time to dry. The preservatives used in the treatment process need to evaporate, which can take at least 3 months. To check if the wood is ready, sprinkle a few drops of water on it. If the water beads up, the wood isn’t dry enough yet. If it soaks in, you’re good to go.
With your fence inspected and repaired, you’re ready to move on to cleaning and prepping for paint.
Step 2: Clean and Prep the Fence Surface
Once you’ve completed the repairs, it’s time to clean the fence thoroughly. A clean surface is key to ensuring the new paint sticks well. Dirt, mold, and peeling paint can interfere with adhesion, leading to a finish that flakes off sooner than you’d like.
Remove Dirt and Organic Growth
Start by trimming back any grass, shrubs, or vines that are in contact with the fence. This clears the area and makes cleaning easier. Next, grab a stiff synthetic-bristle brush and scrub along the wood grain to remove dirt and any dead fibers.
If you spot black or green patches, you’re likely dealing with mold or mildew. Treat these areas with a bleach solution – mix 1 part bleach to 3 parts water and let it sit for 10–15 minutes before scrubbing. For more stubborn growth, use a stronger 1:1 bleach-and-water solution. Safety first: always wear gloves, safety glasses, and a respirator when working with bleach.
Wash and Dry the Fence
Rinse the fence thoroughly using a garden hose or a pressure washer set to low pressure (under 1,500 PSI). Work from the top down so that dirty water runs off the cleaned sections rather than settling on them.
Once rinsed, let the fence dry completely. Use the water-drop test to check: sprinkle a few drops on the surface. If the water soaks in, the wood is ready for the next step. If the water beads up, give it more time to dry.
"If the wood doesn’t absorb the water, it needs to dry more." – Lowe’s
When the wood is fully dry, move on to removing any leftover peeling paint.
Scrape and Sand the Surface
With the fence dry, use a scraper or putty knife to get rid of any loose paint. Follow this by sanding the surface – start with 80-grit sandpaper to remove residue, then switch to 120-grit for a smoother finish. Finally, wipe down the fence with a dry tack cloth to clear away any dust.
"To ensure the stain or paint will adhere properly to the wood, lightly sand the surface of the fence until it’s smooth." – Valerie Albarda, Lowe’s
Step 3: Protect the Area and Pick the Right Products
Once your fence is cleaned and prepped, it’s time to focus on two key steps: safeguarding the area around the fence and choosing the best products for the job.
Cover Nearby Areas
Before you start painting or staining, make sure to protect the surrounding space. Move outdoor furniture, planters, and any decorations at least 10 feet away from the fence. Cover sidewalks, patios, and flower beds with canvas drop cloths or plastic sheeting, and secure the edges with weights to keep everything in place, even on windy days.
If you have shrubs or plants growing close to the fence, use plywood to gently push the branches back and hold them away from the surface while you work. Once everything is protected, you’re ready to decide on the type of finish you want for your fence.
Paint vs. Stain: Which to Use
Choosing between paint and stain depends on your goals for appearance and maintenance. Stain penetrates the wood, highlighting its natural grain and fading gradually over time. It’s easier to reapply, typically requiring a touch-up every 2–3 years with minimal prep work. Paint, on the other hand, forms a protective layer on the surface, hiding the wood grain. It provides stronger protection against UV rays and moisture and generally lasts 3–5 years before needing a refresh. However, when paint does fail, it often chips or blisters, which means more prep work when it’s time to repaint.
"Anything you paint will eventually have to be repainted. So if the fence doesn’t need it, there’s no reason to start that cycle." – Dennis, Craftsman, John Neill Painting
Here’s a quick side-by-side comparison to help you decide:
| Feature | Paint | Stain |
|---|---|---|
| Appearance | Hides the wood grain; wide range of colors available | Enhances the natural grain with earthy tones |
| UV/Moisture Protection | Strong protection | Moderate protection; fades naturally |
| Maintenance Cycle | Lasts 3–5 years; requires scraping and prep | Lasts 2–3 years; minimal prep needed |
| Failure Mode | Chips, peels, or blisters | Gradually fades and weathers |
Pick the Right Products
The type of material your fence is made of will determine the best products to use:
- Wood Fences: Choose an exterior-grade acrylic latex paint or a solid/semi-transparent stain. Acrylic latex is ideal for areas with fluctuating temperatures, as it expands and contracts with the wood, reducing the risk of cracking or blistering. For bare or weathered wood, start with a primer – oil-based primers work well on resinous wood, while water-based primers are faster drying.
- Metal Fences: Use a rust-inhibiting primer followed by DTM (direct-to-metal) acrylic enamel for long-lasting protection.
- Vinyl Fences: Apply a high-adhesion bonding primer and finish with 100% acrylic exterior paint. Avoid darker colors than the original vinyl, as they absorb more heat and can cause warping. In regions with intense sun or high humidity, look for products with UV inhibitors and mildewcide to prevent fading and organic growth.
Step 4: Apply Paint or Stain the Right Way
Choose the Right Tools
Using the right tools makes a big difference in achieving a smooth, lasting finish. For most wood fences, a 4–6 inch nylon or polyester brush is ideal because it penetrates deeply into the wood grain. For smaller, detailed areas like corners or spots near gate hardware, a 1.5–2.5 inch angle-sash brush provides the precision you need.
If you want a faster option for flat wood pickets, a roller with a 3/4-inch nap works well. For chain-link fences, a 1–1/2 inch nap roller applied at a 45-degree angle helps push the finish into the wire gaps. Lastly, for covering large sections quickly, a High-Volume/Low-Pressure (HVLP) sprayer is your best bet, though it requires extra prep to avoid overspray.
Here’s a quick reference:
| Tool | Best For | Advantage |
|---|---|---|
| Wide Brush (4–6") | Wood rails and trim | Reaches deep into wood grain |
| Angle-Sash Brush | Corners, hardware, tight spots | Offers precise control |
| 3/4" Nap Roller | Flat wood pickets | Speeds up application |
| 1–1/2" Nap Roller | Chain-link fencing | Covers wire gaps efficiently |
| HVLP Sprayer | Large fence sections | Covers large areas quickly |
Once you’ve got the right tools, you’re ready to start applying the finish evenly across the fence.
Apply Paint or Stain Correctly
After cleaning and prepping the fence, it’s time to apply the finish. Work in small sections and keep a wet edge – overlap each stroke before the previous one dries to avoid lap marks. Always apply the finish following the wood grain, and use back-brushing every few feet to push the product deeper into the wood and create an even coat.
For the best results, plan on applying two coats. The first seals the wood, while the second adds durability and enhances the color. Be mindful of weather conditions as you work to ensure consistent application.
Once you’re done, monitor the drying process to make sure the finish sets properly.
Paint in the Right Conditions
Weather can make or break your project. Aim to paint when the temperature is between 50°F and 90°F and the humidity is below 70%. Avoid painting in direct sunlight, as it can cause streaks, bubbling, or poor adhesion. The best times to work are early morning or late afternoon, when the fence is shaded and temperatures are steady.
Steer clear of windy conditions to prevent debris or overspray from ruining your work. If the surface feels too hot, wait for cooler conditions to ensure the finish bonds effectively. Adjust your schedule based on seasonal weather patterns to get the best results.
Step 5: Let It Dry and Set a Maintenance Schedule
Drying vs. Curing: Know the Difference
Understanding the difference between "dry time" and "cure time" is key to achieving a durable finish for your fence.
- Dry time refers to how long you need to wait before applying a second coat. For most exterior paints, this is typically 4–8 hours, while some stains allow recoating in as little as one hour.
- Cure time, on the other hand, is the period required before the fence can handle daily wear, weather exposure, or hardware installation.
As Benjamin Moore explains:
"Dry time (how long you need to wait before applying the next coat) and cure time (how long you should wait before returning your fence to everyday use) may vary."
Always check the product label for specific timeframes. Skipping or rushing these steps could lead to a compromised finish, undoing all your hard work.
Once you’re clear on these timelines, take steps to safeguard the fresh paint during the drying and curing process.
Protect the Fence While It Dries
To ensure the best results, keep people, pets, and equipment away from the fence for 24–48 hours after painting. Prevent mishaps by disabling sprinklers during this period – something as small as a light spray can ruin uncured paint. If rain is in the forecast, hold off on painting until you’re guaranteed a clear, dry stretch of weather. Also, wait to reinstall any hardware until the paint has fully cured.
Set Up a Seasonal Maintenance Routine
Once your fence is fully cured, regular upkeep is essential to prolong its lifespan. A seasonal maintenance schedule can help you catch small issues before they become bigger problems. Here’s a simple checklist to follow:
| Season | Key Tasks |
|---|---|
| Spring | Inspect for rot and warping; pressure wash to remove winter mold; tighten any loose hardware |
| Summer | Look for storm damage; trim back any overgrown vegetation; check for mildew in shaded areas |
| Fall | Clear leaves from the base; apply a mildewcide if needed; repair any damaged boards |
| Winter | Check for frost heave; ensure gate alignment is intact; remove standing water from post caps |
A quick test to check the finish: splash water on a board. If the water soaks in immediately, it’s time for a touch-up. By making these seasonal checks a habit, you’ll catch peeling paint or exposed wood early, preventing more extensive damage.
Opting for quality materials, like those offered by Tend Fencing in Plano, TX, can make maintenance easier. High-quality fences not only stand up better between maintenance cycles but also simplify touch-ups when needed. With consistent care, a well-maintained painted wood fence can keep its finish intact for 7 to 10 years – as long as you address small issues before they escalate.
Conclusion: What to Remember About Seasonal Fence Painting
A beautifully painted fence doesn’t happen by chance – it starts with careful preparation. The five steps outlined in this guide work together, and skipping any of them could lead to peeling or fading before its time.
Proper cleaning, repairing, and sanding are essential for strong paint adhesion. On average, painted fences need a fresh coat every 3–5 years, while stained fences can last 4–7 years before requiring maintenance. By sticking to the seasonal maintenance checklist from Step 5, your fence could stay in great shape for as long as 15–20 years.
But don’t forget – keeping the structure sound is just as important as the finish. Fences built with durable materials and installed professionally tend to need fewer fixes between painting cycles, making each refresh easier and more effective. Tend Fencing offers expert residential and commercial fence installation in Plano, TX, and nearby areas, specializing in wood, ornamental iron, and chain-link fencing designed for longevity. A well-maintained finish and a sturdy structure go hand in hand to maximize your fence’s lifespan.
FAQs
Do I need to prime my fence before painting?
Priming plays a key role in achieving a durable and long-lasting finish for your fence. A high-quality exterior primer does more than just prepare the surface – it seals bare wood, blocks stains, and helps the topcoat adhere properly.
While many paints claim to include primer, using a dedicated primer is often the better choice. It provides an extra layer of protection, reducing the chances of peeling and ensuring the finish lasts longer.
Before applying primer, make sure the fence is clean, repaired, and completely dry. Skipping these steps can lead to poor adhesion or even cause the finish to fail over time. Taking the time to prime correctly can make all the difference!
How can I tell if my fence is dry enough to paint?
Before painting your fence, it’s important to ensure the wood is dry enough. A quick way to test this is by sprinkling water on the surface. If the water beads up, the wood is still too moist. If it soaks in quickly, the wood is likely dry enough for painting.
Another tip: feel the surface. If it feels cool or damp, it’s not ready yet. For the most accurate results, consider using a moisture meter. The wood should have moisture levels below 15% before you start painting.
Need help? Tend Fencing offers professional services to keep your fence in great condition.
Should I use paint or stain on my fence?
Choosing between paint and stain comes down to what you value more: the natural look of wood or long-lasting protection.
- Stain brings out the wood’s natural grain, giving it a more organic appearance. It requires less prep work but needs to be reapplied every 2–3 years.
- Paint, on the other hand, provides a stronger shield against moisture and UV rays. It hides the wood grain completely and, when paired with a primer, can last 3–5 years.
If you’re unsure or need help with application, Tend Fencing offers professional services to both protect and enhance your fence’s look.