Want your wood fence to last decades? Start with proper care. Weather can destroy wood fences through rot, cracks, and UV damage. To protect your investment, follow these steps:
- Clean before treatment: Remove dirt and mildew to ensure sealants bond effectively.
- Inspect for damage: Fix loose boards, nails, and cracks before applying any treatment.
- Seal against moisture: Use waterproofers or sealers to prevent swelling and rot.
- Add UV protection: Apply stain-and-sealer products to block sun damage and maintain appearance.
- Install caps and protect posts: Fence caps and post protectors shield the most vulnerable areas.
- Maintain regularly: Check for wear every 6 months and reapply treatments as needed.
A well-maintained cedar fence can last 20+ years, while untreated wood may rot in as few as 8 years. Whether you DIY or hire residential fence installation professionals, consistent care is key to keeping your fence strong and weather-resistant.
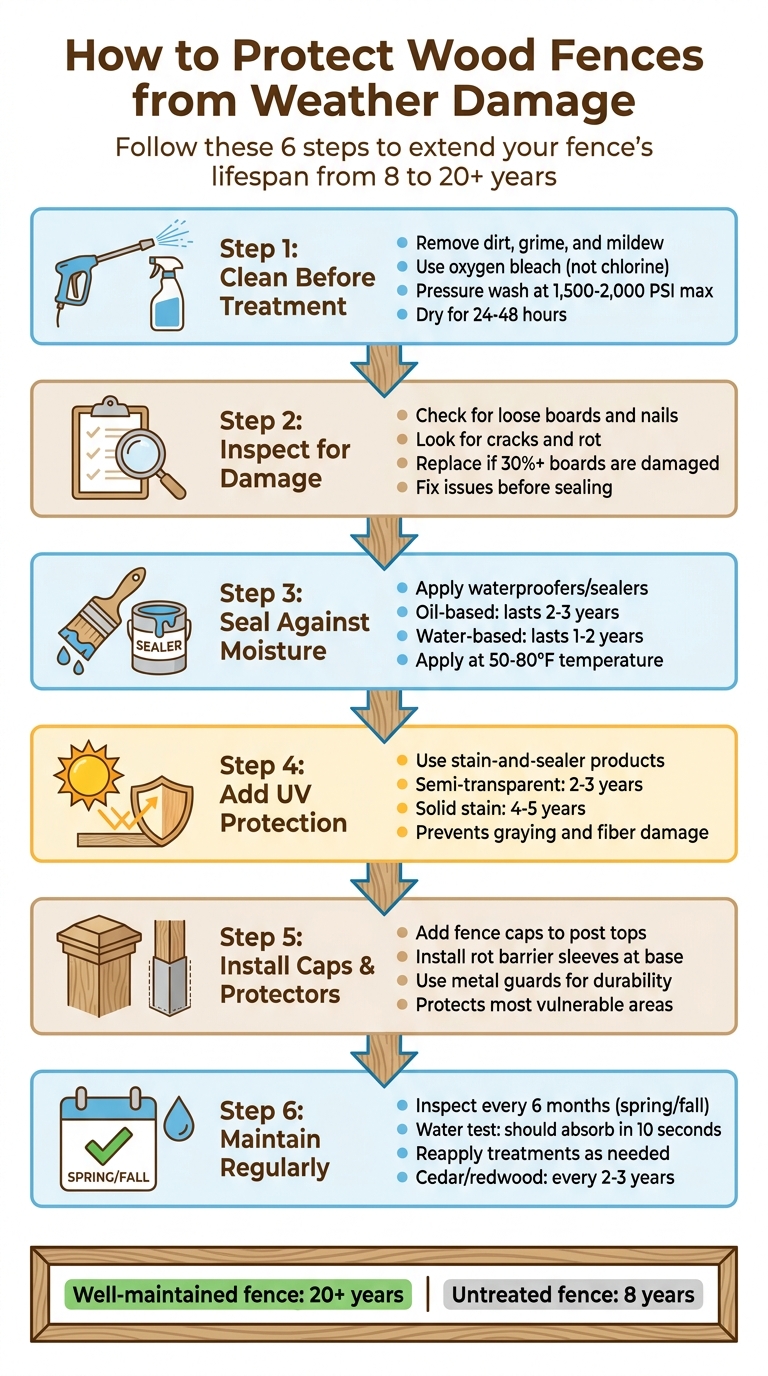
6-Step Guide to Protect Wood Fences from Weather Damage
How to Properly Maintain a Wood Fence for Lifetime Durability | Expert Stain and Seal Tips
sbb-itb-d1d0a96
Step 1: Clean Your Fence Before Treatment
Cleaning your fence is a must if you want your treatment to work. Layers of dirt, grime, and mildew can prevent sealants and stains from properly bonding to the wood, which weakens the treatment. Skipping this step means you’re essentially trapping harmful organisms under the sealant, which can lead to further damage.
"Dirt, grime, and mildew can prevent the sealant from properly adhering to the wood, reducing its effectiveness." – Fence Armor
Cleaning also ensures a smooth, even surface, which helps avoid blotchy or streaked staining. If your fence is brand new, cleaning removes lumber stamps, footprints, and oils that can block the treatment from soaking in. After cleaning, let the fence dry completely for 24–48 hours before applying any treatment. A quick way to check if the wood is ready is by sprinkling water on it. If the water absorbs within 10 seconds, the wood is dry enough. But if it beads up, the wood is either still wet or has an old finish that needs to be stripped. Once the fence is clean and dry, it’s time to choose the right tools and products for the job.
Pick the Right Cleaning Tools and Products
Not all cleaning products are safe for your fence. While chlorine bleach might seem like an easy solution, it can actually damage wood fibers, leaving a fuzzy surface that doesn’t hold stain well. Plus, it can kill nearby plants. A professional explains:
"Never use chlorine bleach on wood. It kills surface mold but damages wood fibers, strips natural color, and can kill nearby plants." – Fence Advisors
A better choice is a sodium metasilicate-based cleaner like Wood Wizard (around $52 per gallon) or Wood Warden ($35 per gallon). These products effectively remove algae, mildew, and grime without altering the wood’s pH. For routine maintenance, oxygen bleach (such as OxiClean) is a gentler option that tackles mold without harming vegetation or stripping color.
To apply the cleaner, use a pump-up garden sprayer for even coverage. Let the solution sit for 15–20 minutes, making sure it doesn’t dry out. When rinsing, a pressure washer works best. Set it to 1,500–2,000 PSI max and use a 25-degree or 40-degree tip. Keep the nozzle 8–12 inches away from the wood and move it in long, consistent strokes along the grain to avoid streaks or damage.
Check for Damage Before You Start Cleaning
Before you begin cleaning, inspect your fence for any damage. Walk along the entire fence line and look for loose or broken boards, protruding nails, and rusted screws. Tighten any loose hardware and hammer in nails that are sticking out, as these can snag on cleaning tools or worsen under water pressure. Pay close attention to areas where the fence meets the ground, as this is a common spot for rot to develop.
Replace any boards that are warped, severely cracked, or rotted before cleaning. This ensures the new wood gets treated along with the rest of the fence. For small holes or minor cracks, use wood filler to patch them up. If more than 30% of your boards are damaged, it’s more practical to replace the entire fence. Also, check for signs of termites, such as hollow-sounding wood, mud tubes on posts, or fine sawdust near small holes. Addressing these issues beforehand prevents water from seeping into cracks during cleaning, which could lead to further damage.
Once your fence is clean, dry, and structurally sound, you’re ready to move on to the next step: applying weatherproofing treatments to protect your investment.
Step 2: Apply Waterproofers and Sealers
Waterproofers and sealers are crucial for protecting your fence from moisture damage. Without them, water can seep into the wood, leading to swelling, cracking, and eventual rot. Once your fence is clean and prepped, the next step is choosing and applying the right products to keep moisture out and extend its lifespan. Picking the wrong product or applying it incorrectly can backfire – trapping moisture and causing even more damage.
"Staining wet wood traps moisture inside, causing the stain to peel and the wood to rot from the inside out." – Fence Advisors
With the right tools and proper technique, you can ensure the sealer penetrates deeply into the wood, offering long-lasting protection. For instance, a cedar fence treated with care can last over 20 years, while an untreated one in the same environment might start rotting in just 8 years.
How to Choose the Right Products for Your Fence
The type of sealer you need depends on your fence’s wood and the local climate. Oil-based sealers are ideal for areas with heavy rain or snow since they penetrate deeply and last 2–3 years. However, they take longer to dry. Water-based sealers, on the other hand, dry faster (within hours) and have a lower odor but need reapplication every 1–2 years.
For premium woods like cedar and redwood, transparent or semi-transparent stains are a great choice. They highlight the wood’s natural grain while adding UV protection and typically last 2–3 years. If your fence is older or has imperfections, semi-solid or solid stains provide more coverage and can last up to 5 years. Looking for an eco-friendly option? Cedarwood oil-based treatments not only protect against moisture but also repel insects and fungi naturally, without harsh chemicals.
| Sealer Type | Durability | Best For |
|---|---|---|
| Transparent/Clear | 1–2 years | New cedar or redwood; keeps natural color |
| Semi-Transparent | 2–3 years | Most residential fences; balances color and grain visibility |
| Semi-Solid | 3–4 years | Older wood needing more coverage |
| Solid Stain | 4–5 years | Opaque finish; hides heavy weathering |
Timing is just as important as the product you choose. For new cedar, apply a sealer within two weeks of installation to prevent UV damage. Pressure-treated pine requires more patience – it needs 3–6 months of weathering until its moisture content drops to 12–15%. Use the water test from Step 1 to confirm your fence is ready for sealing.
Once you’ve picked the right sealer, follow these application tips to ensure maximum protection.
How to Apply Waterproofers and Sealers
Using a pump sprayer is a quick way to cover large areas, but don’t skip the back-brushing step. After spraying, use a 2–3 inch natural bristle brush to work the sealer into the wood grain and eliminate drips.
For best results, apply the sealer when temperatures are between 50°F and 80°F. Avoid working in direct sunlight if it’s over 90°F, as the heat can cause the solvents to evaporate too quickly, reducing effectiveness. Check the weather forecast to ensure there’s no rain for at least 24 hours after application, giving the sealer time to cure properly.
Pay special attention to the end grain – the tops and bottoms of fence boards – as these areas soak up moisture the fastest. Apply two coats to these vulnerable spots for extra protection. To avoid lap marks, work on one full panel at a time. Always wear gloves and safety glasses, and use drop cloths to shield nearby plants and hardscaping.
If you’re tackling a 350-foot fence, expect DIY materials to cost between $0.30 and $0.60 per square foot. Hiring professionals? That’ll run you around $2,625 on average. Semi-transparent sealers cost about $30–$50 per gallon, while translucent options are slightly cheaper at $20–$30 per gallon.
Once sealed, you can further protect your fence by using stain-and-sealer products designed to guard against sun damage.
Step 3: Add UV Protection with Stain-and-Sealer Products
Once your fence is sealed against moisture, the next step is to protect it from the sun’s harsh UV rays with stain-and-sealer products. These products not only shield your fence from sunlight but also improve its appearance. Without UV protection, sunlight causes oxidation, which turns wood gray and weakens its fibers over time. The pigments in these stains act as a barrier against sun damage, while the sealer continues to guard against moisture penetration.
Why Use Stain-and-Sealer Products
Stain-and-sealer products combine UV inhibitors and water repellents to slow the wear and tear caused by the sun and rain. Unlike paint, which sits on the surface and tends to peel over time, penetrating stains soak into the wood’s fibers. This allows them to fade gradually instead of flaking, making future maintenance much simpler since you won’t need to strip off old layers before reapplying.
These products also enhance the look of your fence. Transparent and semi-transparent stains highlight the natural beauty of premium woods like cedar and redwood, while semi-solid and solid stains are ideal for covering up imperfections in older fences. Keep in mind that stains with higher opacity provide more UV protection but may obscure the wood’s natural grain.
How to Pick the Right Stain
Choosing the right stain depends on your fence’s condition and how much of the wood’s natural grain you want to showcase. For most residential fences, a semi-transparent stain offers a good balance of UV protection and grain visibility, typically lasting 2–3 years. If you have new cedar or redwood, a transparent stain will preserve its natural color but usually needs reapplication every 1–2 years. For older, weathered fences, semi-solid (lasting 3–4 years) or solid stains (lasting 4–5 years) provide better coverage and durability.
Before applying any stain, make sure the wood is properly prepared. Pressure-treated lumber should weather for 30–90 days, while fresh cedar needs 3–6 months to reach an ideal moisture content of 12–15%. If your fence has already grayed due to weathering, a wood brightener containing oxalic acid can restore its color and open the grain, ensuring better stain absorption. This final step in your fence care routine ensures long-lasting protection and a polished finish.
Step 4: Install Fence Caps and Post Protectors
Once you’ve treated your fence with professional staining and sealing services, the next step is adding fence caps and post protectors. These components create an extra layer of defense against weather damage, safeguarding the most vulnerable parts of your fence. Since post rot at ground level is the leading cause of wood fence failure, these additions are crucial for keeping your fence sturdy and long-lasting.
Fence caps (or post caps) cover the tops of your posts, protecting the end grain, which is especially prone to soaking up water. Without this protection, rain and snow can seep into the wood, causing internal rot, cracking, and warping over time. Caps also help block UV rays, which can dry out and weaken the wood. You can choose wood caps for a more natural aesthetic or metal caps – such as aluminum or galvanized steel – for added durability. Metal caps are particularly resistant to cracking in extreme temperatures and won’t decay like wood caps might after prolonged exposure.
To further protect your posts, post protectors and rot barrier sleeves act as a waterproof shield at the base of the post, where it meets the soil or concrete. This prevents moisture from being drawn into the wood through a process called "wicking." Some high-quality rot barrier sleeves even come with guarantees of up to 20 years against post decay. Additionally, metal post guards can shield your posts from accidental damage caused by lawn equipment, such as mowers or weed trimmers, which can strip away protective coatings and expose the wood.
Installing these protective elements is relatively simple. For caps, measure the tops of your posts carefully and secure the caps with screws or outdoor-grade adhesive to ensure a snug fit that won’t be dislodged by wind. When it comes to rot barrier sleeves, apply them at the ground line during the initial post installation to create an effective moisture seal right from the start. To enhance protection, consider reapplying sealer to any exposed end grains.
Together, fence caps and post protectors work hand in hand with your sealers and stains to create a robust weatherproofing system. While the treatments penetrate the wood to shield it from within, these physical barriers block water from reaching the most damage-prone areas. This combination significantly increases the lifespan of your fence, ensuring it stays strong and weather-resistant for years. Regular inspections will help maintain this protection over time.
Step 5: Maintain and Inspect Your Fence Regularly
Once you’ve applied waterproofers and stains, keeping up with regular inspections is key to ensuring they stay effective. Weatherproofing treatments don’t last forever. By identifying issues early and reapplying treatments as needed, you can extend your fence’s life and avoid costly repairs.
Look for Early Signs of Damage
Plan to inspect your fence twice a year – ideally in spring and fall – to catch weather-related damage before it worsens. Look for graying, discoloration, cracks, soft spots, mold, or mildew, especially around the base of posts where moisture tends to gather. The "ground contact" zone, where the posts meet the soil, is particularly vulnerable to rot.
A quick test to check your fence’s water resistance: If water soaks into the wood within 10 seconds, it’s time to reapply the sealer. During your inspection, also check and tighten any loose hardware, and tap the wood to listen for hollow sounds, which could signal internal decay. Routine checks like these help preserve the benefits of your weatherproofing efforts.
Reapply Treatments When Needed
Keeping your fence in good shape means reapplying treatments whenever signs of wear appear. How often you need to do this depends on the type of wood and the products you’ve used. For instance, cedar and redwood fences generally need restaining every 2–3 years, while pressure-treated pine may need attention every 1–2 years.
Before reapplying, clean the fence thoroughly with a mixture of 1 gallon of warm water and 1 cup of oxygen bleach to remove dirt, mold, and mildew. Allow the wood to dry for 24–48 hours, ensuring the moisture content is below 15% before applying any new treatments.
For best results, apply treatments when the temperature is between 50–80°F and avoid direct sunlight, which can cause the product to evaporate too quickly. Use a pump sprayer for quick application, then follow up with a natural bristle brush to work the product deep into the wood grain. Pay extra attention to the cut ends of the wood, as these areas absorb moisture more easily – apply an additional coat here.
| Wood Species | Expected Lifespan (Maintained) | Re-staining Frequency |
|---|---|---|
| Western Red Cedar | 20–25 years | Every 2–3 years |
| Redwood | 25–30 years | Every 2–3 years |
| Pressure-Treated Pine | 15–20 years | Every 1–2 years |
| Untreated Pine/Fir | 5–8 years | Not recommended for ground contact |
Why Choose Professional Help from Tend Fencing

If tackling DIY weatherproofing feels like too much after reviewing all the steps, turning to professionals can guarantee long-lasting protection for your fence. North Texas’s challenging conditions – like shifting clay soil and scorching 100°F+ summers – demand expertise. Tend Fencing specializes in addressing these unique challenges with solutions like proper post anchoring, drainage systems, and timely staining to guard against post rot and weather-related damage.
Tend Fencing customizes its approach to combat these local issues. For example, they use drainage systems such as French drains or gravel beds to manage the effects of shifting soil and extreme heat. Additionally, their professional staining services, which range from $1.50 to $3.00 per linear foot, are strategically scheduled in early spring (March–April) or late fall (October–November). These seasons, with temperatures between 50°F and 85°F, provide the ideal conditions for the stain to absorb effectively without drying too quickly under the summer sun.
The benefits of professional maintenance are clear. It can cut emergency fence repairs by 60–80%, offering peace of mind and long-term savings. For example, a well-maintained cedar fence in the Dallas/Plano area can last over 20 years, while an untreated fence in the same environment may start deteriorating after just 8 years. As Fence Advisors aptly puts it:
"The difference isn’t the wood – it’s whether anyone bothered with maintenance".
Tend Fencing also demonstrates its dedication to sustainability by planting one tree for every fence they build. This initiative reflects their broader commitment to quality work and customer satisfaction, whether for residential or commercial projects.
For homeowners looking to maximize the lifespan of their fence without the stress of managing it themselves, professional services from Tend Fencing offer a reliable, effective solution tailored to North Texas’s tough climate. Combining expert care with the detailed DIY steps ensures your fence stays strong and weather-resistant all year long.
Conclusion
Taking care of your wood fence through regular cleaning, treatment, and maintenance is essential to keep it in great shape. Start by cleaning it with oxygen bleach and checking that the wood’s moisture content is between 12–15%. A simple water test – where water absorbs into the wood within 10 seconds – can help confirm it’s ready for treatment. Once prepped, apply waterproofers, sealers, or stains, focusing on end grains where moisture tends to soak in the most. Follow up with annual cleanings and reapply treatments as needed to keep your fence protected.
These straightforward steps not only safeguard your fence but also significantly extend its lifespan. With proper care, a wood fence can last from 8 years to well over 20 years. Regular sealing alone can take a fence’s lifespan from just 5 years to 15 years or more.
For a worry-free option, professional services like Tend Fencing offer expert care designed for North Texas conditions. They understand local challenges and use techniques like back-brushing and safe power washing (under 2,000 PSI) to protect your fence. Their staining services, performed in ideal 50°F–80°F conditions, ensure deep absorption and proper curing. Whether you choose to handle it yourself or rely on professionals, the key is staying consistent with maintenance.
With the right care, your wood fence can endure Texas’s harsh heat, shifting soil, and unpredictable weather for decades.
FAQs
Should I seal or stain my fence first?
Staining your fence before sealing it is a smart move. The stain not only adds color but also protects the wood. However, preparation and proper drying are key before applying it. Once stained, sealing becomes the final touch, forming a clear shield against moisture and UV rays. This sequence – staining first and then sealing – enhances the wood’s look, boosts its durability, and ensures better protection from the elements.
How do I know my fence is dry enough to treat?
To determine if your fence is ready for treatment, make sure it has completely dried after cleaning or exposure to weather. For new wood, this usually takes about 48-72 hours. The surface should feel dry to the touch, and water should no longer bead up when applied. Ensuring the wood is fully dry helps the sealant or stain stick properly, offering better protection against the elements.
What’s the best way to prevent post rot?
To keep your wood fence in good shape and prevent post rot, it’s important to seal the wood. This protects it from moisture, fungi, and pests. Make sure there’s proper drainage around the posts and avoid letting vegetation touch the wood. Selecting rot-resistant wood, such as cedar or redwood, is also a smart choice. Regular upkeep, like staining the fence every 2–3 years, helps maintain its protective coating. By following these steps, you can extend the life of your fence and minimize the chances of rot.