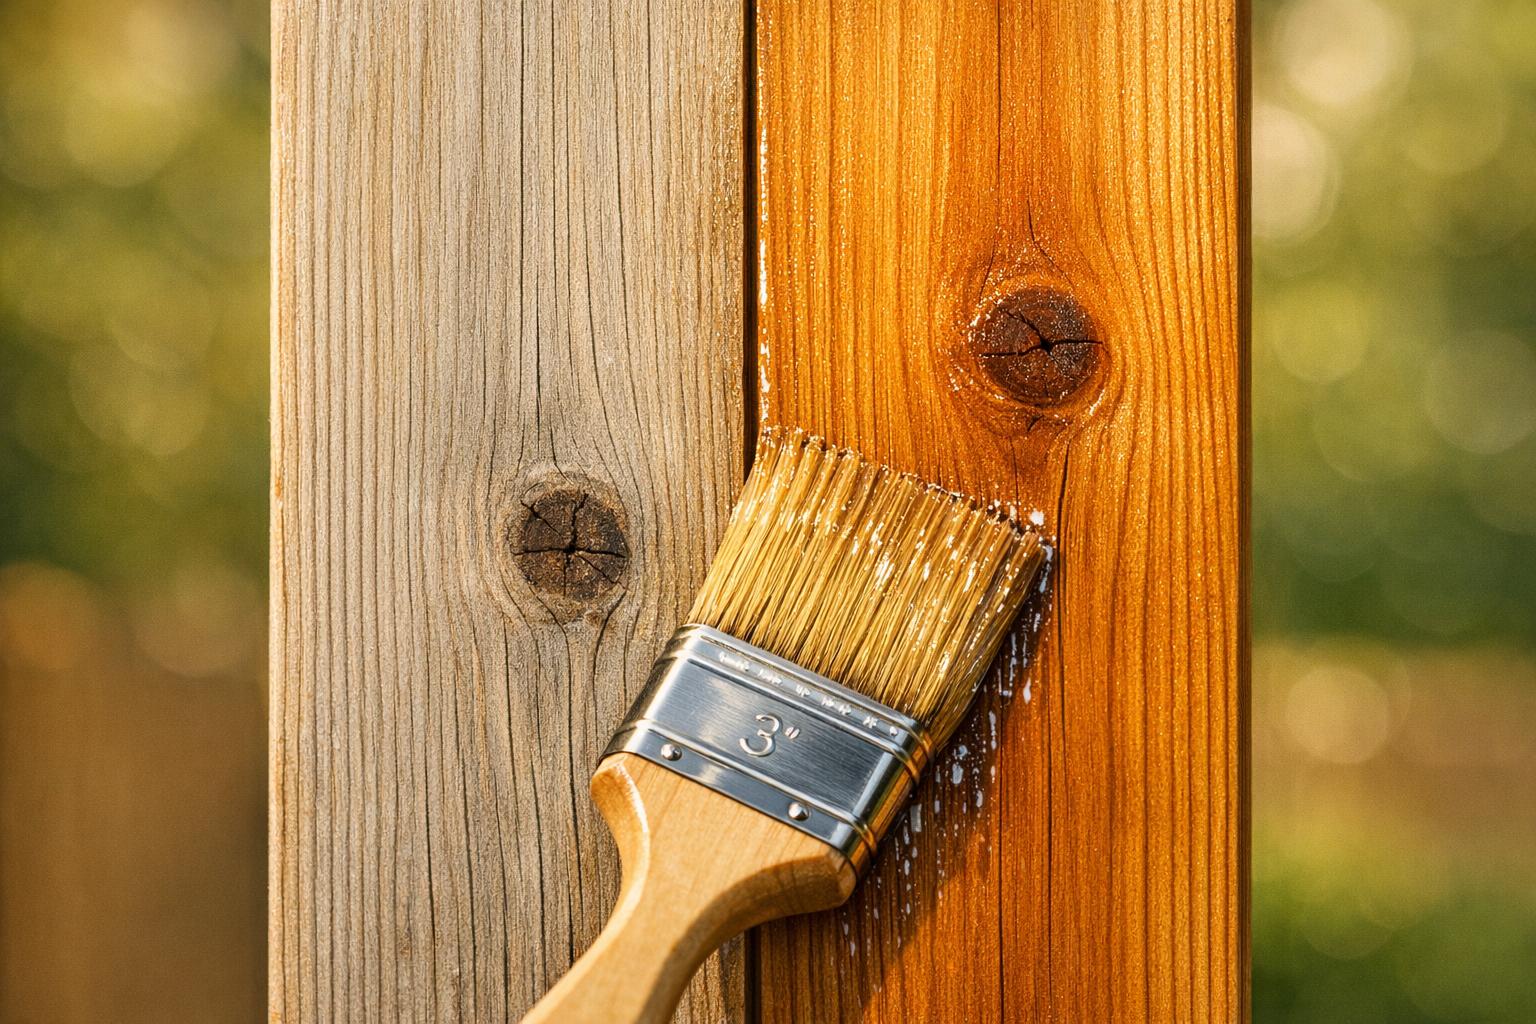
Want your wood fence to last longer? Sealing it is the key. Unsealed fences face moisture, UV rays, and temperature changes that cause warping, rot, and fading. By sealing your fence, you can extend its life from 5 years to 15 years or more. Here’s how to protect your fence effectively:
- Test if your fence needs sealing: Sprinkle water on the surface. If it absorbs within 10 seconds, it’s time to reseal.
- Choose the right sealant:
- Clear waterproof sealants: Preserve natural wood color but offer low UV protection. Reapply every 1–3 years.
- Stain-and-sealer combinations: Add color and block UV rays. Lasts 2–7 years depending on opacity.
- Prepare before sealing: Clean the fence with a pressure washer (1,200–2,000 PSI) or oxygen bleach, repair damage, sand rough areas, or consider professional wood fence installation if the structure is beyond repair. Let the wood dry completely before applying sealant.
- Apply sealant correctly: Use brushes, rollers, or sprayers. Apply thin coats, working with the wood grain. Focus on end grains and avoid sealing in extreme temperatures or direct sunlight.
Regular maintenance, like cleaning and resealing every few years, keeps your fence strong and looking great. A well-sealed fence not only boosts durability but also saves you money on repairs.
DIY Fence Cleaning & Sealing | Save Money with These Pro Tips | Homeowner’s DIY Guide
sbb-itb-d1d0a96
Selecting the Right Sealant for Your Wood Fence
Clear Sealant vs Stain-and-Sealer Comparison for Wood Fences
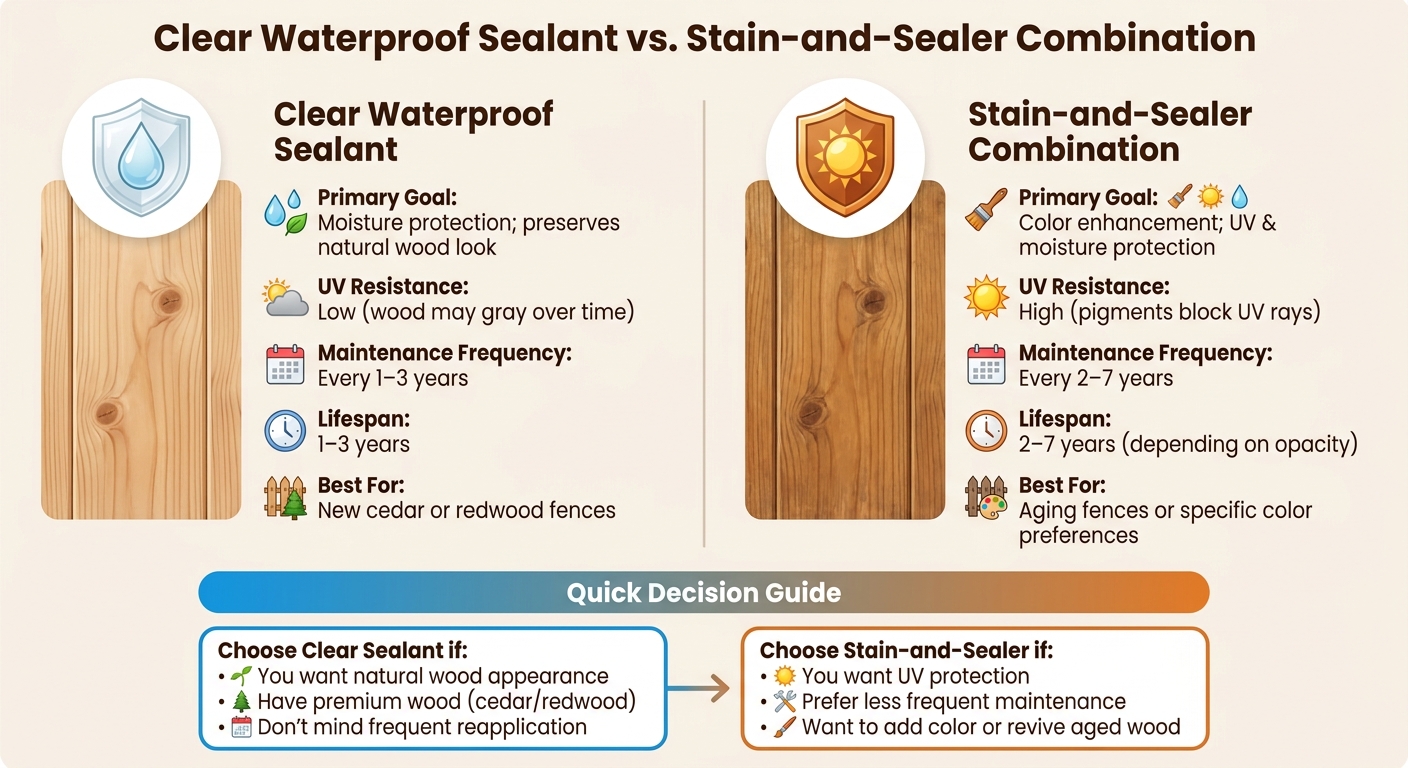
Choosing the right sealant is key to both protecting your fence and achieving the look you want. There are two main options to consider: clear waterproof sealants and stain-and-sealer combinations. Each serves a different purpose depending on your fence’s wood type, age, and your aesthetic goals. Let’s break down how these options differ in terms of protection and appearance.
Waterproof Sealants vs. Stain-and-Sealer Combinations
Clear waterproof sealants are designed to protect your fence from moisture and oxidation while keeping the wood’s natural color intact. These are perfect for highlighting the natural grain of premium woods like cedar or redwood. However, they offer minimal UV protection unless they include UV stabilizers, which means the wood may eventually gray. On average, clear sealants need reapplication every 1–3 years to maintain their effectiveness.
Stain-and-sealer combinations, on the other hand, provide both color and protection. The pigments in these products not only change the wood’s appearance but also shield it from harmful UV rays. You can choose finishes ranging from transparent, which lightly tints the wood while showing its grain, to solid stains that completely cover the wood like paint. These products typically last longer, with a lifespan of 2–7 years, depending on the opacity level. The downside is that you’ll need to commit to a specific color, which may not appeal to those who prefer the natural wood look.
"A stain is a pigmented penetrating or film-forming product that colors the wood while delivering protective compounds… A sealer is a clear or lightly tinted product formulated primarily to repel moisture and block oxidation." – Fence Installation Authority
| Feature | Clear Waterproof Sealant | Stain-and-Sealer Combination |
|---|---|---|
| Primary Goal | Moisture protection; natural look | Color enhancement; UV & moisture protection |
| UV Resistance | Low; wood may gray over time | High; pigments block UV rays |
| Maintenance Frequency | Every 1–3 years | Every 2–7 years |
| Best For | New cedar or redwood fences | Aging fences or specific color preferences |
What to Consider When Buying a Sealant
Once you’ve compared the two types, think about your fence’s material, the local climate, and how easy the sealant is to apply.
Wood Type:
For pressure-treated pine, wait 30–90 days before sealing unless the wood is labeled as Kiln-Dried After Treatment (KDAT). Cedar and redwood benefit from penetrating oil stains, which highlight the grain and provide UV protection. If your cedar fence has already weathered to a gray tone, you may need a wood brightener containing oxalic acid to prepare the surface before sealing.
Climate Conditions:
In sunny areas, tinted sealants help prevent fading and cracking by blocking UV rays. In damp or humid regions, water-repellent sealants are crucial to avoid swelling, warping, and rot. Always apply sealant when temperatures are between 50°F and 80°F, and ensure no rain is expected for 24–48 hours after application.
Application Ease:
Oil-based sealants are ideal for high-absorption woods like cedar and pine. They provide better UV resistance and deliver a more even finish, though they take 24–72 hours to cure before exposure to rain. Water-based sealants dry faster and are more environmentally friendly, but they may require more frequent reapplication. Be sure to check local air quality regulations, as some areas limit Volatile Organic Compounds (VOCs) to 100 grams per liter or less.
Wood Moisture Content & Pricing:
Only seal wood when its moisture content is below 19% – this usually means waiting 24–48 hours after cleaning or rain. Sealants and stains range in price from $18 to $64 per gallon. Budget-friendly options like Rain Guard Natural Finish Wood Sealer are available, while premium products like Seal-Once Nano+Poly Penetrating Wood Sealer offer higher durability.
Once you’ve chosen the right sealant, make sure you have the proper tools to apply it effectively.
Tools and Materials Needed for Sealing a Fence
Before you start sealing your fence, it’s important to gather all the necessary tools and materials. Having everything ready not only saves time but also ensures the job is done efficiently and safely. You’ll need tools for applying the sealant, preparing the surface, and protecting yourself during the process.
Sealant Application Tools
When it comes to applying sealant, you have three main options: brushes, rollers, and sprayers. Each has its advantages:
- Brushes: Ideal for precision work, especially on posts, corners, and gaps. Use synthetic bristles for oil-based sealants and natural bristles for water-based ones to avoid streaking.
- Rollers: Great for covering large areas quickly. A 3/4-inch nap is best for rough wood, while a 1/2-inch nap works well on smoother surfaces.
- Sprayers: The fastest method, capable of sealing a 6×8 panel in under 5 minutes. However, airless sprayers can waste up to 30% of the sealant due to overspray, so handle them carefully.
Surface Preparation Tools
Preparing the fence is just as important as applying the sealant. Proper cleaning ensures the sealant adheres well and provides long-lasting protection. Here’s what you’ll need:
- Pressure Washer: Set it between 1,200 and 2,000 PSI and use a 25-degree nozzle to remove dirt and mildew without damaging the wood.
- Cleaning Agents: Opt for oxygen bleach (sodium percarbonate) or sodium metasilicate for a deep clean. Avoid chlorine bleach, as it can harm the wood and nearby plants.
- Wood Brightener: Use oxalic acid to restore the wood’s natural color if it has grayed over time.
- Sandpaper and Scrub Brush: Use 80-grit sandpaper for rough patches and 120-grit for finishing. A scrub brush can help tackle stubborn spots.
Safety Gear and Protection
Your safety and the protection of the surrounding area are crucial during this project. Be sure to have:
- Safety Gear: Gloves to protect your skin, safety glasses or goggles to shield your eyes, and a mask or respirator to guard against fumes and particles.
- Drop Cloths: Lay these down to protect grass, plants, and hardscaping from drips and overspray.
- Pressure Washer Distance: Keep the nozzle at least 12 to 18 inches away from the wood to prevent damage and injuries.
Costs to Consider
Budgeting for the project is also important. Sealants typically range from $20 to $50 per gallon. A basic sprayer costs around $80, while professional-grade cleaners like EXPERT Wood Cleaner (sodium metasilicate) start at $12.49 per gallon. EXPERT Wood Brightener (oxalic acid) is available for about $12.99.
With these tools and materials in hand, you’re ready to start sealing your fence effectively and safely.
How to Seal Your Wood Fence
Sealing your wood fence is a straightforward process, but it requires careful preparation and attention to detail to ensure long-lasting protection against weather and wear. Here’s how to do it step by step.
Step 1: Clean and Prepare the Fence Surface
Start by thoroughly cleaning the fence to remove dirt, mildew, and any old finishes. A pressure washer is a great tool for this job – set it to 1,500–2,000 PSI with a 25-degree nozzle, and keep the spray 12 to 18 inches away from the wood to prevent damage. If you prefer manual cleaning, use a stiff brush and oxygen bleach (not chlorine bleach) to scrub the surface.
After cleaning, check for damage. Replace any rotten boards instead of patching them, as this ensures the fence remains sturdy. For cracks or splinters, use an exterior-grade wood filler. Reattach any loose boards with galvanized nails or deck screws. Once repairs are complete, sand any rough areas using 80-grit sandpaper first, followed by 120-grit, always working in the direction of the wood grain to smooth the surface and open up the pores.
Let the fence dry completely for 24 to 48 hours. New wood should have a moisture content of 12% to 15% before sealing. To check, sprinkle water on the surface – if it absorbs within 10 seconds, the wood is dry enough. If the water beads up, the wood may still be too wet or have old finishes that need further removal. Once the surface is clean, dry, and smooth, it’s ready for the sealant.
Step 2: Apply the First Coat of Sealant
Start at the top of the fence and work your way down to prevent drips from ruining lower sections. Focus on one panel or a few boards at a time, maintaining a wet edge to avoid lap marks. Always apply the sealant in the direction of the wood grain for a smoother finish.
If you’re using a sprayer, hold the nozzle 6 to 12 inches from the surface. Begin moving the sprayer before pulling the trigger to avoid over-saturating any one spot. After spraying or rolling, use a brush to work the sealant into the wood grain, grooves, and crevices. This "back-brushing" technique ensures even coverage and deep penetration. Pay special attention to the end grains at the tops and bottoms of boards since these areas absorb moisture more easily and may need extra sealant. Wipe away any drips or pooling immediately with a clean cloth.
"Wait to pull the trigger until you’re moving the sprayer to avoid adding too much sealer to one spot." – Tony Carrick, Contributing Writer, Angi
For best results, apply the sealant when temperatures are between 50°F and 80°F. Avoid sealing in direct sunlight if the temperature exceeds 90°F, as this can cause the solvent to evaporate too quickly.
Step 3: Apply Additional Coats and Allow for Drying
Once the first coat has cured, apply additional thin coats for thorough protection. Two to three coats are typically recommended. Allow 24 to 48 hours of drying time between coats, depending on the type of sealant and local weather conditions. Thin, even layers are key to preventing pooling or a sticky finish. Rushing the process can trap moisture, which might lead to issues like warping, cracking, or mold.
Before adding another coat, test the wood again by sprinkling water on the surface. If it absorbs within 10 seconds, the wood is ready for the next layer. Patience during this step ensures a durable, well-sealed fence that stands up to the elements.
Maintaining Your Sealed Fence
Once you’ve sealed your fence, keeping it in good condition requires regular care. This step ensures your barrier stays effective and extends its lifespan. For instance, a properly maintained cedar fence in a climate like Dallas can last over 20 years, while an untreated one might rot in just 8 years.
Start with an annual cleaning routine. Mix 1 gallon of warm water with 1 cup of oxygen bleach, apply it using a garden sprayer, scrub gently with a soft brush, and rinse thoroughly. Avoid chlorine bleach – it harms the wood fibers and strips away the natural color. Additionally, trim plants and bushes so they’re at least 1 foot away from the fence. This improves airflow and reduces trapped moisture, which can lead to damage.
Make it a habit to inspect your fence every year. Watch for signs like graying or fading, which could indicate UV damage, as well as cracks, splits, or dark spots caused by moisture. If you’re unsure whether the sealant is still effective, you can use the earlier water test method to check.
How Often to Reapply Sealant Based on Climate and Exposure
Reapplying sealant at the right intervals is key to keeping your fence protected. The timeline depends on the type of sealant and your local climate. For clear sealers, reapply every 1–2 years. Oil-based products last about 2–3 years, while stain-sealer hybrids can stretch to 3–5 years. Fences in humid areas or those exposed to intense sunlight will need more frequent attention.
The type of wood also plays a role. Cedar and redwood, which naturally resist decay, can go 2–3 years between treatments. Pressure-treated pine, on the other hand, may need resealing every 1–2 years. If your fence faces south or west and gets full sun throughout the day, plan on more frequent resealing compared to a shaded fence.
"Think of sealant as sunscreen for your fence – a small, regular effort that yields long-term protection and beauty." – Lily Carter, WoodRio
Tend Fencing: Professional Wood Fence Installation Services in Plano, TX

While sealing your fence on your own can help with protection, having a professionally installed wood fence ensures a much sturdier foundation. Tend Fencing provides custom wood fence installation services across Plano, TX, and nearby areas, using materials designed to withstand the elements and reliable construction techniques.
The installation process plays a crucial role in safeguarding your fence against weather-related wear. Tend Fencing emphasizes the use of Western Red Cedar for residential fences. This type of wood is naturally resistant to rot and can last 20–25 years with proper upkeep. To address the challenges posed by soil moisture in the region, the company employs galvanized or powder-coated steel posts, attaching wood panels with brackets. This method prevents the wood from contacting the ground directly, reducing the risk of rot in humid conditions.
Beyond building durable fences, Tend Fencing is committed to environmental responsibility. For every fence installed, they plant a tree, helping to offset the use of natural lumber and contribute to reforestation. This initiative aligns with a broader movement in the fencing industry toward balancing longevity with eco-conscious practices.
Whether you’re looking for a residential or commercial fence, Tend Fencing offers customized consultations to meet your specific needs. Their licensed and insured team ensures precision and care at every step, from choosing materials to completing the installation. To explore your options or request a personalized quote, visit tendfencing.com.
Investing in a professionally installed fence means your sealing efforts will protect a structure designed to last.
Conclusion
Protecting your fence with a sealant is one of the smartest ways to guard it against weather damage. A sealed fence can fend off moisture, protect against harmful UV rays, and help prevent issues like mold, mildew, and pests. As Fence Advisors aptly states: "The difference isn’t the wood – it’s whether anyone bothered with maintenance".
With consistent sealing, the lifespan of a fence can jump from 5 years to as much as 15 years. For instance, a cedar fence in Dallas that’s stained every 2–3 years can last over 20 years, while an untreated fence in the same conditions might start rotting in just 8 years. A simple water test can help you monitor your fence: if water beads up, the seal is effective; if the wood absorbs water quickly, it’s time to reseal.
Sealing doesn’t have to be complicated. Start by cleaning the surface, then apply thin coats of sealant along the wood grain, making sure to let each coat dry fully before applying the next. Pay special attention to the cut ends of boards, as they’re most vulnerable to moisture. For best results, seal your fence when temperatures are between 50°F and 80°F, ensuring no rain is expected for at least 24 hours.
To maximize your fence’s durability, combine regular sealing with a high-quality installation. For example, Tend Fencing uses steel post systems to avoid ground-contact rot, a key factor in extending fence life. When professional craftsmanship meets proper maintenance, your fence can stand strong for decades, even against the challenging Texas weather.
FAQs
Can I seal a damp fence?
For the best outcome, avoid sealing a damp fence. Sealant works most effectively when applied to a completely dry surface. The ideal time to seal is during mild weather, typically in spring or fall, with temperatures ranging from 50°F to 90°F. Applying sealant to damp wood can hinder proper adhesion, reducing its effectiveness and potentially harming the fence. Make sure the wood is thoroughly dry before sealing to ensure maximum protection against the elements.
Should I use oil-based or water-based sealer?
Both oil-based and water-based sealers work well to protect wood fences, but they have different strengths. Oil-based sealers soak deeper into the wood, providing longer-lasting protection. On the other hand, water-based sealers are easier to clean up and produce fewer VOC emissions, making them a more environmentally friendly option.
When deciding, think about what matters most to you – durability, ease of maintenance, or eco-consciousness. Keep in mind that regardless of the type you choose, you’ll typically need to reapply the sealer every 2–3 years to shield your fence from moisture, UV damage, and pests.
Do I need to sand before sealing?
Sanding your wood fence before applying sealant is a smart step to achieve better adhesion and a polished finish. By smoothing out rough areas, the sealant grips the surface more effectively, resulting in a cleaner, more appealing look. Along with sanding, it’s important to clean the fence thoroughly and fix any damage to ensure the surface is ready for sealing. These preparation steps make a big difference in the final result.