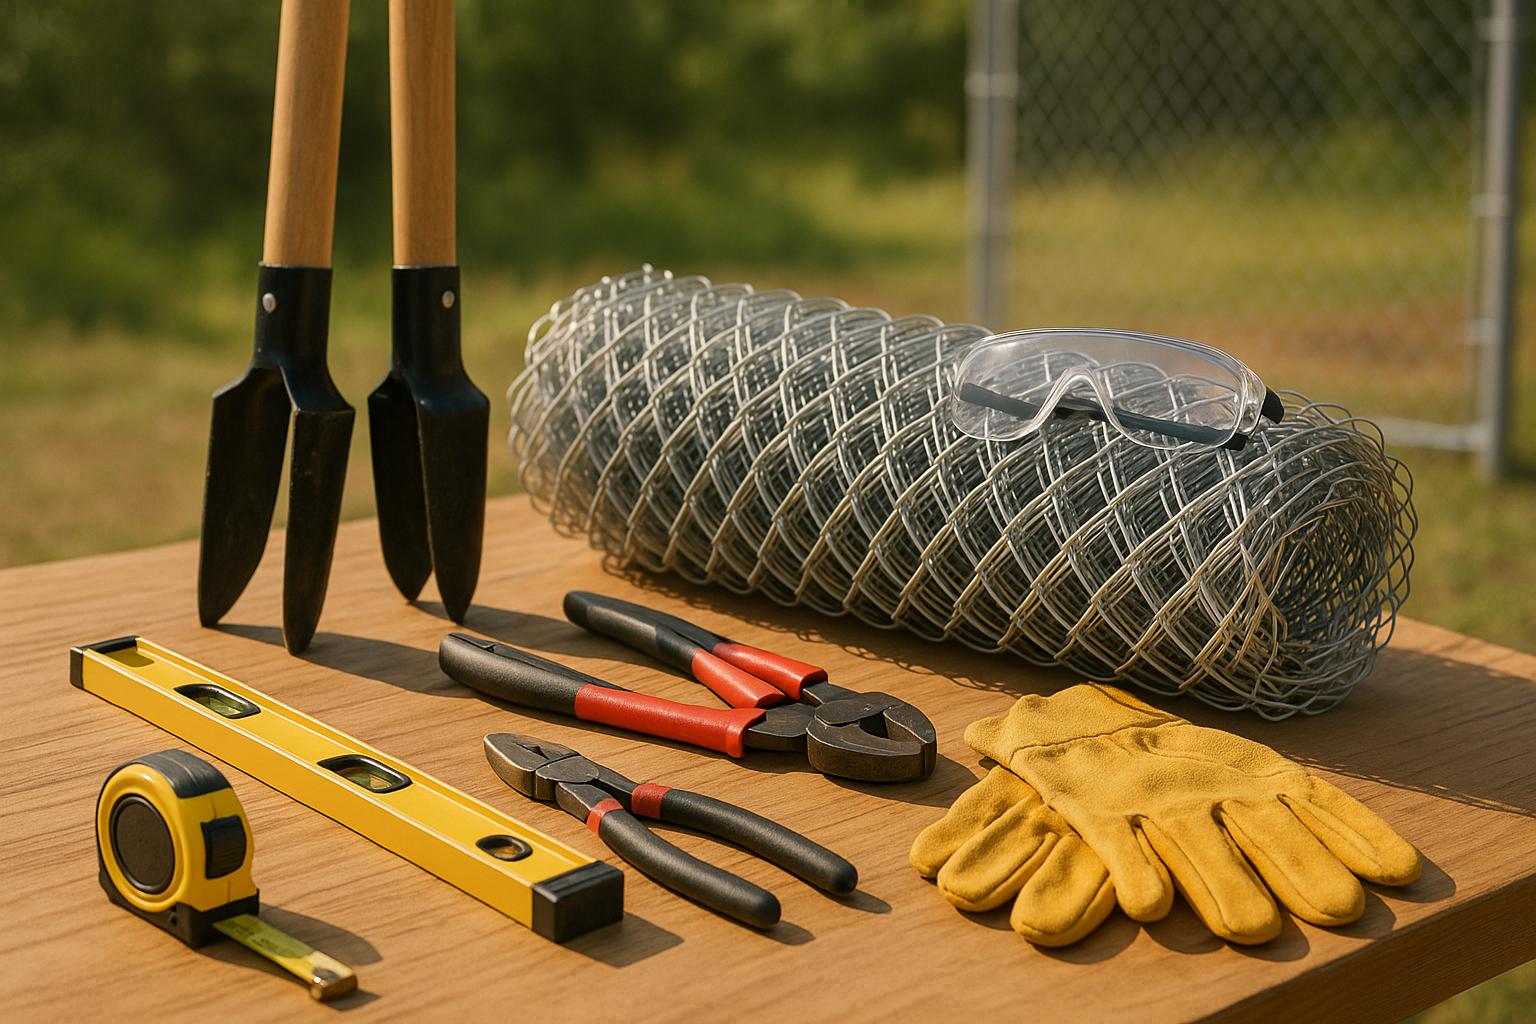
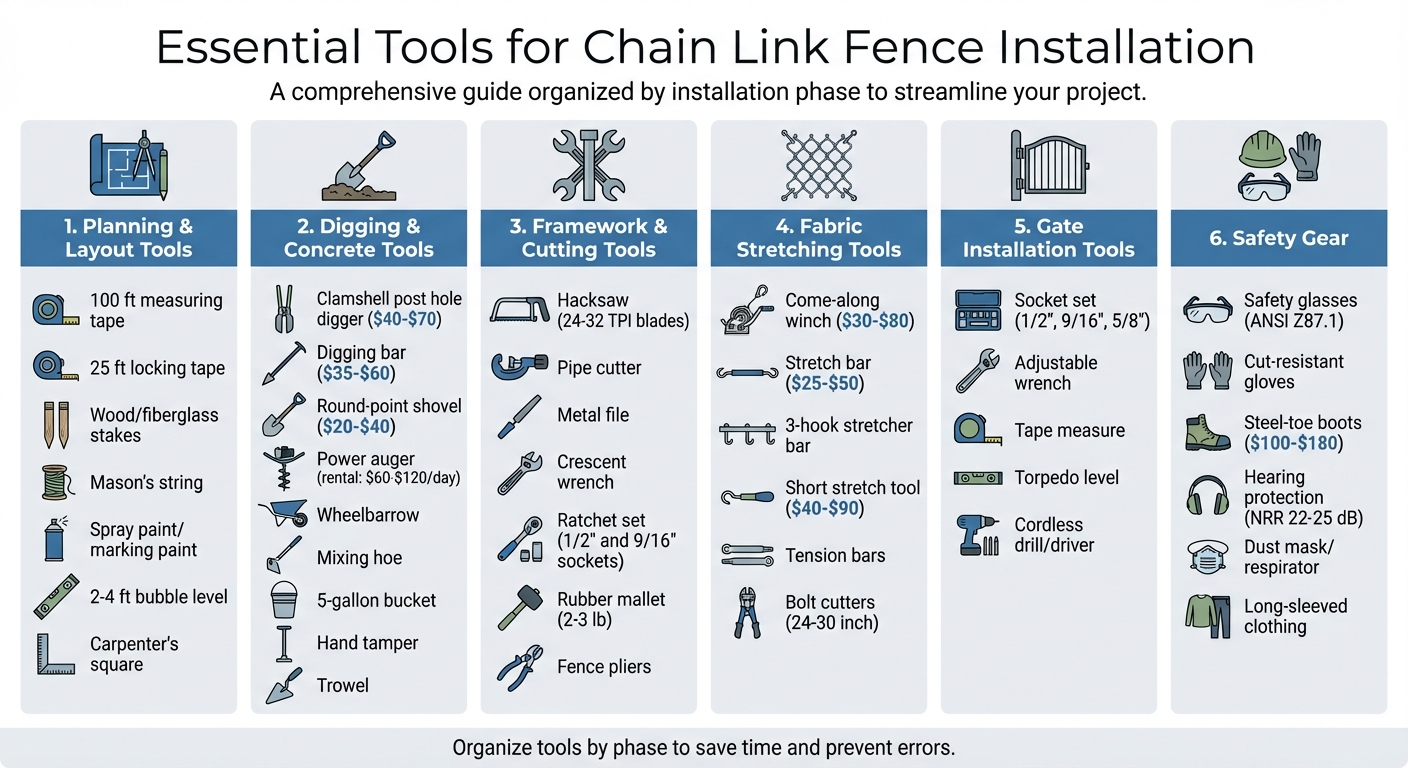
Installing a chainlink fence requires specific tools to ensure durability and proper alignment. From planning and digging to stretching the fabric and securing gates, having the right equipment is essential for a smooth process. Here’s a quick breakdown:
- Planning & Layout Tools: Measuring tapes, stakes, mason’s string, spray paint, and levels for precise alignment.
- Digging & Concrete Tools: Post hole diggers, shovels, power augers (optional), wheelbarrows, and mixing tools for setting posts.
- Framework & Cutting Tools: Hacksaws, pipe cutters, wrenches, and mallets to assemble and adjust the frame.
- Fabric Stretching Tools: Fence stretchers, come-alongs, tension bars, and pliers for proper tensioning.
- Gate Installation Tools: Ratchets, levels, and measuring tools to hang gates securely.
- Safety Gear: Gloves, safety glasses, steel-toe boots, and hearing protection for safe handling.
Whether tackling a small DIY project or a larger installation, organizing tools by phase saves time and prevents errors. For complex setups or professional results, experienced installers like Tend Fencing in Plano, TX, can handle the job with precision.
Essential Tools for Chain Link Fence Installation by Category
Every Pro Chain Link Fence Tool We Use
Planning and Layout Tools
Getting the layout right is the backbone of building a straight, professional-looking chain-link fence. Before you even think about digging, you need to set up an accurate reference line to mark where each post will go. Mistakes like loose strings or inaccurate measurements can lead to sagging fence fabric and gates that don’t align properly.
Measuring and Marking Tools
To plan your fence, start with a 100 ft measuring tape for marking post spacing (typically 6–10 ft apart) and a 25 ft locking tape for measuring gate openings and shorter distances. Make sure both tapes have clear markings in feet and inches to match standard U.S. post spacing measurements.
Define your fence route by placing wood or fiberglass stakes at corners, ends, and gate post locations. Then, run high-visibility mason’s string tightly between these stakes to outline either the centerline or the face of the fence. Keep the string taut and secure any intermediate stakes to avoid sagging. To mark the layout, use spray landscaping paint or contractor marking paint along the string line on grass or packed dirt. These marks will stay visible even after the string is removed. On harder surfaces like concrete or asphalt, a wax marker or construction crayon works well for marking where post bases or core holes need to be drilled.
Once the basic outline is in place, it’s time to fine-tune the layout using alignment tools to ensure everything is perfectly straight and level.
Layout and Alignment Tools
For vertical alignment, a 2–4 ft bubble level is essential. If the terrain is uneven, you might want to use a laser level for more accuracy. These tools help you decide whether to "rack" the fence to follow a gentle slope or to "step" it in sections on steeper grades.
At corners and gate openings, use a carpenter’s square or apply the 3-4-5 triangle method to achieve precise 90-degree angles. For gate openings, measure the finished width carefully with your tape and leave about 3–4 inches of clearance for hinges and latch hardware. Mark the hinge and latch post centers along the string line, and double-check the spacing and squareness before breaking ground.
When marking post locations, use high-contrast paint codes to stay organized:
- "T" for terminal posts
- "L" for line posts
- "G" for gate posts
Companies like Tend Fencing in Plano, TX, combine these layout techniques with their knowledge of local codes and soil conditions. This ensures that the fence not only aligns perfectly with property lines but also meets setback and height requirements.
Digging and Concrete Setting Tools
Once your layout is marked, it’s time to roll up your sleeves and get to work. To start, you’ll need reliable digging tools to create post holes and concrete-handling equipment to securely anchor the posts in place. The tools you choose will depend on your site’s conditions and the scope of your project.
For manual digging, the essentials include a clamshell-style post hole digger, a digging bar, and a shovel. The post hole digger is perfect for cutting clean, cylindrical holes in soft to moderately hard soil. For tougher ground, the digging bar comes in handy for breaking through compacted layers and prying out pesky rocks. A shovel is useful for clearing loose soil and widening the hole if needed. These tools are best for smaller projects, tight spaces, or areas where machinery can’t fit. Expect to spend about $40–$70 for a post hole digger and $35–$60 for a digging bar.
For larger projects or challenging terrain, a gas or electric power auger can save a ton of time and effort. Renting a one-man auger typically costs $60–$120 per day, and it can dig multiple holes in the time it would take to hand-dig just a few. Power augers are especially helpful in clay or compacted soil, delivering consistent hole sizes with much less physical strain. However, they’re best suited for open areas. Near foundations or underground utilities, you’ll still need to rely on hand tools. And don’t forget to call 811 before digging to locate any buried lines – it’s a must for safety.
When digging, follow your layout carefully and adjust your approach based on the soil and terrain. For most residential chain-link fences in the U.S., line post holes should be about 6 inches wide and 18–24 inches deep. For terminal, corner, and gate posts – which bear more weight – holes should be wider and deeper. If you live in a colder region, make sure to dig below the frost line to prevent frost heave; your local building department or utility company can provide frost depth charts for your area. Before setting a post, mark a ground line on it using tape or a marker to ensure the correct depth for the finished height.
When it’s time to mix and pour concrete, you’ll need a wheelbarrow or large mixing tub, a mixing hoe, a bucket for measuring water, and a shovel for transferring the mixed concrete into the holes. Most DIYers opt for pre-bagged concrete mix, which comes in 60–80 lb bags and costs around $4–$7 per bag. Mix the concrete to a thick, pourable consistency so it flows around the post while providing firm support. After pouring, use a shovel, rod, or rebar to work through the mix and remove air pockets. Finish the top with a trowel, shaping it into a slight crown that slopes away from the post to help water drain and prevent corrosion.
While the concrete is still wet, use a 4-foot level to check the post’s plumb on two sides. Make adjustments as needed and brace the post with scrap lumber to hold it in place. Re-check the alignment after a few minutes to ensure nothing has shifted. Allow the concrete to cure for at least 24–48 hours (or as directed on the product label) before applying tension to the fence fabric. Professionals, like Tend Fencing in Plano, TX, use these tried-and-true methods to achieve consistent, durable results every time.
Hole Digging Tools
Choosing the right tools for digging post holes is key to building a sturdy chain-link fence. The tools you’ll need depend on the size of your project, the type of soil, and whether you’re working in open spaces or tighter areas. Let’s break down the essential hand tools before moving on to powered options.
For manual digging, a clamshell-style post hole digger is a go-to tool. It creates clean, cylindrical holes and works best in soft to medium soil. You can usually pick one up for about $40–$70. A round-point shovel is another must-have. It’s perfect for clearing out loose soil, widening holes where the post hole digger can’t reach, and keeping the area tidy. Basic shovels are typically priced between $20–$40. If you’re dealing with compacted or rocky soil, a digging bar (also called a spud bar or pry bar) is invaluable. It helps break through tough ground, loosen rocks, and even compact gravel at the hole’s base before pouring concrete. Expect to spend around $35–$60 for one of these.
For larger jobs or tougher conditions, like dense clay or hard-packed soil, a power auger can save you a ton of time and effort. These gas or electric tools drill holes quickly and consistently. Renting one usually costs about $60–$100 per day. Even with a power auger, you’ll still need hand tools for working in tight spots, especially near foundations or underground utilities.
Concrete Mixing and Setting Tools
Once your post holes are ready, the next step is mixing and setting concrete to ensure a sturdy foundation. For most residential projects, basic manual tools will do the job.
Start with a wheelbarrow (6–10 cubic feet capacity) to mix and transport the concrete efficiently. To blend the mix properly, a mixing hoe with perforated blades is essential – it helps break up clumps and evenly combine cement, sand, and gravel. A standard mix ratio often used is 1 part cement, 2 parts sand, and 3 parts gravel.
For water measurement, a 5-gallon bucket works perfectly. Aim for about 6 quarts of water per 80-pound bag of concrete mix to achieve the right consistency.
Once the concrete is poured, a 12–18 lb hand tamper with a 6×8-inch steel base is ideal for compacting it in 4-inch layers. This step removes air pockets, ensuring a solid foundation. After tamping, use a trowel to smooth the surface and create a slight slope away from the post for proper drainage.
For projects under 50 feet, these tools are more than sufficient to produce a strong foundation. If you’re tackling a larger job, say over 100 feet, a portable concrete mixer might save you time. However, for most DIY setups, manual tools are perfectly capable. A well-mixed and properly set concrete base will ensure your posts are secure, ready for the next steps in your fence installation.
Framework Assembly and Cutting Tools
With your posts securely set in concrete, it’s time to start framing your fence. This step involves cutting metal components to size and fastening them together to create a sturdy structure. Let’s break down the tools you’ll need for cutting and securing the frame.
For cutting metal components, you’ll want either a hacksaw or a pipe cutter. These tools are essential for trimming top rails, posts, and pipes to the exact lengths required. A pipe cutter is particularly efficient for galvanized steel pipes, offering straighter and faster cuts. On the other hand, a hacksaw, with extra blades on hand, is more versatile, especially for tight or angled cuts. Once your cuts are made, use a file to smooth out rough edges, ensuring the pieces slide easily into the line post tops.
When it comes to fastening, you’ll need the right hardware to keep everything secure. A crescent wrench or a ratchet set with 1/2" and 9/16" sockets is perfect for tightening carriage bolts on rail ends, tension bands, and post fittings. To avoid damaging the galvanization, a rubber mallet is ideal for gently tapping components into place. Additionally, fence pliers are indispensable for attaching tie wires every 12–24 inches, helping to prevent sagging.
Make sure your tools are compatible with standard galvanized steel pipe sizes. Terminal posts are typically 2-3/8 inches in diameter, while line posts are around 1-5/8 inches. Double-check all measurements before cutting – mistakes can lead to wasted materials and extra costs, which can easily be avoided with careful planning.
Cutting Metal Components
Getting clean, precise cuts on galvanized steel is crucial for a polished and professional fence installation. To achieve this, you’ll need two essential tools: a hacksaw and a pipe cutter. Each serves a unique purpose in the process.
The hacksaw is a handy, portable tool that’s perfect for general metal cutting. Opt for one with 24–32 teeth per inch (TPI) bi-metal blades, specifically designed for cutting metal. These fine-toothed blades slice through galvanized steel smoothly, minimizing sparks and protecting the zinc coating that prevents corrosion. To use it effectively, secure the pipe firmly in a vise or with clamps, measure and mark your cut line with a tape measure and pencil, and apply steady, even strokes. This approach helps avoid jagged edges, which can compromise fittings and increase the risk of rust.
For round tubing, like top rails, a pipe cutter is the better choice. This tool uses a rolling wheel mechanism to score and cut through pipes up to 2 inches in diameter, delivering straight, burr-free cuts while preserving the galvanized coating. Pipe cutters are particularly useful for precision cuts, such as trimming top rails to fit between terminal posts or adjusting line posts to exact measurements. For a typical 50-foot residential fence, you might need to make 10–20 cuts – this includes trimming 4–6 terminal posts to match the fabric height plus 2 inches, adjusting 8–10 line posts, and cutting top rails to fit snugly between swedged ends.
After making each cut, smooth out any burrs with a metal file to prevent fabric snags. Always wear safety goggles and heavy gloves to protect yourself from sharp edges and flying chips. These careful, precise cuts ensure a secure and seamless assembly of your fence’s rails and posts.
Fastening Hardware
Once you’ve cut and positioned the posts and rails, the next step is securing everything with the right tools. With the frame set up, use wrenches, ratchets, and mallets to fasten bands, rail ends, and gate components securely.
For most residential chain-link fences, you’ll need 1/2-inch and 9/16-inch wrenches or an adjustable crescent wrench to tighten carriage bolts. Many installers prefer using a ratchet with 1/2-inch and 5/8-inch deep-well sockets, especially for longer fence runs where you’ll be fastening dozens of bands and gate hinges. A ratchet not only speeds up the process but also makes it easier to work in tight spaces around posts without constantly repositioning the tool. To seat fittings like brace bands, tension bands, and rail ends snugly without damaging the galvanized coating or denting the posts, a 2–3 lb rubber or dead-blow mallet is invaluable.
When tightening, start with loosely positioned bands. Adjust the hardware and stretch the chain-link fabric before fully tightening. Place the carriage bolt head on the outside of the fence and tighten the nut until the band is snug against the post and tension bar, but avoid overtightening to prevent distortion. Work your way from the top to the bottom along each terminal post to ensure the load is evenly distributed and the tension bar stays vertical.
For gates and heavier fittings, switch to larger sockets, such as 5/8-inch, and use a long-handled ratchet for added leverage. Since gates are moving parts, take extra care to adjust hinge and latch fasteners for smooth operation before fully securing them. A mallet can help you fine-tune the position of hinge brackets or latch receivers on the post before final tightening.
If you’re tackling a larger project, dealing with sloped terrain, or installing multiple gates, professional crews bring both the tools and expertise to handle these challenges. For example, in North Texas areas like Plano, homeowners often hire specialists like Tend Fencing. These professionals ensure proper spacing, alignment, and fastening under tension to withstand local wind loads and soil conditions. They also offer comprehensive services, including design, layout, and cleanup. Following these fastening techniques will set you up for success when it comes to installing gate hardware and any additional accessories.
Chainlink Fabric Handling and Tensioning Tools
Once your fence frame is set, the next step is handling and properly stretching the chainlink fabric. To do this, you’ll need three key tools: a fence stretcher bar, a come-along (or fence puller), and a tension bar. The tension bar slides through the end diamonds of the fabric and attaches to each terminal post using tension bands and carriage bolts. A 3-hook stretcher bar is then used to grip several mesh diamonds a few feet away from the post, spreading the pulling force evenly across the fabric. By connecting a come-along between the stretcher bar and the next terminal post, you can ratchet the fabric incrementally until it’s tight, ensuring the diamond pattern stays intact. Proper tension should allow for about 1–2 inches of deflection when you press on the fabric at the midpoint.
For the final adjustment, a short stretch tool is invaluable. This compact lever wraps around the post and hooks onto the tension bar, allowing you to close any remaining gap with precision. Once the fabric is snug, you can fully tighten the tension bands and carriage bolts. To finish the edges neatly, use wire or bolt cutters to trim the fabric by snipping one strand and unwinding it from the edge.
With the fabric stretched evenly, the next step is securing it to prevent any loosening or movement. Use fence pliers to twist tie wires around the fabric (spaced every 12 inches on posts and 24 inches along rails). For the bottom tension wire, hog-ring pliers are ideal for crimping clips that keep the fabric from slipping. Skipping these steps can result in the fabric relaxing or shifting once the stretcher and come-along are removed.
For smaller projects, homeowners often rent or purchase a basic kit that includes a single stretcher bar, one come-along, standard pliers, and wire cutters. While this setup works for short backyard fences, it may require more manual adjustments and time. On the other hand, professional contractors rely on contractor-grade tools, such as heavy-duty stretcher bars, multiple come-alongs, specialized hog-ring pliers, and short stretch tools. These tools not only speed up the process but also ensure consistent tension across long runs, reducing the chances of sagging or misalignment. This approach helps meet local standards for both security and aesthetics.
Common pitfalls include attempting to pull the fabric by hand, which can leave sections sagging, or over-tightening with a come-along, which may distort the fabric or cause posts to lean. Another frequent mistake is neglecting to secure the bottom with hog rings or tie wires, which can allow animals to push underneath or lead to fabric loosening over time. By using the right tools – stretcher bar, come-along, short stretch tool, and fastening pliers – and working in stages while checking alignment with a level and string line, you can avoid these issues and achieve a sturdy, professional-looking fence.
This precise tensioning is essential for consistent results, especially when adding gates and other accessories later in the installation process.
Pulling and Stretching Fabric
Once you’ve mastered proper fabric handling, the next step is pulling and stretching the mesh to achieve a tight, even finish.
This process relies on three key tools: a come-along winch (also known as a fence puller), a stretch bar, and a stretcher bar assembly. The come-along, equipped with a ratcheting mechanism and cable or chain, applies steady force to pull the fabric taut between terminal posts, something manual pulling just can’t match. You can find manual come-alongs priced around $30–$80, while stretch bars typically cost $25–$50 at fencing supply stores.
To begin, weave a stretch bar (or tension bar) vertically through the end row of chainlink diamonds. This bar evenly distributes the pulling force and prevents the mesh from warping. Attach the come-along to the opposite terminal post and connect its cable to the stretch bar. As you ratchet, check the tension every few feet to ensure the diamonds stay uniform and square – avoiding any elongation or compression. Proper tension should allow for a slight give without noticeable sagging, ensuring the fence remains sturdy and durable.
A 3-hook stretcher bar is another handy tool, designed to hook into the mesh at three points – top, middle, and bottom – for balanced force distribution. For those final adjustments, a short stretch tool, which typically costs $40–$90, helps close the last few inches with precision before attaching tension bands and carriage bolts.
Be cautious not to over-tighten the mesh, as this can bend posts inward or distort the fabric. Stop ratcheting once the diamonds look uniform and the mesh gives only slightly under pressure. Always stand to the side of the puller, not directly in line with the tensioned cable, and wear gloves and eye protection to guard against potential snapbacks. Once all bands and ties are securely in place, release the tension slowly to avoid sudden jerks or whipping of the fabric.
For longer fence runs, sloped areas, or taller commercial-grade mesh, maintaining consistent tension with basic DIY tools can be tricky. Professional contractors, like Tend Fencing, often utilize multiple heavy-duty come-alongs and specialized stretch bars to ensure uniform tension across the entire fence. Their skill in applying the right amount of force helps prevent leaning posts or sagging fabric, resulting in a straighter, more durable fence. This precise tensioning also lays the groundwork for secure band installation and accurate gate fitting in the next steps.
sbb-itb-d1d0a96
Cutting and Attaching Fabric
Once the mesh is properly tensioned, the next step is trimming and securing the fabric to ensure it stays intact. To get the job done right, you’ll need three key tools: bolt cutters, fence pliers, and hog ring pliers. For 9–11 gauge chainlink fences, 24–30 inch bolt cutters are ideal. Their longer handles give you better leverage, making it easier to cut through the thicker galvanized wire. Shorter cutters or basic wire cutters often fall short with these materials and can quickly wear you out during extended work. Expect to spend between $25 and $60 for a decent pair of bolt cutters at most home improvement stores.
Professionals typically remove an entire wire line by carefully unbending it from the knuckles of adjacent wires. This approach leaves a clean edge, which makes attaching the fabric much easier. After cutting, fence pliers (priced around $15–$35) come into play. These are used to twist and close the tie wires that fasten the fabric to both the top rail and the line posts. The standard procedure is to secure the fabric to line posts with a tie wire every 12 inches of post height, and to the top rail every 18–24 inches along its length. This spacing prevents sagging and keeps the mesh taut, even under pressure.
For the bottom of the fence, hog ring pliers (costing $15–$40) are used to crimp C-shaped hog rings around the fabric and the tension wire. This method is quicker and more consistent than using loose tie wire. It also helps keep pets or wildlife from pushing their way underneath the fence. Hog rings should be spaced every 12–18 inches along the bottom tension wire. Many professionals prefer spring-loaded hog ring pliers with collated rings, which allow them to work more efficiently without the hassle of reloading after every crimp.
Safety is crucial during this process. Always wear cut-resistant gloves and safety glasses to protect yourself from sharp wire edges and the potential for cut wire ends to snap back unexpectedly. For homeowners in Plano, TX, and nearby areas who want a polished, uniform finish without dealing with sharp wires or heavy tools, Tend Fencing offers professional services. They specialize in cutting, stretching, and attaching chainlink fabric – especially on larger or sloped properties where achieving proper tension and secure attachment can be tricky.
Gate and Accessory Installation Tools
Once the fence fabric is securely installed, the next step is setting up the gate and its accessories. This part of the process requires a different toolkit compared to stretching the fence itself. The hardware tends to be heavier, alignment is more precise, and accessories like latches and closers need careful attention to detail.
For residential walk gates, you’ll want an adjustable wrench or a socket set with common sizes like 1/2 in, 9/16 in, and 5/8 in. These tools allow you to tighten hinge and latch bolts securely without damaging the hardware. A tape measure is indispensable for centering the gate within the opening, ensuring even side gaps (usually 2–4 inches in total), and properly positioning the latch receiver. A torpedo level will help keep gate posts plumb and ensure the gate hangs evenly, which prevents binding and ensures smooth latch engagement.
Once the gate is measured and leveled, you can move on to attaching and tensioning the fabric. The tools you used earlier – such as a short stretch tool, hog ring pliers, bolt cutters (or a hacksaw), and fence pliers – will come in handy again to tension, secure, and trim the fabric around the gate frame.
For larger gates or more complex setups, heavier-duty tools might be necessary. A come-along winch or cable grip can help align wide gate frames with posts or a center stop, especially when minor tweaks are needed before tightening the hardware. A deep-well socket ratchet provides better leverage and speeds up the process, while adjustable stands or a small material lift can safely support heavy gate panels during hinge adjustments.
If you’re adding security features – like padlockable latches, gate closers, or keypad controls – a cordless drill/driver with the right bits will be essential for mounting accessory brackets to posts, walls, or concrete pads. For child-safe or pool-compliant latches, which are often mounted at least 48 inches high, careful measurement and alignment are a must. Additionally, if you’re installing low-voltage gate operators or access controls, keep wire cutters, strippers, and crimpers on hand for electrical connections.
For homeowners in Plano, TX, looking for professional installation of gates with automatic openers or advanced security features, Tend Fencing offers expert services. They ensure gates comply with local codes and function smoothly for years to come.
As a general tip, professional installation guides recommend loosely attaching hinge and latch hardware first. Only tighten them fully after confirming the gate swings freely and latches without issues – this helps avoid binding or sagging over time. And don’t forget to wear safety glasses and heavy-duty gloves when cutting, drilling, or trimming metal to protect yourself during the process.
Gate Hanging Tools
After setting up the frame and installing accessories, hanging a gate requires specific tools to get the job done right. A socket set or ratchet is essential for handling most chainlink gate hardware fasteners, typically in sizes 1/2 in., 9/16 in., and 5/8 in. To cover a broader range, a set that includes sockets from 3/8 in. to 3/4 in., with both shallow and deep-well options, is ideal. Deep-well sockets are especially handy for reaching recessed nuts on hinge brackets. It’s also smart to keep an adjustable wrench or crescent wrench on hand for those tighter spots.
Once you’ve got the right fasteners, proper alignment is key. Use a level to ensure gate posts are perfectly plumb before the concrete sets. Even a slight lean can lead to issues like the gate bottom dragging on the ground. When attaching hinges, start by loosely securing them. Then, rest the gate leaf on temporary supports – like wood blocks or bricks – at the desired height (usually 2–4 inches off the ground). Place the level along the top rail to confirm the gate is horizontal before tightening the hinge bolts. After securing everything, double-check that the posts are still plumb and the gate remains level. Over-tightening bolts can twist the frame, so be cautious.
Accurate measurements are just as important as alignment. A tape measure plays a dual role here. First, confirm that the distance between gate posts matches the gate frame width, plus the necessary clearance for hinge and latch hardware (usually 1–3 inches total). Then, mark the hinge locations on the posts, spacing them evenly from top to bottom. For latches – especially child-safe or pool-compliant ones – measure carefully to ensure they’re mounted at the correct height (typically at least 48 inches). For double swing gates, measuring the diagonals between latch posts ensures the opening is square so both leaves meet properly.
Finally, don’t overlook the smaller tools. Pliers are great for working with wire ties, cotter pins, and clips that secure latch and hinge components. For double gates, use a string line stretched across the tops of the posts to align both leaves evenly. With the right tools and careful adjustments, you’ll ensure your gate hangs evenly, meets clearance requirements, and operates smoothly.
Optional Security Accessories
Once the main fence fabric is in place, you can add optional security accessories to strengthen and personalize your fence. These additions, such as tension wire, barbed wire, or privacy screens, can enhance both functionality and security.
Bottom tension wire is a common choice for residential fences, as it helps keep animals or intruders from pushing the fence fabric up at ground level. To install it, you’ll need a few tools: hog ring pliers to secure the wire to the fabric every 18–24 inches, heavy-duty wire or bolt cutters to trim the galvanized wire to the right length, and a come-along or fence stretcher to pull the wire taut before attaching it to the posts. If you’re using bands and carriage bolts to anchor the wire, a wrench or ratchet with deep-well sockets will be necessary to tighten the hardware securely.
For barbed wire or razor wire, which are more commonly used on commercial, industrial, or agricultural properties, you’ll need additional tools and precautions. Start by attaching barbed wire extension arms to your posts. Then, use a barbed wire pulling tool to stretch each strand tightly and secure it with the appropriate pliers. Since barbed wire is sharp and under tension, safety gear is a must – wear cut-resistant or heavy leather gloves, safety glasses, and long sleeves to avoid injury. Also, check local regulations and homeowners’ association rules before purchasing materials, as many cities across the U.S. restrict or ban the use of barbed or razor wire in residential areas.
If you’re looking to add privacy slats or windscreen fabric for more visual security, the tool list is shorter. Use tin snips or a utility knife to trim the material to size, and secure it with zip-tie pliers at 12–18 inch intervals along the edges. A tape measure will help ensure the screen is properly aligned and centered. Pre-tensioning the fabric during installation helps prevent sagging over time. For single projects, consider renting specialty tools like a fence stretcher or barbed wire pulling tool for a day or weekend to save on costs while still achieving professional results.
Safety Gear and Jobsite Preparation
Personal Protective Equipment
Before you start, make sure you have the right protective gear. At a minimum, you’ll need safety glasses or impact-rated goggles to protect your eyes from flying debris like metal chips, concrete splatter, or snapping wire ends. Heavy-duty, cut-resistant gloves are essential for handling sharp metal fittings and chainlink fabric. For your feet, wear steel-toe, slip-resistant boots to guard against heavy objects and ensure stable footing. If you’re using power tools like augers, grinders, or saws, hearing protection – either earplugs or earmuffs – is a must. When mixing concrete or cutting metal, use a dust mask or respirator to avoid inhaling fine particles. Lastly, wear durable, long-sleeved clothing to reduce the risk of scrapes and abrasions.
Once you’re geared up, it’s time to organize and prepare your jobsite for a safe and efficient workflow.
Site Preparation Items
A well-prepared jobsite can save time and help prevent accidents. Start by calling 811 at least two to three business days before digging. This free service marks underground utilities like gas, electric, water, and telecom lines, helping you avoid dangerous mistakes and outages. Next, verify property lines to steer clear of boundary disputes, and check for any necessary permits or HOA rules before beginning work. Clear and mow the area where the fence will go to remove obstacles and improve visibility. Use landscape stakes and mason’s string to outline the fence line and mark post locations. For accurate spacing, grab some measuring tape and marking paint or chalk.
Set up a clean staging area on level ground to keep tools, posts, rails, and concrete bags organized and out of the way. Keep tools like a wheelbarrow, shovel, rake, and buckets handy for moving soil, spreading fill, and mixing or transporting concrete. At the end of each day, use a magnet sweeper to pick up stray screws, wire cutoffs, and metal debris to prevent punctures to tires or footwear. Finally, have a basic first-aid kit nearby for treating minor injuries or rinsing out eyes in case of accidents.
Personal Protective Equipment
When it comes to chainlink fence installation, having the right personal protective equipment (PPE) isn’t just a recommendation – it’s a must for staying safe on the job. Before you dive into the work, make sure you’ve got the right gear to keep yourself protected.
Eye protection is essential. Flying debris like metal chips, concrete splatter, or sharp wire ends can cause serious injuries. Equip yourself with safety glasses or impact-rated goggles that meet ANSI Z87.1 standards. For bright outdoor conditions, go for tinted or polarized lenses, while clear lenses work best in low-light settings.
Your hands need protection too. Invest in heavy-duty, cut-resistant gloves made of leather or synthetic materials with reinforced palms. These gloves should fit snugly to avoid getting caught on sharp edges.
For your feet, steel-toe or composite-toe work boots are a solid choice. Look for boots with oil- and slip-resistant soles to protect against heavy objects and ensure stable footing. Waterproof boots are especially helpful when working with concrete. Expect to spend around $60–$80 for basic work boots, while steel-toe models typically range from $100 to $180.
If you’re using power tools, don’t overlook hearing protection. Choose earplugs or earmuffs with a Noise Reduction Rating (NRR) of at least 22–25 dB. Entry-level earplugs are budget-friendly, often costing less than $1 per pair, while reusable earmuffs for DIY projects can range from $15 to $40.
For tasks like mixing concrete or cutting metal, a dust mask or respirator is crucial to avoid inhaling fine particles. Additionally, wear durable, long-sleeved clothing to shield your skin from scrapes and abrasions caused by sharp wire edges.
Lastly, inspect your gear regularly. Replace or discard any worn or damaged safety glasses, gloves, or boots immediately to ensure they continue to offer proper protection.
Site Preparation Items
Getting your site ready is key to keeping the workspace organized and ensuring safety throughout the project. A well-prepared area not only minimizes risks but also makes the job run more smoothly.
Start with health and hydration essentials. A fully stocked first-aid kit is a must – include bandages, gauze, antiseptic, tweezers, eye wash, cold packs, and elastic bandages. These items come in handy for treating minor injuries like cuts or abrasions, as well as eye irritation from dust. Staying hydrated is just as important. Keep water readily available with an insulated jug and individual bottles, and make sure to take shade breaks every 45–60 minutes. Wearing light-colored, breathable clothing can also help prevent heat exhaustion.
Next, tackle debris management and surface protection. Heavy-duty trash bags are great for disposing of concrete bags and packaging. Use a container or bucket to collect metal scraps, and lay tarps or plastic sheeting under mixing areas to catch spills. Protect driveways from wheelbarrow damage by laying down plywood sheets. For cleanup, a stiff broom and flat shovel are useful for clearing gravel, concrete drips, and metal scraps efficiently.
Finally, round out your prep work with a few extra tools. Shop towels are handy for quick cleanups, while 5-gallon buckets or a wheelbarrow can help transport materials. Marking flags or spray paint are perfect for outlining fence lines, gate openings, and utility locations – just don’t forget to call 811 before you dig. These steps not only keep your site safe and organized but also set the stage for a smoother fence installation process.
Materials Checklist for Chainlink Fence Installation
Once you’ve chosen the right tools and prepared your worksite, it’s time to gather the materials you’ll need for your chainlink fence. Having a complete list upfront saves you from making extra trips to the supplier later.
Start with the structural components. You’ll need line posts (usually 1-5/8 inches in diameter, spaced 6–10 feet apart), terminal posts for ends and corners (2-3/8 inches in diameter), and gate posts if you’re adding a gate. Don’t forget the top rail (a 1-3/8-inch diameter pipe), post caps for each post, and line post tops (loop caps) to secure the rail. For a standard residential fence that’s 50 feet long and 4 feet high, you’ll typically need 8 line posts, 4 terminal posts, and 50 feet of top rail.
Next, focus on your mesh and tensioning materials. The chainlink fabric is essential and comes in galvanized or vinyl-coated options. Galvanized fabric usually costs $1–$3 per linear foot for a 4-foot height, while vinyl-coated fabric is pricier but offers a polished look and better resistance to rust. You’ll also need tension bars (one for each terminal post), tension bands (roughly one per foot of fence height – so 4 bands for a 4-foot fence), and fence ties, spaced according to installation guidelines. To prevent sagging and keep pets from digging under, include bottom tension wire in your list.
For gates and hardware, you’ll need pre-hung walk gates, hinges, latches, and carriage bolts. These components ensure your gate is sturdy and functional.
Finally, don’t forget your footing materials. You’ll need bagged concrete mix, which generally costs $5–$8 per 50–80 pound bag. Residential installations usually require 1–2 bags per post hole. To account for unexpected needs, it’s a good idea to buy 10–15% more ties, bands, and bolts than you think you’ll need.
If you’re unsure about the right materials for your soil type or want to ensure you’re using high-quality components, Tend Fencing in Plano, TX, can help. They can review your list and recommend the best post spacing, fabric gauge, and hardware to handle the weather and ground conditions in North Texas.
Professional Support From Tend Fencing
Installing a chain-link fence isn’t as simple as it might seem – it takes the right tools and know-how to get it just right. That’s where Tend Fencing in Plano, TX steps in. They take care of the entire process with professional-grade equipment and years of experience, ensuring your fence is installed perfectly. This expertise is a great complement to the DIY tools checklist mentioned earlier, saving you from potential headaches like crooked posts or sagging fabric.
Their team uses advanced tools like power augers, specialized fence stretchers, and precision levels to build fences that last. These tools, combined with their skill, help avoid common DIY pitfalls and ensure the fence meets local codes and can handle the weather. If you’re feeling overwhelmed by the challenges of getting the layout and fabric tension just right, their expertise guarantees a secure, properly installed fence. Their history of successful projects – both residential and commercial – proves their consistent quality.
But Tend Fencing goes beyond just building fences. Through their partnership with One Tree Planted, they plant a tree for every fence they install. This initiative not only reflects their dedication to sustainability but also lets you enjoy a professionally installed fence without worrying about renting tools or mixing concrete.
Whether you need a 4-foot backyard fence or a secure commercial perimeter, Tend Fencing offers free consultations and custom designs tailored to your property. Their process is simple: request a quote, schedule the installation, and let them handle the hard work while you enjoy your new, hassle-free fence.
FAQs
What tools do I need to stretch chainlink fabric during installation?
To stretch chain-link fabric effectively during installation, you’ll need a few key tools: a chain-link stretcher or tensioning tool, pliers, a wire tensioning device, and a come-along or winch. Don’t forget to wear durable gloves to protect your hands while handling the material. These tools help ensure the fabric is evenly and securely stretched, giving your fence a clean and professional appearance.
What’s the best way to ensure a chainlink fence is properly aligned and level during installation?
To ensure your chain-link fence stays straight and level, begin by running string lines along the intended fence line. These strings act as a guide for alignment. When positioning the fence posts, use a bubble level to confirm they’re vertically straight and set to the proper height. Make any necessary adjustments before securing each post. As you work, check frequently to ensure the posts remain straight and evenly spaced for a polished, professional look.
What safety gear should I use when installing a chainlink fence?
When installing a chain-link fence, prioritize safety by wearing safety goggles to guard your eyes against flying debris and durable gloves to protect your hands from sharp edges. Opt for sturdy, closed-toe shoes to shield your feet, particularly when working with heavy tools or materials. If you’re cutting metal or dealing with dusty conditions, using hearing protection and a dust mask can provide extra protection.