Want to create a privacy screen for your yard? Here’s the quick guide:
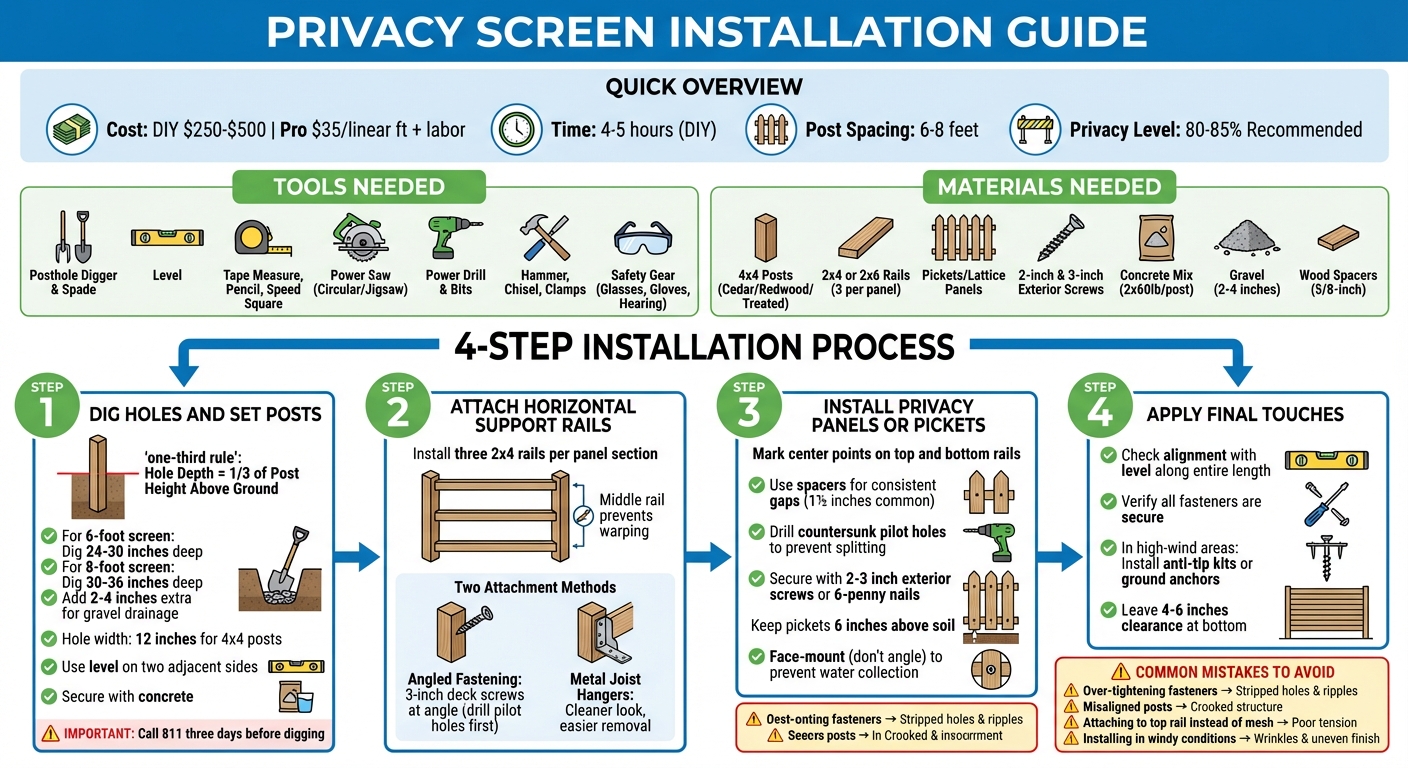
- Cost: DIY projects cost $250–$500, while hiring a pro is around $35 per linear foot plus labor.
- Time: Most DIY installations take 4–5 hours.
- Materials: Use rot-resistant wood like cedar or redwood, 4×4 posts, 2×4 or 2×6 rails, concrete mix, and screws.
- Preparation: Call 811 to check for underground utilities, measure and mark your layout, and dig post holes to the correct depth (e.g., 24–30 inches for a 6-foot screen).
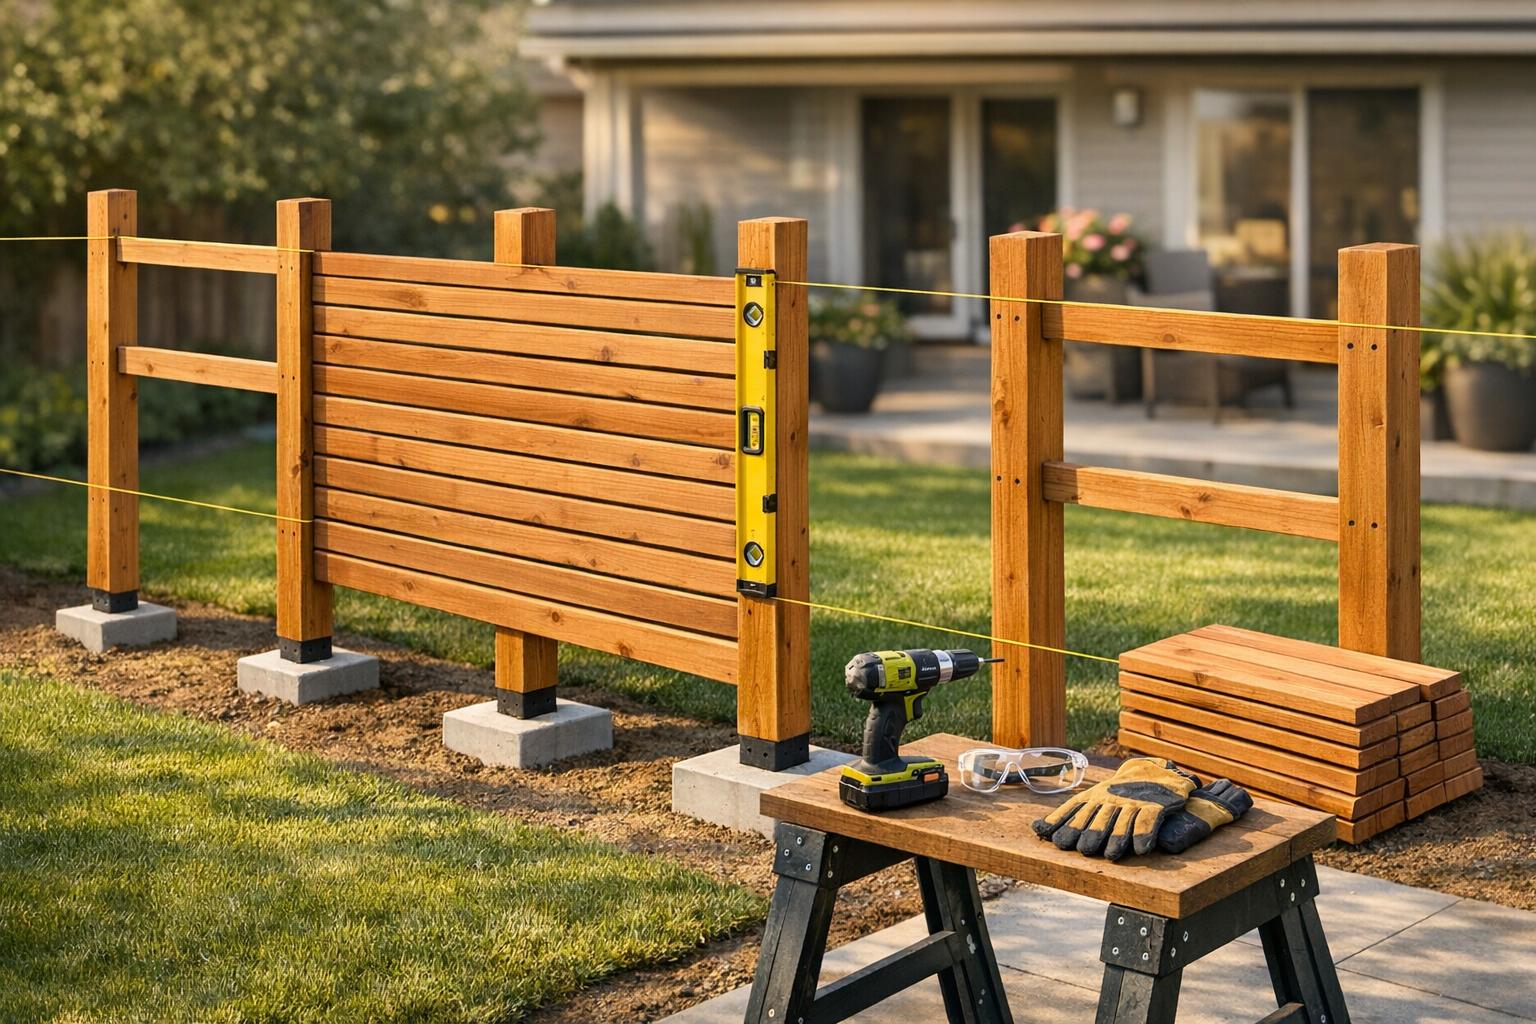
This simple process involves setting posts, attaching rails, and securing panels or pickets for a durable, functional, and attractive outdoor feature. Follow the detailed steps to get it right or hire a professional for expert results.
Privacy Screen Installation: 4-Step DIY Process with Tools and Materials
How to Build a Privacy Screen (w/ Monica from The Weekender)
sbb-itb-d1d0a96
Tools and Materials You’ll Need
Getting your tools and materials ready ahead of time can save you from unnecessary delays. Here’s a breakdown of what you’ll need for a typical privacy screen installation.
Required Tools
Start with a posthole digger and spade to dig holes about 3 feet deep for stable post placement. A level is critical for ensuring your posts are perfectly vertical and your rails stay straight. For accurate measurements and layout, keep a tape measure, pencil, and speed square on hand .
Power tools can speed things up. A circular saw, jigsaw, or miter saw will help you cut lumber to the right lengths and even add decorative touches if needed . A power drill with driver and drill bits is essential for driving screws and pre-drilling holes, which helps prevent wood from splitting . Additionally, a hammer, wood chisel, and clamps will ensure your rails are flush and secure during assembly.
Don’t skimp on safety gear. Always wear safety glasses, work gloves, and hearing protection when cutting or drilling . Using screws instead of nails is recommended, as screws are less likely to loosen over time as the wood expands and contracts. If you’re working with multiple posts, renting a power earth auger can save you a lot of time and effort.
Once your tools are ready, gather these materials to complete the job efficiently.
Required Materials
For the posts, use 4×4 lumber made of cedar, redwood, or pressure-treated wood, depending on your budget and local weather conditions . Cedar and redwood are naturally rot-resistant and visually appealing, while pressure-treated pine is a more affordable option . For horizontal rails, choose 2×4 or 2×6 boards. A standard 8-foot fence panel usually requires three 2×4 rails or two 2×6 rails to prevent sagging.
For the screen itself, pick between fence pickets or lattice panels, depending on the level of privacy and style you want . Use exterior-grade enameled or stainless-steel screws (2-inch and 3-inch lengths) to avoid rust and unsightly marks on the wood. You’ll also need concrete mix – about two 60-pound bags per post hole should do the trick. Add a gravel layer (2–4 inches) at the bottom of each hole for drainage and to prevent wood rot . Lastly, use wood spacers (like 5/8-inch fence pickets) to maintain consistent gaps between slats during installation.
It’s smart to order about 10% more lumber than you think you’ll need to account for errors, waste, or unexpected cuts.
Planning and Preparation
Before you break ground, take the time to plan your layout carefully. Start by sketching a simple diagram of your installation area. Include key landmarks like trees, buildings, or any existing fences to guide your measurements and placement decisions . If you’re attaching a screen to an existing chain-link fence, be precise – measure from the inside of one tension bar to the inside of the next to ensure a proper fit .
Measure and Mark Your Installation Area
Measure the height of your fence line at multiple points, and use the lowest measurement to prevent sagging or dragging on uneven terrain. For a clean, professional look, trim panels to be 1 to 3 inches shorter than the actual length . Leave 4 to 6 inches of clearance at the bottom to shield the screen from lawn mower damage and ground moisture. When marking post locations, space them 6 to 8 feet apart, depending on the size and material of your panels. Use stakes and string to outline your post placements, double-checking all measurements for accuracy.
Check for Underground Utility Lines
Before digging, call 811 at least three business days in advance to have underground utilities marked . Remember, it’s illegal to remove or tamper with these markers once they’ve been placed. If you’re working within 4 feet of utility lines, stick to hand tools to avoid damaging them. Keep in mind that private utilities, like irrigation systems, aren’t included in the 811 service. You may need to hire a professional to locate these lines. Safety first – confirm all utilities are accounted for before moving forward.
"Safety is in your hands. Every Dig. Every Time." – MISS DIG 811
Calculate Post Hole Depth
Follow the one-third rule: your hole should be one-third the height of the post above ground. For a 6-foot privacy screen, dig 24 to 30 inches deep. Add an extra 2 to 4 inches for gravel drainage at the bottom . Be sure to check your local building codes for frost line requirements – posts must extend below this depth to prevent shifting during freeze-thaw cycles. For standard 4×4 posts, dig holes about 12 inches wide.
| Post Height (Above Ground) | Recommended Post Depth | Total Excavation Depth (Including 3" Gravel) |
|---|---|---|
| 6 Feet | 24 – 30 Inches | 27 – 33 Inches |
| 8 Feet | 30 – 36 Inches | 33 – 39 Inches |
Once your layout is planned, utilities are marked, and hole depths are calculated, you’re ready to move on to the installation phase.
Step-by-Step Installation Process
Once your planning is done and utilities are marked, it’s time to start building your privacy screen. Follow these steps carefully to avoid mistakes that could cost you time and money later.
Step 1: Dig Holes and Set the Posts
Start by marking the locations for your post holes using stakes, based on the spacing you decided during planning (usually 6–8 feet apart). Dig the holes to the required depth and place each post in its hole. Use a level on two adjacent sides to ensure the post is perfectly vertical. Secure the posts with concrete or another anchoring method of your choice.
"Privacy fences not only enhance your home’s aesthetic but also offer significant security advantages. Selecting the right privacy fence depends on balancing durability, maintenance, and style." – Luke Beerman, Founder and CEO of Freedom Fence
Step 2: Attach Horizontal Support Rails
Install three horizontal 2×4 rails for each panel section to provide proper support and prevent sagging. The middle rail is especially important for keeping pickets from warping or twisting due to weather changes. Attach the rails using one of two methods:
- Angled fastening: Drive 3-inch deck screws at an angle. Drill pilot holes first to avoid splitting the wood.
- Metal joist hangers: These create a cleaner look and make future removal easier.
If you want the panels to be removable, joist hangers are a better choice than angled screws.
Step 3: Install the Privacy Panels or Pickets
With your posts and rails in place, it’s time to attach the privacy panels or pickets. Start by marking the center points for each picket on the top and bottom rails to ensure even spacing. Use spacers (e.g., 2×4 scraps) to maintain consistent gaps between pickets – 1½ inches is a common choice. Drill countersunk pilot holes before driving screws, especially near the ends of the boards, to prevent splitting .
Secure each picket to the three horizontal rails using 2-inch to 3-inch exterior-rated deck screws or 6-penny nails. Face-mounting is preferred over angled fastening because it avoids creating pockets where water can collect and cause rot. Keep the bottom of the pickets at least 6 inches above the soil to prevent moisture-related damage. If possible, work with a partner to ensure the pickets stay level.
| Fastener Type | Recommended Use | Key Benefit |
|---|---|---|
| 6-penny Nails | Attaching pickets to rails | Quick installation; classic look |
| 2-inch Deck Screws | Securing slats to frames | Good balance of depth and hold |
| 3-inch Deck Screws | Securing panels to posts | Strong structural support |
Step 4: Apply Final Touches
After assembling the main structure, take a final walk along the length of your privacy screen with a level to check alignment and stability. Ensure all fasteners are secure. If you live in an area prone to high winds, consider installing anti-tip kits or straps to anchor the screen to the ground or a nearby sturdy structure.
Safety Tips and Common Mistakes to Avoid
Safety Guidelines
When working with materials and power tools, always wear gloves and safety glasses for protection. Keep your workspace tidy and clear of tripping hazards, especially when carrying heavy posts or panels. Before digging, confirm that underground utilities are marked – hitting a gas line or electrical cable could lead to serious injury or worse.
For heavy lifting, use proper techniques: bend at your knees, not your waist, and don’t hesitate to ask for help with anything too heavy to handle alone. Also, give concrete enough time to fully cure before attaching rails. These steps not only keep you safe but also contribute to a strong, long-lasting installation.
Common Installation Mistakes
Knowing what can go wrong helps you avoid costly errors. One frequent issue is over-tightening fasteners. Screws that are tightened too much can strip their holes, weakening the connection. For privacy screens secured with zip ties, over-tightening can create unsightly ripples and wrinkles in the fabric . Aim for connections that are snug but not forced.
"Incorrect installation compromises appearance, function, and longevity." – Ball Fabrics
Misaligned posts are another common problem and can lead to bigger issues as you build. Always use a spirit level to ensure each post is perfectly vertical on at least two adjacent sides before the concrete sets. Even a slightly leaning post can make the entire structure look uneven and compromise its stability.
Another mistake is attaching privacy screens to the fence’s top rail instead of the mesh. This improper tension can damage both the screen and the residential fence . Lastly, avoid working on windy days – it’s nearly impossible to achieve a smooth, tight finish when the material is constantly moving .
| Installation Error | Consequence | How to Prevent It |
|---|---|---|
| Over-tightening zip ties or screws | Ripples in fabric; stripped screw holes | Tighten firmly but stop before forcing |
| Misaligned posts | Crooked structure; potential failure | Use a spirit level on two adjacent sides |
| Attaching to top rail | Poor tension; damage to materials | Secure to mesh, not the rail |
| Installing in windy conditions | Wrinkles; uneven finish | Wait for calm weather |
Professional Installation Services by Tend Fencing
Hiring professionals for your privacy screen or fence installation offers several advantages. Tend Fencing serves Plano, TX, and nearby areas, delivering expert installation services designed to prevent common issues like screen failures.
One of the main culprits behind privacy screen damage is wind. Professional installers at Tend Fencing use fastening techniques that allow screens to fold under pressure rather than tear during strong winds. This approach directly addresses alignment and tension problems, ensuring your screen remains intact and functional for years, not just a single season.
Tend Fencing pairs top-notch materials with skilled craftsmanship to tackle challenges like sagging and instability. Their team ensures proper tension during installation and adapts methods based on the surface type. For example, they use weighted bases for patios or ground stakes for garden beds. In particularly windy areas, they secure screens to nearby structures using brackets or ties. This attention to detail ensures your screens are both durable and seamlessly integrated into your outdoor space.
What truly sets Tend Fencing apart is their dedication to quality and environmental responsibility. For every fence they install, the company plants a tree, combining sustainability with their custom designs that enhance both security and aesthetics. Their expertise spans a variety of options, including wood, ornamental steel fences, automatic gates, and chainlink fencing, all backed by licensed and insured services.
The installation process is efficient, typically taking just a few hours to a single day, depending on the size and complexity of your project. If you’d rather leave the finishing touches to the experts after attempting DIY steps, Tend Fencing offers personalized consultations to discuss your needs and provide tailored quotes for residential projects.
Conclusion
A well-constructed privacy screen boosts security, shields against the wind, and enhances the look of your property. By following the outlined planning and installation steps, you can create a lasting outdoor feature that serves both practical and aesthetic purposes.
Building a DIY privacy screen usually takes around 5 hours, making it a manageable weekend project for those familiar with basic construction skills. However, success hinges on careful attention to details like tension, alignment, and anchoring. Errors such as over-tightening fasteners or neglecting level checks can result in issues like rippling, sagging, or even early wear and tear.
Privacy screens also provide added benefits like noise reduction, shade, and a more polished appearance. To achieve the best results for privacy and wind control, aim for a blockage level of 80–85%.
If you’d rather leave it to the pros, check out the professional installation tips shared earlier. Hiring experts is a smart move if you’re unsure about tasks like installing posts, managing uneven terrain, or navigating local building codes. For residents in Plano, TX, and nearby areas, Tend Fencing offers professional installation services. Their skilled team handles everything from on-site measurements to ensuring code compliance. Plus, they go the extra mile by planting a tree for every fence they install as part of their commitment to the environment.
FAQs
What materials should I use to build a long-lasting privacy screen?
When choosing a privacy screen that lasts, focus on materials designed to handle the outdoors and require little maintenance. Metal options like aluminum and steel are ideal because they resist rust and stand up well to tough weather conditions. Vinyl and composite materials are also reliable picks, as they hold up against rot, insects, and UV exposure, all while needing minimal care.
If you prefer a more natural aesthetic, wood is an option, but it does demand regular sealing or treatment to stay in good shape. For something lightweight yet durable, HDPE mesh is a solid choice, offering fade resistance and longevity. By opting for materials like metal, vinyl, or composite, you can ensure your privacy screen stays durable, weatherproof, and attractive over time.
How can I make sure my privacy screen stays secure during strong winds?
To ensure your privacy screen stays firmly in place during high winds, attach it securely to the fence with UV-resistant zip ties or tie wraps. Space the ties evenly along the top, sides, and bottom of the screen to provide consistent support. For extra strength, opt for heavy-duty ties rated to handle 50 to 120 pounds. This added durability will help keep the screen from shifting or detaching when the wind picks up.
What should I know before digging post holes for my privacy screen?
Before you start digging post holes for your privacy screen, it’s important to figure out the right depth for stability. This usually depends on factors like your local frost line and the height of the screen. As a general guideline, aim to dig holes that are at least one-third the height of the screen.
Take time to carefully plan the layout by measuring and marking the post locations. This helps ensure the screen will be straight and evenly spaced. Also, don’t forget to check for underground utilities before digging – safety first! Avoid attaching the screen to the top rail of an existing fence, as this can weaken its stability over time. Using high-quality materials and tools will go a long way in creating a secure, durable privacy screen.