Installing a fence might seem straightforward, but it involves risks that can lead to serious issues like property damage, safety hazards, and costly repairs. Here’s what you need to know to avoid common pitfalls:
- Hitting Underground Utility Lines: Digging without calling 811 can result in gas leaks, electrical shocks, or service disruptions. Always mark your dig area and follow utility line guidelines.
- Shallow Post Holes: Posts not buried deep enough can weaken the structure, making it prone to collapse, especially in harsh weather or frost-prone areas.
- Cuts and Injuries: Sharp materials like barbed wire or chain-link fencing can cause serious harm. Proper safety gear and tool maintenance are essential.
- Poor Site Preparation: Uneven ground, debris, and improper drainage can destabilize the fence. Clear and level the area before installation.
- Defective Materials and Weather Issues: Low-quality materials or extreme weather can cause warping, rusting, or structural failures. Inspect materials and choose the right time for installation.
Key Tip: Planning ahead, using proper safety measures, and consulting professionals can save you time, money, and stress. For complex projects, hiring experts ensures a safer and longer-lasting fence.
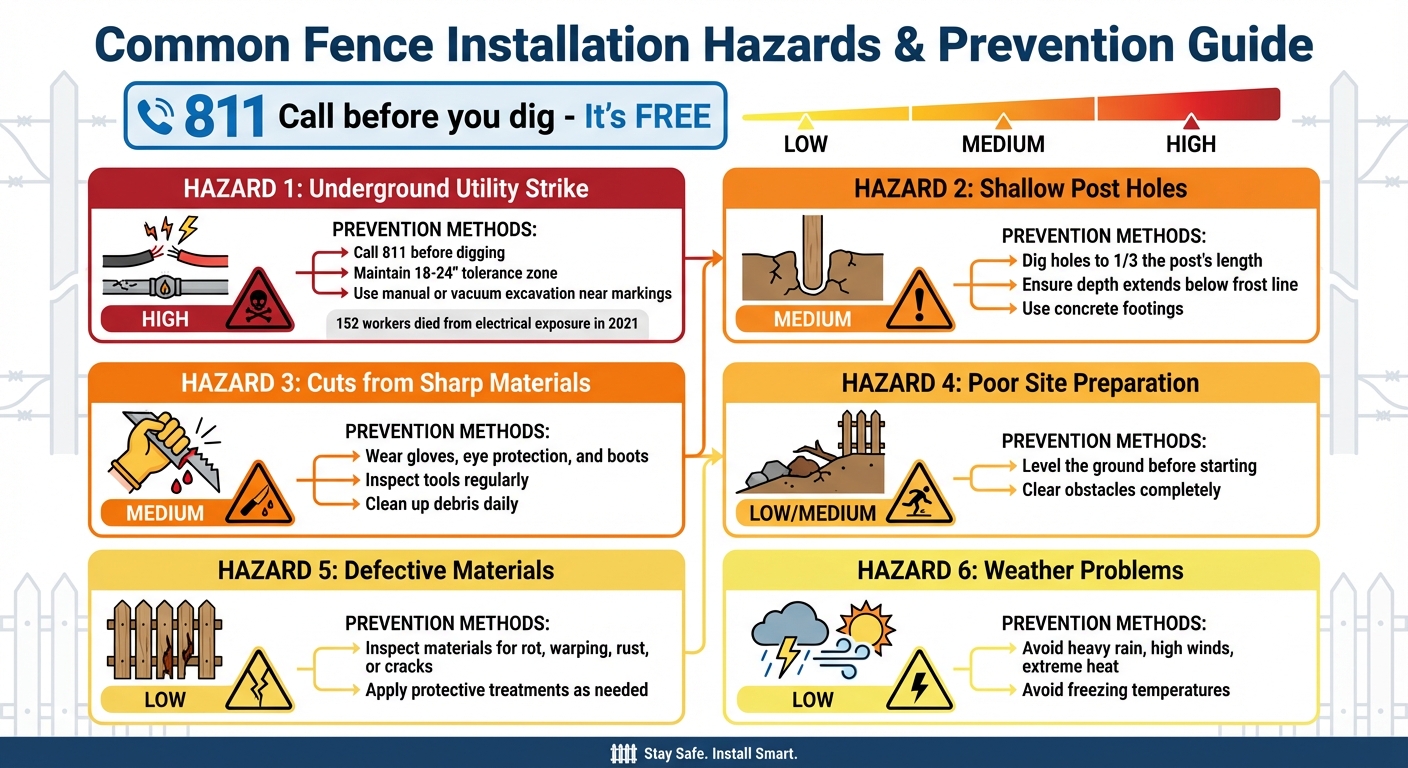
Fence Installation Hazards Prevention Guide with Risk Levels
Fencing 101: Fencing Safety
sbb-itb-d1d0a96
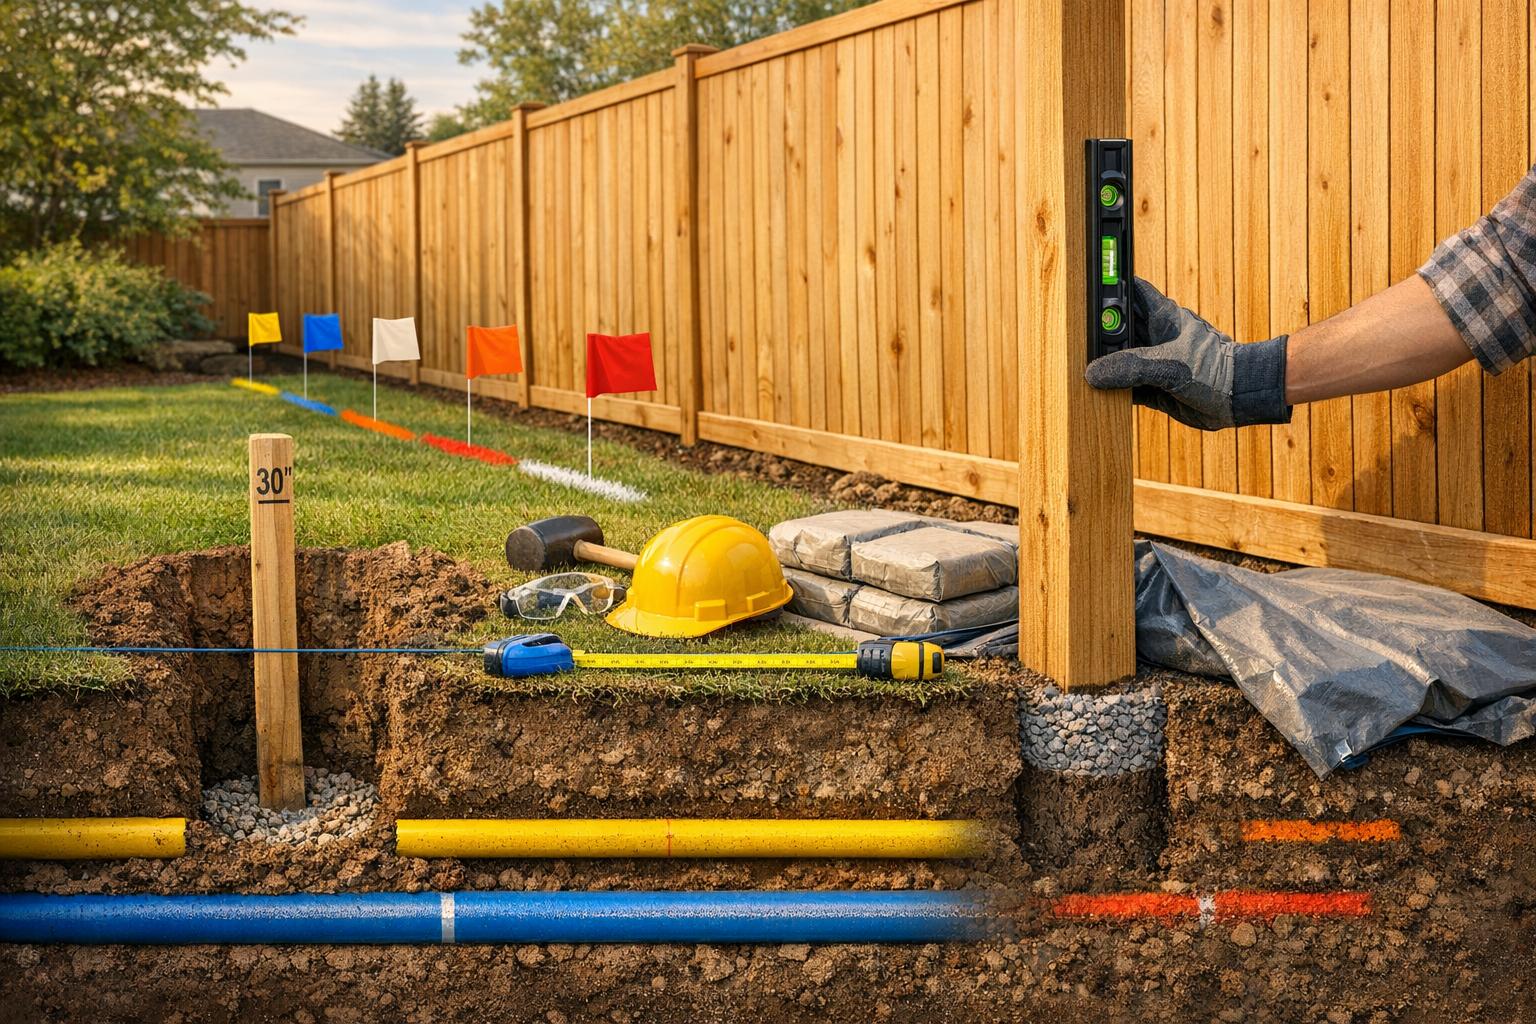
Underground Utility Lines
Digging without knowing the location of underground utilities can be extremely hazardous. Gas lines, electrical cables, water mains, and communication lines are often buried just a few inches beneath the surface. Over time, factors like soil erosion, root growth, and prior residential fence installation or landscaping work can shift these lines closer to the surface.
The risks of hitting a utility line are serious. Striking a gas line can lead to explosions, while cutting an electrical cable can cause electrocution or blackouts that may affect your entire neighborhood. In 2021, 152 workers in the U.S. lost their lives due to electrical exposure, and around 70 workers annually suffer severe injuries from hitting live underground power lines. Alarmingly, nearly one-third of commercial fence installation tradespeople still fail to check for underground cables before starting excavation work.
How to Locate Utility Lines
Call 811 at least two to three business days before digging – this is a legal requirement across all 50 states and is completely free. In Texas, for example, you must notify 811 at least 48 hours before beginning any excavation. When you call, be ready to provide details such as the project address, the type of work, and the depth of the excavation. You’ll receive a ticket number to track your request.
To assist utility locators, mark your proposed dig area with white paint or flags – this ensures they know exactly where to check. Make sure the area is accessible by unlocking gates and securing pets. Within a few days, utility companies will mark their lines with color-coded paint or flags:
- Red: Electric
- Yellow: Gas
- Orange: Communications
- Blue: Water
- Green: Sewer lines
Once the lines are marked, maintain a tolerance zone of 18 to 24 inches on either side of each mark. Use only hand tools or vacuum excavation within this zone – never use mechanical equipment. Following these steps helps prevent injuries and expensive repairs. Keep in mind, however, that 811 only marks public utility-owned lines. For private systems like irrigation, pool lines, or landscape lighting, you’ll need to hire a private locating service.
Taking the time to follow these procedures is essential to avoid the serious risks and consequences that come with improper digging.
Consequences of Hitting Utility Lines
The dangers of hitting a utility line go beyond immediate physical harm. You could face steep repair bills – sometimes in the thousands of dollars – and legal penalties if you didn’t contact 811 beforehand. According to Call811.com:
Hitting a buried line while digging can disrupt utility service, cost money to repair, or cause serious injury or death.
Service disruptions don’t just affect your property. They can cut off power, water, internet, or phone service for your entire neighborhood, sometimes for hours or even days. If you hit a line during installation, stop work immediately and notify 811. For gas line strikes, evacuate the area and call 911.
Shallow Post Holes
Digging shallow post holes can significantly weaken the structural integrity of a fence. When posts aren’t set deep enough, they fail to anchor the fence securely, creating weak points that are especially vulnerable to wind. This can lead to leaning posts, cracked concrete footings, or even total fence collapse during severe weather.
In colder regions, frost heave adds another layer of risk. As the ground freezes and expands, shallow posts can be lifted or shifted. For example, in states like Minnesota and Wisconsin, frost depths can reach between 42 and 60 inches. Posts set at standard depths may shift or lean each winter, causing misaligned panels. A 6-foot solid wood privacy fence can experience wind loads exceeding 20 pounds per square foot, meaning even small instabilities can lead to quicker structural failure.
Correct Post Hole Depths
A good rule of thumb is the one-third rule: bury at least one-third of the post’s total length. For instance, a 6-foot fence above ground would require a 3-foot embedment, making the total post length 9 feet. Gate posts, which bear more stress, typically need to be buried to half their above-ground height.
In colder climates, the bottom of the footing should extend at least 6 inches below the local frost line to ensure the post’s base stays in stable, unfrozen soil. Frost depths vary widely in the U.S., from 0 inches in southern Florida to over 60 inches in states like Minnesota and North Dakota. Always check local building codes to confirm the appropriate depth for your area.
| Fence Height (Aboveground) | Standard Post Hole Depth | Gate Post Hole Depth |
|---|---|---|
| 3 feet | 15–24 inches | 24 inches |
| 4 feet | 19–30 inches | 30 inches |
| 6 feet | 27–42 inches | 42 inches |
| 8 feet | 35–54 inches | 54 inches |
However, depth alone won’t guarantee stability. Proper drainage and concrete application are just as critical for a strong foundation.
Creating Stable Foundations
Concrete footings are essential for distributing lateral loads effectively, helping to keep posts upright. The concrete used should have a compressive strength of 3,000 to 4,000 psi. The diameter of the hole should be about three times the width of the post. For example, a 4-inch post would require a 12-inch diameter hole.
To further stabilize the foundation, add 3–6 inches of gravel at the bottom of the hole for drainage. Crown the concrete slightly above ground level to allow water to run off, reducing the risk of post rot. While concrete reaches its full design strength after 28 days, it’s best to wait 48–72 hours before attaching heavy panels to avoid cracking the footings.
For a hassle-free installation that ensures proper post depth and a solid foundation, you might consider reaching out to professionals like Tend Fencing (https://tendfencing.com). Their experienced team can help build a fence that lasts.
Cuts from Sharp Materials
Fencing materials like chain link, barbed wire, and ornamental iron come with sharp edges that can cause serious harm. Razor wire, in particular, poses a unique danger due to its flat steel blades ending in needle-like points. These points can easily snag loose clothing, creating a high risk for deep wounds.
Hand injuries are common when using saws or slipping with pliers while handling wire coils. Chain-link panels, which can weigh over 80 pounds for a 10-foot section, may also cause severe cuts if they collapse. Additionally, tension wires that recoil under stress can lead to further injuries. The danger increases when workers use excessive force with dull tools, as these are more likely to slip and come into accidental contact with sharp materials. This underscores the importance of using proper safety gear and tools.
Required Safety Equipment
When working with sharp fencing materials, it’s essential to wear the right protective gear. Thick leather gloves, rated ANSI Level A4 or higher, are recommended to shield hands and forearms from punctures caused by razor or barbed wire.
"Safety gear is not a suggestion. It is a requirement." – US Razor Fencing
Protect your eyes with safety glasses that meet the Z87.1 impact rating, especially when cutting wire ties or stretching tension wire, as springing barbs can pose a hazard. Long-sleeved, close-fitting clothing is also critical to prevent loose fabric from snagging on sharp edges, which could pull skin into contact with metal. For foot protection, sturdy work boots or steel-toe footwear are necessary to guard against falling materials and sharp debris scattered on the ground.
Tool Maintenance and Inspection
Keeping tools in excellent condition is key to safe installation work. Dull or damaged tools like wire cutters, pliers, and bolt cutters require more effort to use, increasing the likelihood of slipping and causing injuries.
"Dull or damaged tools can be more dangerous to work with and can lead to accidents." – shopchainlink.com
Before starting a project, inspect all tools and replace any that are dull or damaged. Avoid using pliers to force wire coils into place – if the tool slips off a barb, it can result in injury. Sharp, well-maintained tools cut wire cleanly, reducing the need for excessive force and keeping you safer throughout the process.
Poor Site Preparation
Skipping proper site preparation can seriously affect the stability and durability of a fence. Uneven ground, leftover debris, and inadequate drainage can destabilize posts and speed up material wear and tear. In colder regions, root systems that extend below the frost line – often as deep as 60 inches – can push posts out of alignment due to frost heave. Obstacles like rocks, stumps, or thick brush can prevent digging to the correct depth, which should typically be about one-third of the post’s total length. Even small oversights during preparation can lead to expensive repairs later. Clearing and leveling the area are essential starting points.
Clearing and Leveling the Area
To begin, create a cleared path that’s 2 to 4 feet wide along the planned fence line. Remove all trees, shrubs, stumps, and roots within this space. Make sure to extract root systems entirely to avoid future soil movement that might displace the posts. This step is particularly critical in regions where roots extend below the frost line.
Next, assess how water naturally flows across the area before digging. Adjust your grading to direct water away from post bases and prevent pooling. For sloped areas, you’ll need to decide between two methods: racked panels, which follow the natural contour of the land, or stepped panels, which require leveling each section. Racked panels typically allow for up to 2 inches of grade variation per 8-foot panel. Using tools like a string line and level during installation can help ensure posts are straight and panels align properly. Thorough clearing and leveling not only keep posts in place but also help protect materials from ground moisture.
Preventing Ground Contact Damage
Another critical step is keeping fence materials elevated to avoid water damage. This prevents moisture retention, rot, and pest issues. While vinyl fencing is naturally resistant to rot, wood fences are particularly vulnerable when they come into contact with damp debris or dense vegetation that traps moisture. Leaving a small gap – about 1 to 2 inches – between the bottom rail and the ground can go a long way in extending the life of your fence.
Ground contact can also interfere with proper drainage around footings. When panels rest directly on the soil, water can pool during heavy rain, weakening the concrete collar or footing. For areas with poor drainage or unstable soils – like fill dirt, sand, or expansive clay – consider using engineered footings or helical piers instead of standard concrete collars. These options provide better long-term stability in challenging conditions.
Defective Materials and Weather Problems
Poor material quality and harsh weather can drastically reduce your fence’s lifespan. Metal is prone to rust if not properly protected from moisture, untreated wood deteriorates when exposed to the elements, vinyl can warp under intense heat, and aluminum may bend in strong winds. Extreme temperatures also cause materials to expand and contract, which can lead to sagging joints, misaligned panels, or damaged hinges.
"Weather is often a neglected factor in fence installation. However, failing to consider its impact can delay the process and even cause a long-term problem with the fence system." – All Security Equipment
Installing a fence during heavy rain or high winds can disturb the soil, interfere with concrete setting, and destabilize the entire structure. Similarly, extreme heat can cause vinyl to warp and make metal components unsafe to handle, while high humidity puts untreated wood at immediate risk of mold growth. Spring and fall are ideal seasons for installation, offering milder weather that supports accurate measurements and material stability.
These weather and material challenges add to the risks posed by incorrect installation methods. Addressing these factors is essential to avoid compounding problems.
Checking Materials Before Use
Before starting the installation, inspect all materials thoroughly to identify any defects that could compromise the fence’s durability. For wood, check for signs of rot, warping, or splitting caused by moisture exposure during storage. Examine vinyl for cracks or mildew that may have developed during shipping, and inspect metal components for rust, corrosion, or peeling protective coatings – especially on decorative iron. Don’t forget to check hardware like nails, screws, and brackets, as defective pieces can undermine the fence’s stability.
Proper preparation also includes applying protective treatments tailored to the material. For wood, use waterproof sealants to guard against moisture and sun damage, even if the wood has been pressure-treated. In hot climates, lighter-colored stains can help reflect sunlight and reduce heat absorption. For vinyl, UV-resistant coatings can prevent fading and brittleness. Choose materials that suit your local conditions, such as moisture-resistant options for humid regions or rust-resistant metals for areas with frequent rain.
Weather Conditions to Avoid
Certain weather conditions can make fence installation both unsafe and ineffective. High winds can knock over unsecured panels and posts before the concrete sets. Intense heat can warp vinyl during handling and make metal parts dangerously hot. Heavy rain disrupts concrete curing and shifts soil, weakening the foundation. High humidity accelerates mold growth on untreated wood and promotes corrosion in metal components. Freezing temperatures create tight spacing and joint stress due to material contraction, which can lead to issues when temperatures rise. To ensure a smooth installation, aim for mild and dry weather.
For expert advice on managing these challenges, reach out to Tend Fencing, a trusted provider of residential and commercial fence installations in Plano, TX, and nearby areas.
How to Prevent Installation Hazards
To minimize the risks tied to fence installation, follow these practical prevention steps. A well-thought-out plan keeps potential hazards at bay.
Start by calling 811 before any digging begins. This allows utility operators to mark underground lines with color-coded indicators. Once marked, maintain an 18- to 24-inch tolerance zone around these lines, and use manual or vacuum excavation in these areas to avoid damage. Keep in mind that 811 only covers public utilities – private lines will need a separate locator service. These steps help mitigate risks related to utilities, structural issues, and weather.
A clear, level site is crucial for safe installation. Clear away rocks, roots, and debris, and double-check property boundaries before starting. When digging post holes, follow the one-third rule: the hole should be at least one-third the length of the post and extend below the frost line in colder climates. Use concrete footings to ensure stability.
Personal safety is equally important. Always wear gloves, eye protection, and sturdy boots when working with sharp materials or power tools. Clean up the site daily to remove debris that could cause injuries, and if you’re working above six feet, use appropriate fall protection equipment. Beyond personal safety, inspect all materials for damage or defects before use, and treat them as needed to extend their durability.
Lastly, avoid installation during extreme weather conditions like heavy rain, high winds, freezing temperatures, or extreme heat.
Hazard Prevention Reference Table
| Hazard | Risk Level | Recommended Prevention Methods |
|---|---|---|
| Underground Utility Strike | High | Call 811 before digging; maintain an 18–24″ tolerance zone; use manual or vacuum excavation near markings. |
| Shallow Post Holes | Medium | Dig holes to one-third the post’s length; ensure depth extends below frost line; use concrete footings. |
| Cuts from Sharp Materials | Medium | Wear gloves, eye protection, and boots; inspect tools; clean up debris daily. |
| Poor Site Preparation | Low/Medium | Level the ground and clear obstacles before starting installation. |
| Defective Materials | Low | Inspect materials for rot, warping, rust, or cracks; apply protective treatments as needed. |
| Weather Problems | Low | Avoid working in heavy rain, high winds, extreme heat, or freezing temperatures. |
Conclusion
Installing a fence comes with its share of risks, but most issues can be avoided with proper preparation and attention to detail. As highlighted by industry experts:
Errors made during site assessment – from missed utility lines to boundary misidentification – are among the most cited causes of permit denial, neighbor disputes, and post-installation removal orders
(Fence Installation Authority).
One of the most critical steps is confirming utility locations to prevent costly fines, structural problems, or even dangerous accidents. Additionally, ensuring property boundaries are accurately marked, consulting local zoning regulations, and setting posts to at least one-third of their total length are essential for both compliance and durability.
Safety on-site is just as important. Wearing gloves, sturdy boots, and eye protection reduces the risk of injury, while keeping the work area organized prevents unnecessary accidents. Weather is another factor to consider – installing a fence during heavy rain, strong winds, or freezing conditions can compromise both worker safety and the fence’s long-term stability.
Another key decision is whether to tackle the project yourself or hire professionals. For complex projects, like those on uneven or waterlogged ground, professional installers bring the expertise needed to handle permits, follow safety protocols, and ensure proper post installation. Most residential fences can be installed by professionals in one to five days, with strict adherence to safety measures like temporary fencing and fall protection for elevated work. Professionals also conduct thorough material inspections and account for weather conditions to deliver a long-lasting result. For residents of Plano, TX, Tend Fencing (https://tendfencing.com) offers reliable services to turn difficult installations into safe, durable fences.
Whether you go the DIY route or hire experts, thorough planning is the foundation of success. A well-prepared site, careful material checks, and strict adherence to local rules can turn what might seem like a risky project into a fence that lasts for years.
FAQs
Does 811 mark private utility lines too?
Before starting any digging or fence installation, it’s essential to contact 811. This service can mark not only public utility lines but also private ones, helping to prevent accidental damage. Taking this step ensures underground utilities are properly identified and marked, keeping your project safe and avoiding costly mistakes.
How do I find my local frost line for post depth?
To figure out the frost line depth in your area for setting posts, refer to local building codes or regional guidelines. Frost line depths in the U.S. can range dramatically – from 0 inches in places like Florida to over 60 inches in northern states. It’s crucial to set posts below this depth to avoid frost heave, which helps maintain the fence’s stability and longevity.
When should I hire a pro instead of DIY?
When your fencing project requires intricate planning, accurate measurements, or adherence to local regulations, it’s smart to bring in a professional fence contractor. These experts can evaluate factors like slopes, soil conditions, and drainage to ensure the fence is correctly aligned and to sidestep expensive errors.
A pro is especially helpful when the fence impacts safety, privacy, or your property’s value. Their experience ensures a safe and efficient installation process. If you’re tackling a project that demands detailed planning or want to avoid common DIY pitfalls, hiring a professional is the way to go.