Cleaning your fence without wasting water is simpler than you think. The key is preparation, using targeted cleaning methods, and eco-friendly solutions. Here’s how you can do it:
- Prepare the fence: Clear dirt and debris with a broom or leaf blower to reduce water usage later. Test your wood’s sealer by sprinkling water – if it absorbs, the fence needs cleaning and resealing.
- Choose the right method: Use low-pressure water for wood (600–1,500 PSI depending on the type) and mild cleaning solutions like oxygen bleach or vinegar for different materials. Avoid chlorine bleach as it damages wood and plants.
- Eco-friendly cleaners: Mix vinegar, dish soap, and warm water for a safe, effective cleaning solution. Protect nearby plants with tarps and rinse minimally.
- Maintain regularly: Perform water bead tests annually and reseal residential wood fences every 1–3 years to prevent heavy buildup and prolong their lifespan.
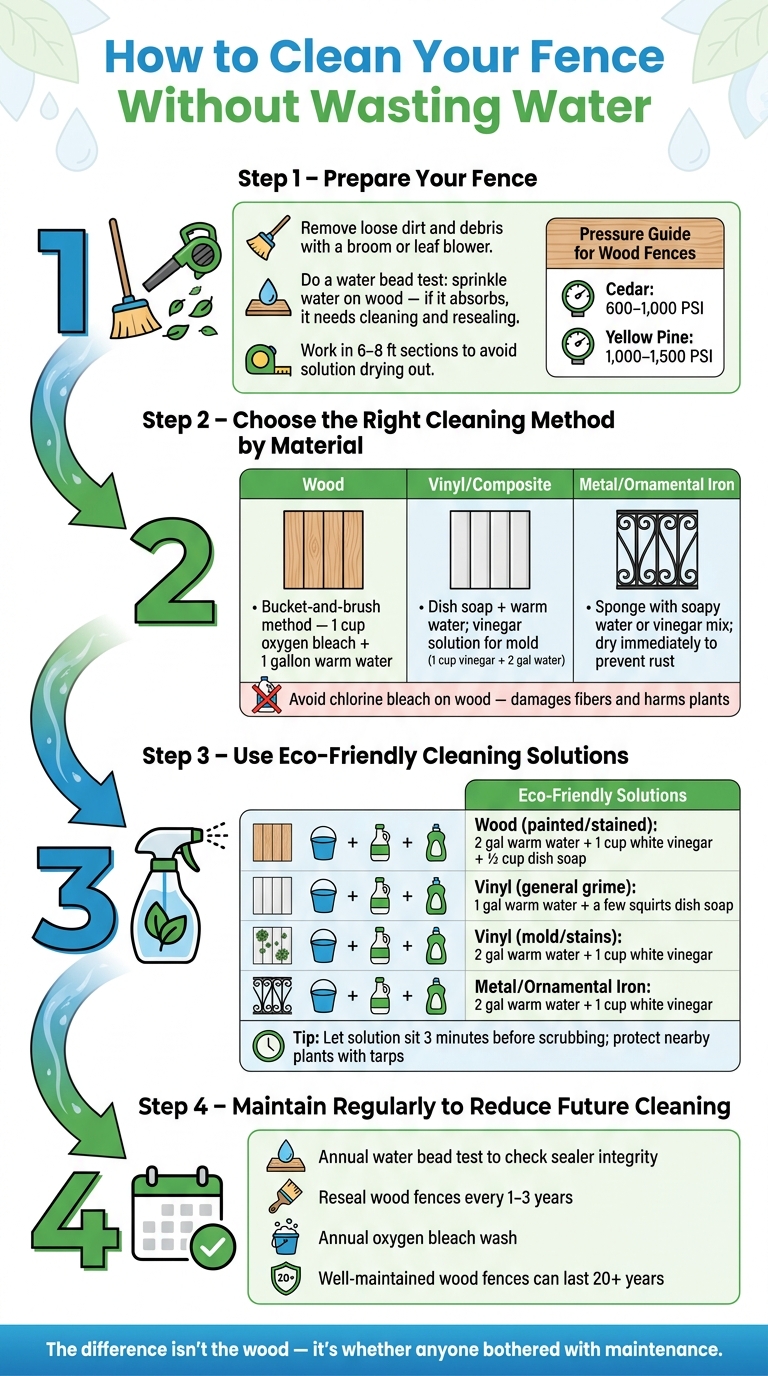
How to Clean Your Fence Without Wasting Water: 4-Step Guide
How to Wash Wood Fence WITHOUT a Pressure Washer (2 Methods) | Backyardscape

sbb-itb-d1d0a96
Step 1: Preparing Your Fence for Cleaning
Getting your fence ready is the key to cutting down on water use. The more dirt and debris you clear away beforehand, the less rinsing you’ll need later.
Know Your Fence Material
Different fence materials respond differently to water and cleaning products. For instance, wood fences – especially softwoods like cedar and pine – are more delicate. A quick test to check your wood fence’s protective barrier is to splash a little water on it. If the water beads up, the sealer is still doing its job. If it soaks in, the fence likely needs cleaning and resealing after the process.
"In general, when water soaks into the wood rather than beading up, it’s time to re-stain or reseal your fence." – Best Pick Reports
Vinyl and composite fences are easier to maintain but can still develop algae and mildew in humid areas. Ornamental iron fences, on the other hand, are prone to rust if water lingers on them for too long, so it’s best to use low-moisture cleaning methods.
Here’s a quick reference for safe pressure levels when cleaning wood fences:
| Wood Type | Main Concerns | Max Safe Pressure |
|---|---|---|
| Cedar | Furring, splintering | 600–1,000 PSI |
| Yellow Pine | Mold, mildew | 1,000–1,500 PSI |
Once you’ve assessed your fence material, start with a dry cleaning to further minimize water use.
Dry Cleaning Before You Add Water
Before using water, give your fence a dry clean. Use a stiff-bristle broom or a leaf blower to remove loose debris like dirt and leaves. For tougher spots, such as dried mud or bird droppings, a plastic scraper works well. This step not only reduces the amount of water needed later but also helps you spot problem areas, like mold or algae. Look for dark, slimy patches, especially in shaded sections, as these will need extra attention during the cleaning process.
Work in Sections
Tackling the entire fence at once can lead to wasted water. Instead, break it into smaller sections – about 6 to 8 feet at a time. Finish cleaning one section completely before moving to the next. This prevents the cleaning solution from drying on the surface, which would require reapplication and more water. By working methodically, you’ll ensure every section is cleaned thoroughly without unnecessary waste.
"The quickest way to do [shadowbox fences] is go down a section at a time shooting at about a 45 deg angle… then turn around and come back doing the same the opposite way." – Racer, Wood Restoration Expert
Step 2: Low-Water Cleaning Methods by Fence Material
Once your fence is prepped and dry-cleaned, it’s time to bring in water – but only as much as necessary. Each fence material requires a specific cleaning approach to ensure thoroughness while conserving water.
How to Clean Wood Fences
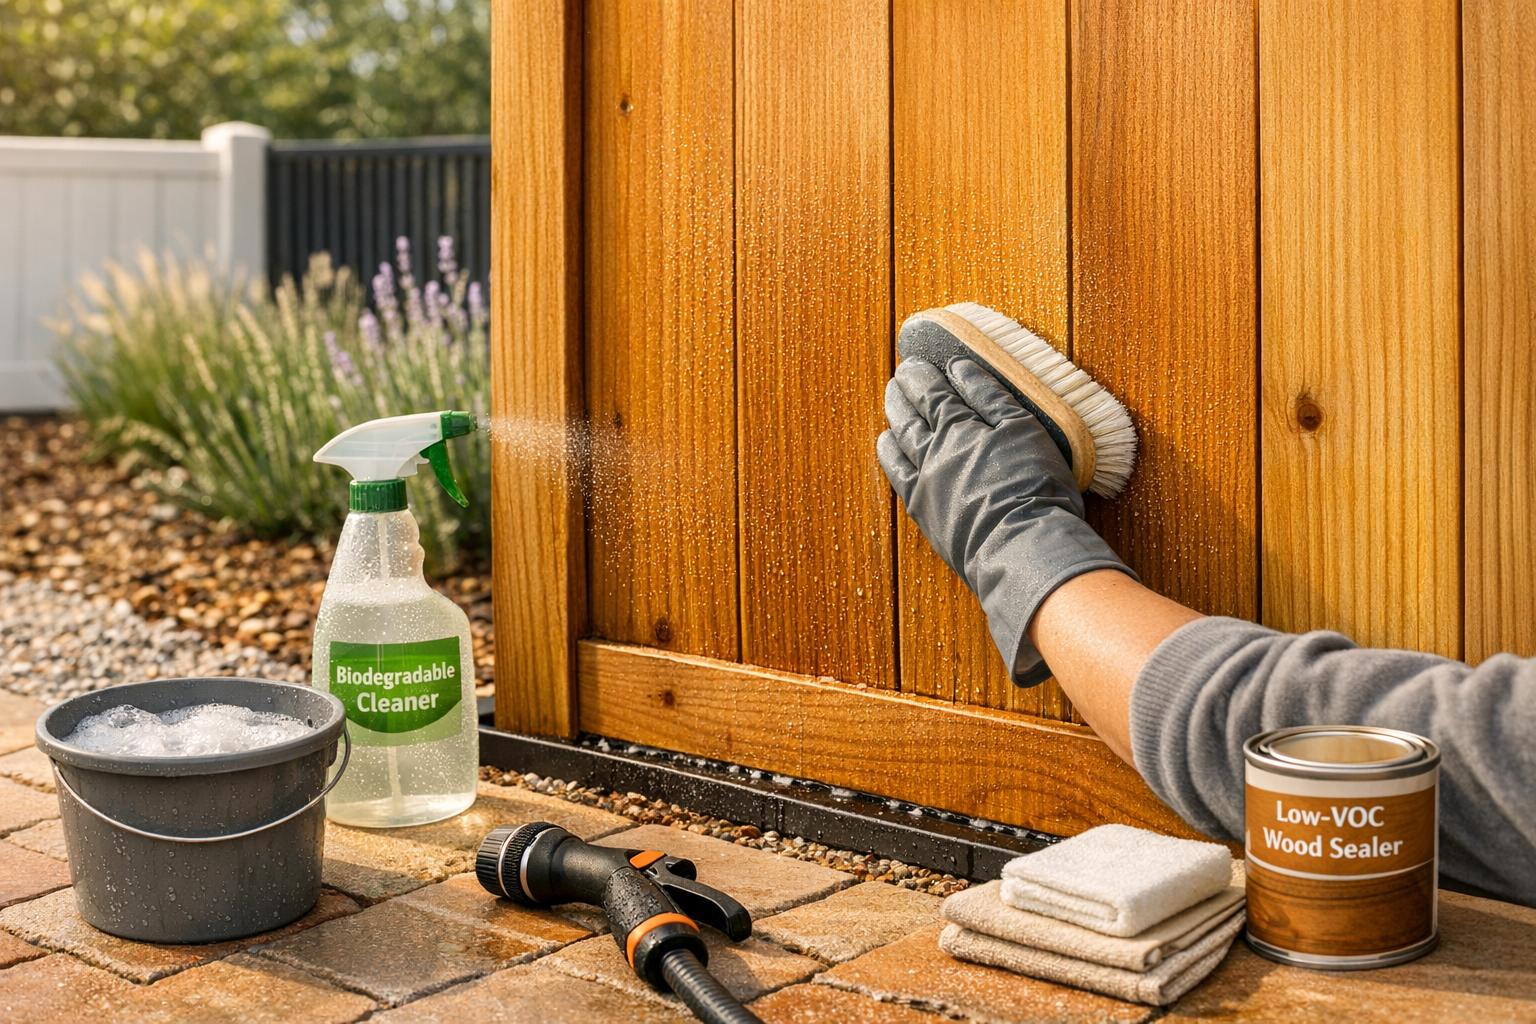
For wood fences, the bucket-and-brush method is your best bet for cleaning while keeping water usage low. Mix 1 cup of oxygen bleach with 1 gallon of warm water and apply it using a pump sprayer. Allow the solution to sit for a bit – it helps lift mold and grime – then scrub gently with a soft-bristle brush. This method effectively removes buildup without the need for heavy rinsing.
"Never use chlorine bleach on wood. It kills surface mold but damages wood fibers, strips natural color, and can kill nearby plants." – Fence Advisors
Once cleaned, let the wood dry for about 24–48 hours before applying any stain or sealer.
How to Clean Vinyl and Composite Fences
Vinyl and composite fences can be cleaned effectively with a mild approach. Start with a mix of non-abrasive dish soap and warm water, applied using a soft sponge or microfiber cloth. For mold or mildew, combine 1 cup of white vinegar with 2 gallons of warm water. Clean small sections at a time, working from top to bottom. Scrub the area, then rinse it lightly with a garden hose, using short, controlled bursts instead of a continuous stream.
For tougher spots, like dried paint or sap, a cloth dampened with rubbing alcohol can help remove them without needing additional water.
"Vinyl fences are long-lasting and low maintenance, but they do get dirty. Cleaning your fence regularly isn’t just about making it look nice. It also makes it last longer by preventing buildup of mold and mildew." – Valerie Albarda
How to Clean Ornamental Iron and Metal Fences
When cleaning metal fences, it’s essential to avoid excessive water to prevent rust. Instead, use a sponge or cloth dipped in a bucket of warm, soapy water or a mix of 1 cup vinegar and 2 gallons of warm water. Wipe down each section directly, focusing on one area at a time.
For intricate details – like scrolls or decorative joints – use a small stiff-bristle brush to reach into crevices. If rinsing is absolutely necessary, use a narrow spray nozzle for a quick, targeted pass. Be sure to dry the metal immediately with a clean cloth to stop rust from forming.
Step 3: Eco-Friendly Cleaning Solutions
Cleaning your fence doesn’t have to harm the environment. With simple, household ingredients, you can create effective, eco-friendly cleaning solutions that get the job done while being gentle on nature. Let’s dive into some recipes and tips to make your fence sparkle.
DIY and Biodegradable Cleaners
White vinegar and liquid dish soap are a powerful duo for fence cleaning. White vinegar acts as a natural fungicide, tackling mold and mildew, while dish soap cuts through dirt and grime. Together, they create a versatile and environmentally friendly cleaning solution.
Here’s a handy table with recipes tailored to different fence materials:
| Fence Material | Eco-Friendly Recipe | Best For |
|---|---|---|
| Wood (painted/stained) | 2 gal warm water + 1 cup white vinegar + 1/2 cup dish soap | Mold, mildew, dirt, debris |
| Vinyl (general grime) | 1 gal warm water + a few squirts of dish soap | Surface dirt, animal droppings |
| Vinyl (mold/stains) | 2 gal warm water + 1 cup white vinegar | Grass stains, mold, mildew |
| Metal/Ornamental Iron | 2 gal warm water + 1 cup white vinegar | Grime, light oxidation |
"The white vinegar will kill the mold and mildew, and soap will clean the dirt and debris off the fence." – Angela LaFollette
For best results, let the solution sit on the fence for about 3 minutes before scrubbing. This short dwell time helps loosen grime, making it easier to clean while reducing the need for excessive scrubbing or rinsing. Use a soft-bristle brush or sponge, applying the solution in a circular motion and working from top to bottom.
Now, let’s talk about how to protect your plants and soil during the cleaning process.
Protecting Plants and Soil During Cleaning
Eco-friendly cleaning is not just about the ingredients – it’s also about minimizing the impact on your surroundings. Start by moving any potted plants and outdoor furniture away from the fence. For garden beds or landscaping near the cleaning area, use a tarp to catch any drips or runoff from your solution.
Instead of spraying the cleaner broadly, apply it with a sponge or brush to control where it goes. When it’s time to rinse, use a garden hose with a spray nozzle, focusing only on the section you just cleaned. To ensure your plants and soil stay safe, give the surrounding area a quick rinse with plain water to dilute any leftover cleaner.
Step 4: Long-Term Habits to Cut Down on Cleaning
Once you’ve mastered low-water cleaning methods, the next step is adopting habits that keep your fence looking great for years to come. These habits not only help reduce water use but also extend the life of your fence. The secret? Regular maintenance routines that prevent dirt buildup in the first place.
Simple Routine Maintenance
A quick way to stay ahead of the game is by regularly checking your wood’s protective coating. You can use a simple water bead test – just sprinkle some water on the surface. If the water doesn’t bead up, it’s time to reseal. Staying on top of this can save you from needing more intensive cleaning later.
Professional Maintenance for Wood Fences
Sometimes, a little professional help goes a long way. Professional cleaning and sealing services can provide deeper care, protecting your fence and cutting down on future cleaning efforts. Sealing is especially important because it prevents moisture from seeping into the wood, which can lead to decay and unsightly stains.
"While your fence can survive without a stain or sealer, keep in mind that skipping this step leaves the wood unprotected, which will result in the need for more frequent cleanings and a shorter lifespan for your fence." – Best Pick Reports
With regular cleaning and sealing, your wood fence could last over 20 years. And if you’re starting fresh, don’t underestimate the importance of a quality installation. For example, Tend Fencing specializes in building wood fences in Plano, TX, and nearby North Texas areas with durability in mind. A well-built fence makes long-term care easier and more water-efficient.
Conclusion: Keep Your Fence Clean Without Wasting Water
Cleaning your fence effectively while conserving water comes down to four key practices: preparation, using methods tailored to your fence material, opting for eco-friendly cleaners, and maintaining a regular care routine. These steps work together to preserve your fence and minimize water use.
Routine maintenance beats major cleanups any day. By committing to simple habits like an annual oxygen bleach wash, seasonal water bead tests, and resealing every 1–3 years, you can avoid the need for heavy-duty, water-intensive cleaning. As Fence Advisors wisely state:
"The difference isn’t the wood – it’s whether anyone bothered with maintenance."
This principle applies across all fence types. Something as quick as a water bead test can save you from expensive and time-consuming repairs. If water absorbs into the wood within 10 seconds, it’s time to reseal – don’t wait for bigger problems to arise.
FAQs
How can I tell if my fence needs cleaning or resealing?
To keep your fence in good shape, look for visible signs like dirt, mold, mildew, or stains. If the wood appears faded, cracked, or weathered, it might be time to reseal it to avoid further damage. Regularly inspecting the fence after cleaning can help you decide if resealing is needed to preserve its durability and appearance.
What’s the safest way to remove algae or mildew without a pressure washer?
The best way to clean algae or mildew off a fence without using a pressure washer is by opting for eco-friendly cleaning solutions and gentle techniques. Start by mixing plant-based surfactants with citric or lactic acid. Apply this mixture at room temperature, ensuring it effectively breaks down the buildup. Then, rinse the fence using low-pressure water – keeping it under 1,200 PSI to avoid causing any harm.
If you’re dealing with a wooden fence, use a soft brush along with the eco-friendly cleaner. Scrub gently to remove the algae or mildew while preserving the wood and minimizing any environmental impact.
How do I protect nearby plants while cleaning my fence?
To keep your plants safe while cleaning your fence, opt for eco-friendly cleaning solutions and use as little water as possible. This reduces the risk of harming your garden. For added protection, cover nearby plants with plastic sheeting or a tarp. This simple step shields them from overspray and runoff, keeping cleaning agents and excess water away from your vegetation.