
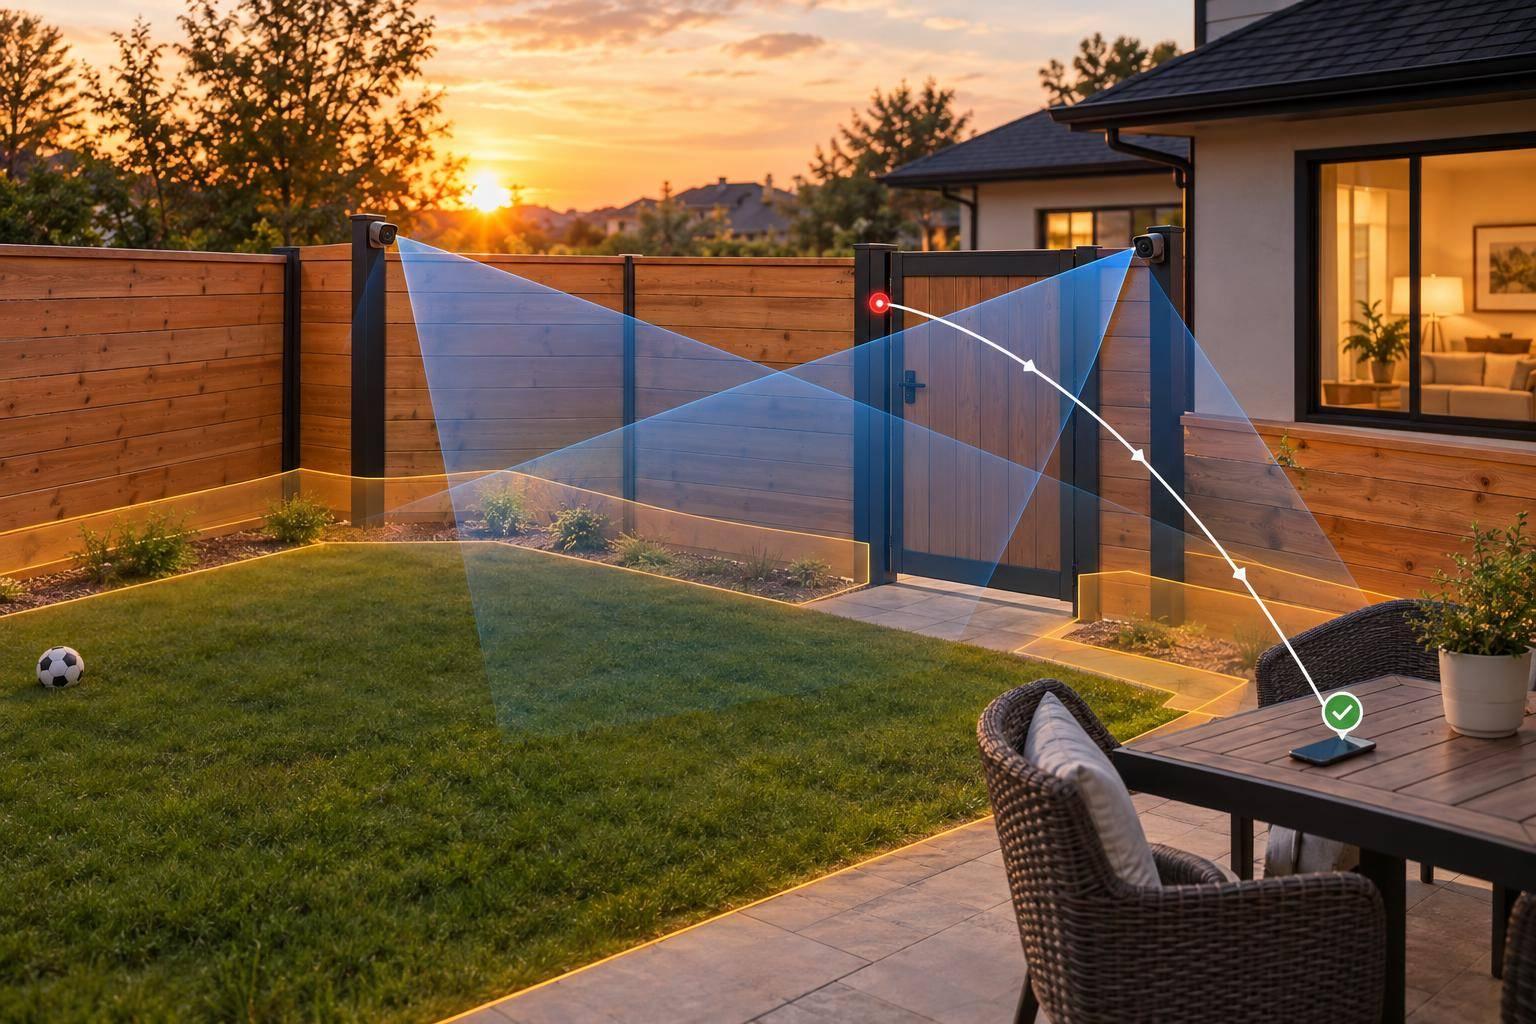
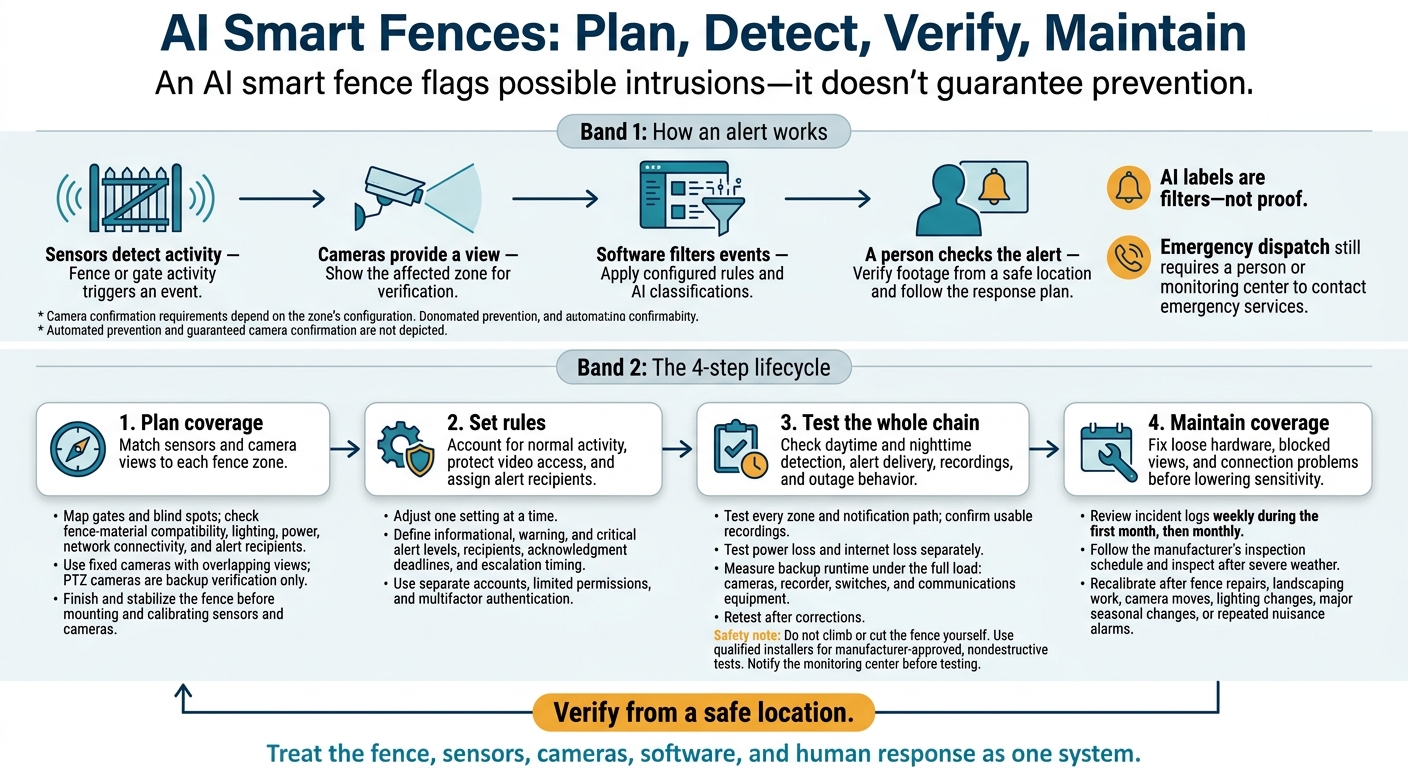
An AI smart fence flags possible intrusions – it doesn’t guarantee prevention. I look at it as a chain: sensors detect activity, cameras provide a view, software filters events, and a person checks the alert.
Before buying, I’d map commercial gates and blind spots, check power and internet needs, and decide who responds. My checklist covers 4 steps:
- Plan coverage: Match sensors and camera views to each fence zone.
- Set rules: Account for normal activity, protect video access, and assign alert recipients.
- Test the whole chain: Check daytime and nighttime detection, alert delivery, recordings, and outage behavior.
- Maintain coverage: Fix loose hardware, blocked views, and connection problems before lowering sensitivity.
The rule I’d keep front and center: <u>verify from a safe location</u>. AI labels are filters, not proof, and an alert is only useful if someone receives it and knows what to do.
AI Smart Fences: Plan, Detect, Verify, Maintain
AI Fence-Line Intrusion Detection Explained
sbb-itb-d1d0a96
Assess Your Property Before Installation
Start with a perimeter sketch. Record perimeter length in feet, fence material, height, post spacing, gates, corners, buildings, and driveways. Mark slopes, vegetation, nearby roads, lighting, and weather exposure.
Walk the property in daylight and after dark to spot hidden approaches and camera blind spots. Photograph damage and note where someone could climb, cut, lift, force, or drive through the barrier.
Choose Sensors and Cameras for Each Zone
Divide the property into zones using your sketch. Give each zone a sensor, camera view, lighting, power route, network connection, and alert recipient. Before buying equipment, check that the sensors work with your fence material – wood, ornamental iron, or chain-link. Where needed, add latch monitoring, impact sensing, or rules that compare gate activity with authorized access.
Plan fixed cameras with overlapping views for continuous coverage. Check nighttime lighting and sightlines around slopes, trees, buildings, and parked vehicles. Use pan-tilt-zoom (PTZ) cameras only for backup verification: they may be pointed away from the zone when an event happens.
Check Site, Power, and Network Needs
With the zones mapped out, check what each one needs for power and connectivity. Before ordering, confirm that the sensors, cameras, gate controls, and alert software work together.
Ask whether analytics run locally or in the cloud, what keeps working without internet, and whether remote alerts still arrive. Get outage details in writing.
Homeowner and Business Installation Requirements
| Requirement | Homeowner considerations | Business considerations |
|---|---|---|
| Site plans and boundaries | Mark lot lines, fence routes, driveways, buildings, and easements | Include surveyed boundaries, leased areas, and delivery routes |
| Fence and gates | Record material, height, length, repairs, latches, and automatic-gate features | Document perimeter segments, vehicle and pedestrian gates, loading areas, and emergency exits |
| Vulnerable areas | Prioritize side yards, pools, sheds, detached garages, and dark approaches | Prioritize loading docks, yards, rooftops, parking areas, and restricted compounds |
| Electrical service | Check outdoor outlets, circuit capacity, and surge protection | Plan dedicated circuits, grounding, and service access |
| Weather-rated equipment | Choose equipment suited to local rain, heat, cold, dust, and insects | Specify suitable enclosures, corrosion resistance, and lightning protection |
| Network routes and bandwidth | Test Wi-Fi or plan Ethernet, cellular, or local recording | Plan cabling, bandwidth, network segmentation, and redundancy |
| Mounts and lighting | Check that posts or walls are stable and avoid glare into neighboring properties | Engineer mounts for wind and vibration; provide uniform lighting and service access |
| Backup power | Plan backup for sensors, cameras, router, and recorder | Define backup duration, generator integration, and outage alarms |
| Permits, privacy, and utilities | Check HOA approval, local permits, and recording boundaries | Coordinate permits, employee or tenant notices, and privacy rules |
Before digging for posts or conduit, contact 811 and follow local utility-locating requirements.
Coordinate Fence and Security Installation
Settle the fence design and security layout before either contractor starts. Confirm mounting locations for sensor cables, gate contacts, camera brackets, conduit, junction boxes, power supplies, and network cables. Agree on who supplies and warrants each item.
Loose panels, unstable posts, and misaligned gates can change vibration patterns, trigger repeated alarms, or leave gaps that cameras can’t verify. Finish and stabilize the fence before mounting and calibrating the sensors and cameras to the completed structure.
Tend Fencing provides residential and commercial fence installation in Plano, TX, and surrounding areas. Request an itemized quote that separates fence work from detection hardware, installation, software, storage, and recurring fees.
Set Detection Rules and Alerts
Once the hardware is installed, tune the system to ignore routine activity and flag real threats.
Adjust Sensitivity and Zone Settings
Give each rule a clear name, such as “front driveway” or “restricted rear gate.” Record its protected boundary, expected activity, and protected hours. Schedule rules around occupancy and access windows rather than disabling whole zones.
Start with the manufacturer’s baseline sensitivity, then adjust one setting at a time. Account for fence material, mounting stability, wind, rain, vegetation, and routine traffic. Where supported, configure crossing tripwires, sidewalk exclusion zones, restricted areas, travel direction, and loitering thresholds. Give temporary access exceptions an expiration time.
For each zone, document whether the sensor alone triggers an alert or camera confirmation is required. Camera confirmation can cut nuisance alerts, but it may also suppress a warning if the view is blocked. Treat person, vehicle, and animal classifications as filters – not proof. Keep important events available for human review.
Choose Alert Recipients and Response Steps
With detection rules in place, decide who receives each alert and what they should do next.
Set informational, warning, and critical alert levels. For each level, define recipients, notification channels, acknowledgment deadlines, and escalation timing. Include the zone name, timestamp, event type, and a short clip in each alert.
Write clear, safe response steps: verify footage, avoid confrontation, secure occupied areas when safe, and contact the appropriate help. Emergency dispatch still requires a person or monitoring center to contact emergency services.
Protect Accounts and Video Access
Once alerts are configured, control who can view and export footage.
Choose the shortest video retention period that meets investigation and recordkeeping needs. Limit camera views to necessary areas, and apply privacy masks where supported.
Create separate accounts for administrators, managers, and installers. Limit their permissions and set temporary access to expire. Enable multifactor authentication, use a different password for each account, keep software updated, and allow only approved secure remote connections.
Document where footage is stored, who can view or export it, and whether it stays accessible during an internet outage.
Test the System Before Use
After installation and rule setup, run a full acceptance test – not just an online check. Check the entire chain: sensor event, camera view, AI label, and alert. Set pass/fail criteria for every zone, gate sensor, camera view, detection rule, notification channel, recording function, and backup device. Log the device ID, test date, trigger, expected result, actual result, and corrective action.
Test Entry Signals and Everyday Activity
Have qualified installers perform manufacturer-approved, nondestructive tests for climb, cut, and gate events. Do not climb or cut the fence yourself. Test gate opening, closing, held-open alarms, and repeated cycles without bypassing safety devices. Test one device at a time. Confirm that each alert names the correct zone and opens usable video wherever coverage exists.
Walk normal pedestrian routes, drive through authorized entrances, and check routine delivery and landscaping activity for nuisance alerts before handover. Repeat movement tests from different directions, both in daylight and after dark. Look for glare, shadows, blocked views, and vegetation touching the fence. Record any weather or wildlife conditions you couldn’t test, and schedule follow-up checks.
Test Alerts and Outage Behavior
Check every alert path, local siren or strobe, and monitoring-center connection. Notify the monitoring center before testing to avoid an accidental dispatch. Confirm delivery to each recipient, measure the time from trigger to alert, and test acknowledgment and escalation under daytime and after-hours settings. Make sure event, camera, and gate-log timestamps align. Search, play back, and export each test recording to confirm it provides usable evidence. Check pre-event footage where configured, along with the oldest retained recording.
Have the installer test power loss and internet loss separately, including any backup communication path. Measure backup runtime under the full load: cameras, recorder, switches, and communications equipment – not just the controller. Document which functions stop. Then restore service and check reconnection, recording continuity, clock accuracy, and whether trouble alerts clear. Keep failed or untested items open, with a person assigned and a correction date. Document open issues before approving handover. Flag false alerts, blind spots, or delays for the troubleshooting step that follows.
Troubleshoot and Maintain Detection
Use your test baseline to spot changes in live performance. Keep the same log structure so you can compare expected and actual behavior at each step: sensor event, camera view, AI label, and alert delivery.
Review incident logs weekly during the first month, then monthly. Compare the zone, device, time, weather, alert type, video result, and network status against your test records. Group recurring problems by location and conditions to tell hardware faults apart from weather, nearby activity, or network issues.
Fix False Alerts, Blind Spots, and Delays
Fix hardware and site conditions before lowering sensitivity. Check for loose sensor mounts, damaged fence sections, rattling gates, and vegetation touching the fence. Review unwanted camera alerts for animals, headlights, shadows, or activity outside the boundary. Correct physical problems first. Adjust zones or filters only if the issue remains – broad sensitivity reductions can hide real entry attempts.
Start by finding where the failure occurs: the sensor, camera, AI, or notification delivery.
For poor video, check lens cleanliness, camera alignment, mounting vibration, obstructions, lighting, and zone mapping. Keep glare out of the lens. Confirm that detection zones cover gates without needlessly including public sidewalks.
For delayed alerts, trace each step: detection, recording, AI classification, processing, and notification. Check power, connectivity, mobile notification permissions, recipients, subscriptions, and recording access. Retest after each correction. Saved footage alone doesn’t prove the alert reached its recipient.
Inspect Equipment and Recalibrate Settings
When a problem repeats, reset the baseline before changing sensitivity again.
Follow the manufacturer’s inspection schedule for sensor mounts, wiring, gates, lenses, lighting, network connections, storage, and batteries. Inspect after severe weather, too. Wind can loosen hardware, while rain, dust, and ice can block views. Seasonal growth and changing sun angles can also affect detection.
During maintenance, check firmware versions and alert contacts. Install updates through authorized methods during a maintenance window, then verify that the system works.
Recalibrate after fence repairs, landscaping work, camera moves, lighting changes, major seasonal changes, or repeated nuisance alarms. Check hardware first, change one material setting at a time, and compare results with the previous baseline.
Record the date, person responsible, parts replaced, software version, settings changed, and test outcome. Refer repeated sensor failures, water intrusion, persistent blind spots, or unresolved delays to the installer or manufacturer.
Conclusion: Plan, Test, and Maintain Your System
After testing and troubleshooting, put a documented routine in place. Treat the fence, sensors, cameras, software, and human response as one system. Plan zones, set up alerts, test the full chain, and follow a written maintenance schedule. Use the manufacturer’s instructions and the property’s security risk assessment to guide inspections, testing, and maintenance.
Before handoff, gather the zone map, equipment inventory, access roles, user management instructions, alert and escalation plan, outage instructions, and maintenance calendar. Include warranty and support contacts, test results, and unresolved risks.
Show users how to operate the system: arm and disarm it, acknowledge alerts, review video, and operate the gate manually. Schedule a follow-up review after the system has run through normal weather and activity. Use that review to adjust sensitivity, camera views, and response procedures without reducing coverage.
For Plano-area projects, coordinate fence and gate work with Tend Fencing. Bring in qualified security professionals before installing posts, conduit, power runs, cameras, or sensor mounts.
FAQs
Can I add AI detection to my existing fence?
Yes. You can add AI detection, cameras, motion sensors, and alarms to your existing fence to monitor activity and deter unwanted entry. Metal and chain-link fences generally make mounting easier. Wood or vinyl fences may need extra mounting hardware or reinforcement.
Wireless or solar-powered devices can help you avoid complex electrical trenching. Before installation, check local building codes and zoning rules for camera placement, sight lines, and lighting.
What should I budget for installation and ongoing fees?
A basic AI-integrated smart fence with keypads, smart locks, cameras, and alarms typically costs $1,500–$3,500 to install. Commercial installations typically cost $7,500–$13,500.
Plan for regular professional inspections, rust control, and maintenance of motorized components to keep the system safe and working properly. When comparing quotes, ask for an itemized breakdown of labor, materials, and permit costs.
How can I measure my system’s detection accuracy?
Test sensors and integrated alarms monthly. At dusk, check that motion-activated lights and security cameras trigger correctly and clearly cover their assigned areas.
For gates, interrupt the photoelectric sensor beams and press the safety edges. Confirm that the gate stops or reverses immediately. Keep digital alert logs and audit trails to spot recurring issues and verify that the system responds consistently to triggers.