
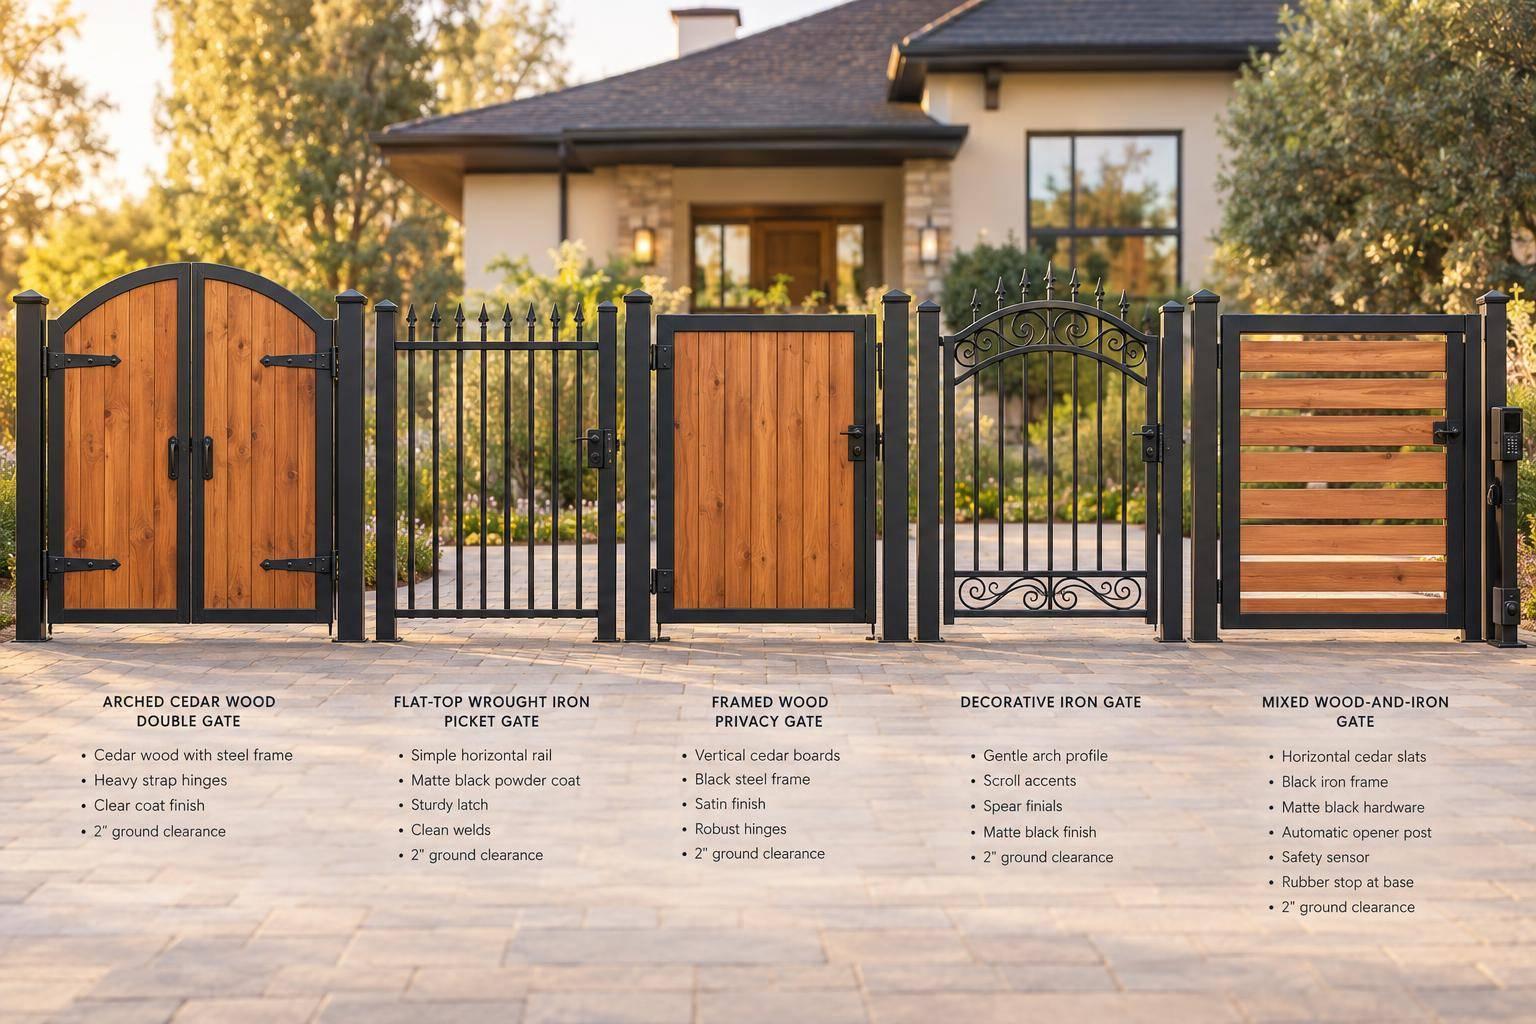
I’d choose a gate that matches your fence – and plan the opening before picking the details. Pedestrian gates are commonly 3–5 feet wide; driveway gates need vehicle clearance and room to swing or slide.
Here’s how I’d narrow the choices:
- Arched: A curved top for wood privacy gates or open iron entrances.
- Flat-top: A straight edge that follows the fence line.
- Framed wood: A wood frame with solid boards for privacy or spaced infill for views.
- Decorative iron: Open views with scrollwork, finials, or simple geometric patterns.
- Mixed-material: Wood infill inside a metal frame for wood texture with metal support.
My rule: match the look, then check the load. Posts, hinges, and bracing must support the gate’s weight and wind exposure. I’d also plan for wood sealing or metal rust protection, slope, drainage, and local rules before installation. If you’re ready to start, you can request a free quote for your project.
For automated driveway gates, <u>entry controls do not replace safety devices</u>. Plan the operator, entrapment protection, manual release, and separate pedestrian access together.
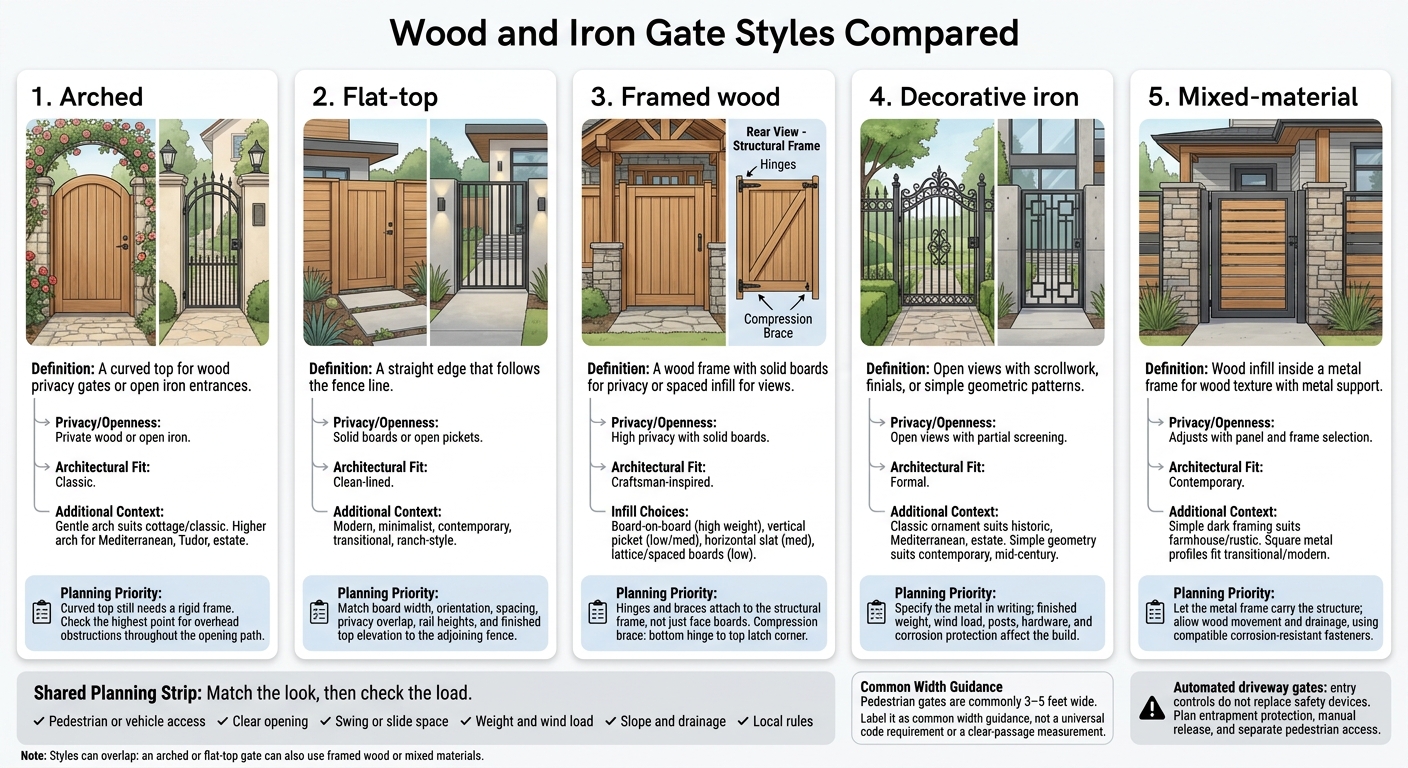
Wood and Iron Gate Styles Compared
Latest 70+ Wooden and Iron Gate Designs for Home | Modern Main Gate Ideas 2025#044 |#maingatedesign
sbb-itb-d1d0a96
Arched Gates
A gentle center arch suits cottage and classic entrances, while a higher arch works well with Mediterranean, Tudor, and estate-style homes. Paired driveway gates can form a single centered arch where they meet. In ornamental iron, an inverted arch dips toward the middle for a different look.
Choose a curve that echoes nearby windows, a portico, or masonry rather than introducing an unrelated shape. Then match the frame and clearance to the gate’s weight and opening path.
Solid Wood and Open Iron Designs
Solid wood arches screen patios and service areas, but they also catch more wind. Vertical boards make the curve easy to see. When shaping the top, seal the newly cut ends. Open iron arches leave landscaping visible, with curved rails, finials, spear tops, or scrollwork adding detail.
| Design | Privacy | Openness | Maintenance | Architectural fit |
|---|---|---|---|---|
| Solid wood gentle arch | High | Low | Seal or stain exposed wood; check for movement and moisture | Cottage, Craftsman, Tudor |
| Solid wood high arch | High | Low | Needs rigid framing and reliable bracing | Mediterranean, estate, Tudor |
| Open iron center arch | Low | High | Check finish, welds, hinges, and latch; touch up chips promptly | Classic, Mediterranean, estate |
| Open iron paired arch | Moderate to high, depending on infill | Moderate to high | Check the center seam and latch alignment | Formal driveways and symmetrical façades |
| Inverted-arch iron gate | Low to moderate | High | Decorative curves and scrollwork may need detailed cleaning | Contemporary, Gothic, or highly customized designs |
Arch Framing and Gate Clearance
A curved top still needs a rigid frame. Wood arches also need a diagonal compression brace running from the lower hinge corner toward the upper latch corner. Curved iron rails should be fabricated into a supported frame. Before fabrication, measure between posts at several heights. Uneven posts can leave inconsistent gaps.
Check the arch’s highest point for overhead obstructions throughout its opening path, and allow for grade changes beneath the gate. Where accessibility applies, verify at least 32 inches of clear passage with the gate open 90 degrees – not just the distance between posts. Set the bottom gap to account for the finished grade, drainage, and seasonal snow or mulch exposure.
For paired driveway gates, align both leaves so the curves meet at the center. Leave room for meeting hardware, a drop rod, and operator attachments. A sliding arch-top gate still needs suitable structural support and enough space beside the opening to slide clear. Cantilever hardware may need extra room beyond the gate’s opening width. If the curve feels too formal, flat-top gates offer a cleaner, simpler profile.
Flat-Top Gates
After the curve of an arched gate, a flat top gives the entrance a clean, level line. A flat-top gate has a straight upper edge that follows the adjoining fence’s top line. This simple shape suits modern, minimalist, and contemporary properties, as well as transitional and ranch-style homes.
Wood Boards and Simple Iron Layouts
Vertical boards give a flat-top gate a classic look, while horizontal slats draw attention to a modern fence’s long lines. Board-on-board panels add privacy; spaced wood pickets leave front-yard views open. At the gate edges, match the fence’s board width, orientation, spacing, and privacy overlap.
For iron gates, choose straight vertical bars, horizontal rails, square frames, or simple geometric patterns. Match rail heights and bar spacing to the adjoining fence to tie the entrance into the property. Keep the frame in proportion, too – a heavy frame can look out of place beside a light fence.
Fence Alignment and Opening Options
Even small differences in spacing or height stand out on a flat-top gate. Before fabrication, specify the finished top elevation, rail locations, and infill gaps. Check clearance at the top, middle, and bottom, allowing room for the hinges, latch, and bottom gap so the gate and fence line up cleanly.
Alignment also depends on support. Matching panels won’t stay lined up if the posts or hardware can’t carry the finished gate.
Choose the opening type before fabrication so the gate, posts, framing, and hardware work with the site plan. If the design needs more structure, framed wood gates are the next step.
Framed Wood Gates
A framed wood gate uses vertical stiles and horizontal rails to support the infill and give the gate its structure. Hinges and braces attach to this frame – not just the face boards. With the frame carrying the load, the next choice is how much privacy and weight the infill should add.
Wood Species and Infill Options
Cedar typically costs more, but it naturally resists decay, weighs relatively little, and holds its shape well. Pressure-treated pine usually costs less, but it can be heavier when new and may shrink or warp as it dries. Use compatible fasteners, and follow the lumber and coating instructions before finishing.
| Infill option | Appearance | Weight | Maintenance |
|---|---|---|---|
| Board-on-board | Solid, classic | High | More surfaces and overlaps to stain and inspect |
| Vertical picket | Classic, open | Low to medium | Individual pickets are easy to replace |
| Horizontal slat | Modern, linear | Medium | Check long boards for cupping; protect end grain |
| Lattice or spaced boards | Airy, decorative | Usually low | Clear debris from openings; inspect narrow joints |
Choose spacing based on the view you want to block, leaving room for seasonal swelling and shrinkage. Overlapping boards help hide shrinkage gaps, but they also add weight and wind resistance. Check local code before settling on spacing, especially for pool gates or other regulated access gates. Hardware and posts must support the infill’s weight and wind load.
Bracing, Hinges, and Support Posts
Build the frame square by making both diagonal measurements equal. Run a compression brace from the bottom hinge corner to the top latch corner, and secure it to the frame. Choose hinges rated for the finished gate’s weight, including wet wood, and use corrosion-resistant structural fasteners. Size hinge posts for the gate load and site conditions.
Keep pedestrian gates light enough to move easily, with clear space to swing. Paired driveway gates also need aligned leaves, a center stop, and drop bolts or an equivalent restraint. Wide privacy panels often need reinforcement. Check weight, clearance, slope, drainage, power, and safety requirements before adding sliding hardware or automation. Inspect the hardware and finish annually.
For less visual mass and more ornament, the next option is decorative iron gates.
Decorative Iron Gates
Open ornamental iron gates keep views clear, while closer pickets or panels provide partial screening. Specify the metal in writing: welded steel, aluminum, or cast details on a steel frame. That choice affects weight, corrosion protection, repairs, and the supports the gate needs.
Next, decide whether you want classic ornament or a cleaner, modern frame.
Classic Details and Modern Geometry
Scrollwork adds curves, while spear-tipped pickets and finials shape the top edge. Medallions give the eye a focal point; floral motifs and twisted bars add texture. For contemporary homes, simple rectangles, squares, and horizontal lines usually work better. Tie the gate to the adjoining fence by repeating its picket spacing, finish, and post caps.
| Design direction | Key details | Screening | Architectural fit | Maintenance focus |
|---|---|---|---|---|
| Classic ornamental | Scrolls, finials, twisted bars | Low to moderate | Historic, Mediterranean, estate | Decorative joints and recesses |
| Modern geometric | Rectangles, straight bars | Low to moderate | Contemporary, mid-century | Welds, edges, and fasteners |
| Dense decorative pattern | Close pickets, layered medallions | Moderate | Formal estates, visible entry drives | Hard-to-clean recessed areas |
Once you’ve settled on a pattern, size the gate for its loads and choose the finish.
Gate Weight, Finishes, and Access Controls
Have the fabricator account for finished weight, wind load, hardware, and how often the gate will open and close – not just the hinge rating. Heavy ironwork may need reinforced hinge plates, posts, and footings. Before fabrication, request shop drawings that show the ornament, weld locations, hinge points, stops, and finish specification.
For steel, ask about hot-dip galvanizing or a zinc-rich primer beneath the specified topcoat. Both powder coating and paint need proper surface prep; neither makes damaged metal rustproof. Inspect welds, recesses, cut edges, and fasteners at least once a year, and more often in wet or salty conditions. Remove loose coating and corrosion before priming and recoating, following the coating manufacturer’s instructions.
Keep ornament clear of guides, rollers, and stops. Match automatic operators to the gate’s weight, width, movement, and frequency of use. Keypads, remotes, and intercoms control entry, but they don’t replace safety devices. Have a qualified installer address UL 325 and ASTM F2200, monitored entrapment protection, manual release, and local requirements. Keep pedestrian access separate from automated vehicle gates. For an iron structure with wood texture, mixed-material gates combine both.
Mixed-Material Gates
Wood Panels and Iron Frames
Mixed-material gates pair the warmth of wood with the support of an iron frame in a single gate leaf. Options include wood panels inside an iron frame, iron rails with wood infill, or a solid wood lower panel topped by iron. Let the iron frame carry the structure, with wood serving as infill.
Match the materials to the house. Simple dark framing suits farmhouse and rustic homes, while square metal profiles fit transitional and modern homes. Heavier borders and ornament work well for estate-style gates. Repeat the wood tone of the siding or entry door, and match metal finishes to window frames or entry hardware.
Choose solid infill for privacy or spaced slats for visibility. Solid wood also adds wind load. Once you’ve settled on the look, plan connections that let the wood move without binding.
Material Connections and Gate Operation
Wood needs room to move without pressing against the frame. Specify compatible, corrosion-resistant fasteners, connections that allow movement, and drainage gaps. Individual boards should be replaceable without taking the gate apart.
One installation guide recommends at least a 1/2-inch gap between wood and metal to allow for seasonal swelling and reduce rubbing. Size hinges and dedicated gate posts to support the full assembly, including the wood infill.
Plan automation before fabrication so mounting plates, power, and controls fit the finished assembly. Once the frame, infill, and hardware are aligned, choose the gate style that fits the property and access plan.
Conclusion: Choose Your Style and Plan Access
Choose a gate style that balances privacy, visibility, and your home’s architecture.
| Gate style | Privacy/openness | Architectural fit |
|---|---|---|
| Arched | Private wood or open iron | Classic |
| Flat-top | Solid boards or open pickets | Clean-lined |
| Framed wood | High privacy with solid boards | Craftsman-inspired |
| Decorative iron | Open views with partial screening | Formal |
| Mixed-material | Adjusts with panel and frame selection | Contemporary |
Next, settle on the opening type and hardware. The style sets the look, but access needs determine the final build.
Confirm whether the gate serves pedestrians or vehicles before setting dimensions. Record the clear opening, height, and post spacing. Review those measurements with your installer, along with swing or slide clearance, slope, drainage, and turning space.
Choose manual operation for low-use entrances and automatic operation for frequent driveway access. Plan the operator, keypad, emergency release, and entrapment protection together. ASTM F2200 covers automated gate construction, while UL 325 addresses operator safety. Require monitored photo eyes or edge sensors, plus pinch-point protection.
Before fabrication, check current municipal building, gate, driveway-access, right-of-way, and HOA requirements with the city or permitting authority. In Plano, published guidance says sliding gates must sit inside the fence line and must not encroach on the public right-of-way. For pool access, check self-closing, self-latching, locking, outward-opening, and opening-size rules separately. CPSC guidance uses a 4-inch sphere test for barrier openings.
For a custom wood, ornamental iron, or automatic gate in Plano, TX, Tend Fencing can help with design, hardware, and installation planning.
FAQs
Which gate style works best on a sloped driveway?
Swing gates usually work best on flat ground. On uphill slopes, they may need special arms to maintain proper force. Sliding gates tend to handle uneven ground better, but their tracks must be nearly level. Slopes over 2% can affect performance and safety.
Accurate measurements and professional planning help gates move smoothly and stay aligned. For steeper grades, choose a gate system rated for both the slope and your local climate.
Can my existing fence posts support a new gate?
It depends on whether your posts can support the gate’s weight and movement, especially if you’re adding an automatic system. Gate posts should typically be one size larger than standard fence posts – 5 inches instead of 4 inches, for example – and set at least 6 inches deeper in concrete for stability. If your existing posts aren’t strong enough, you may need to reinforce or replace them.
Which gate styles offer privacy with less upkeep?
For privacy with less upkeep, consider vinyl or composite gates. Vinyl resists rot, warping, and pests. It usually needs just an occasional wash with soap and water. Composite gives you a wood-like look without the frequent staining or sealing that natural wood requires.
Prefer metal? Aluminum gates are lightweight and rust-resistant, and their finish takes less work to maintain than wrought iron or wood.