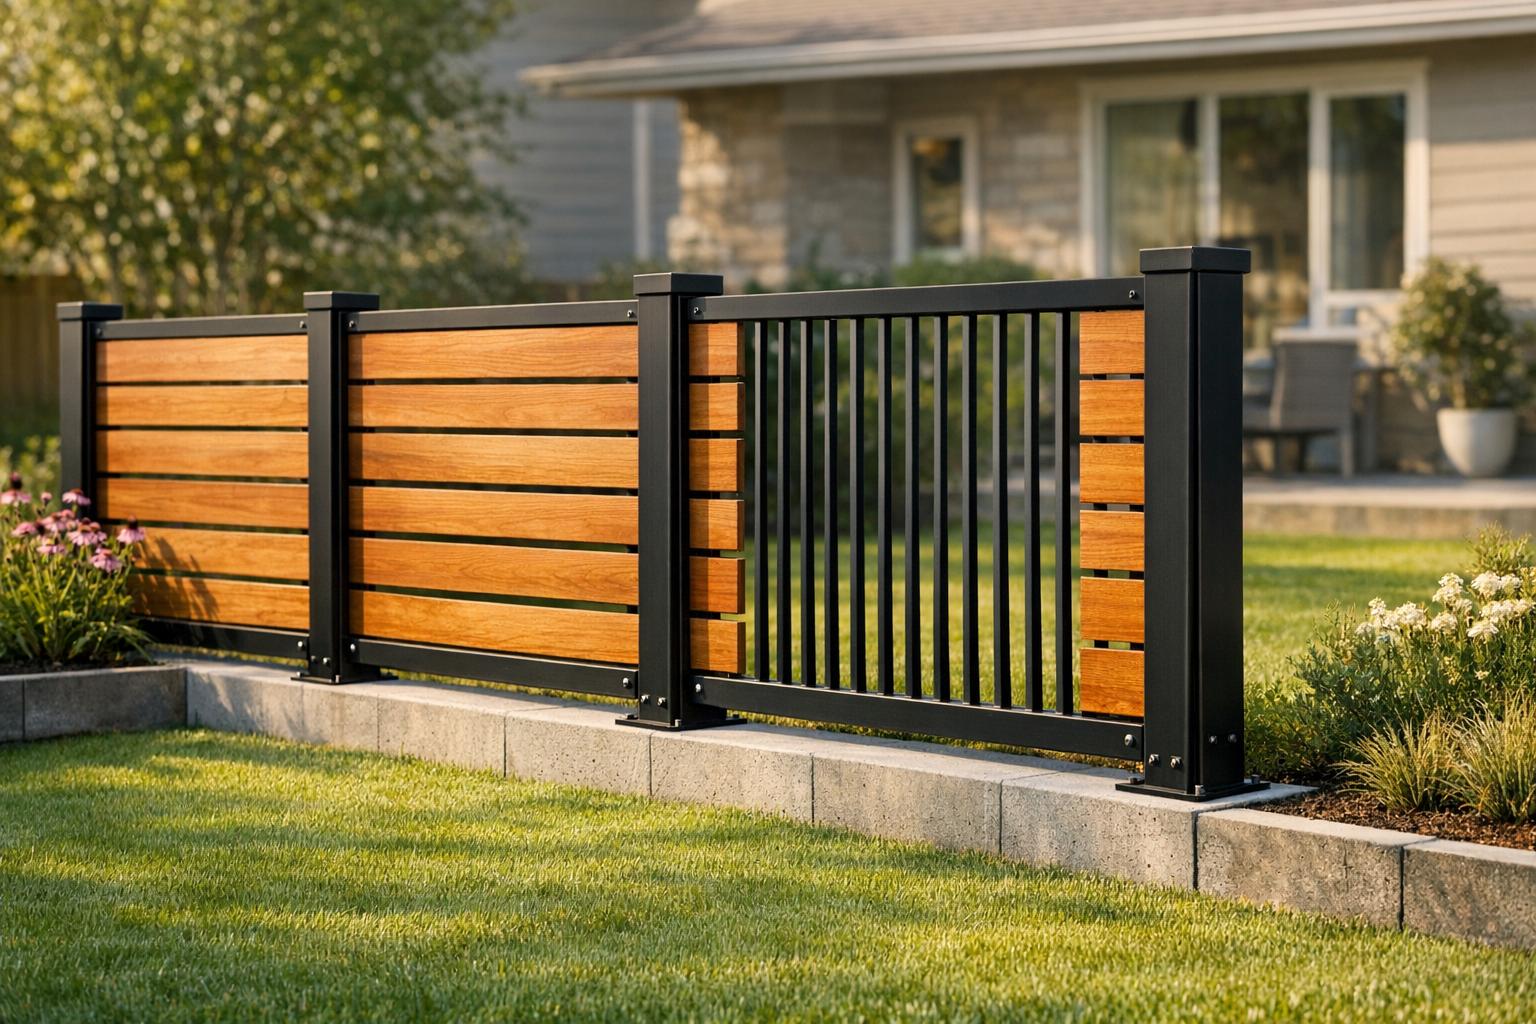
Combining wood and iron for garden fencing creates a durable, visually appealing solution that balances strength and natural beauty. Iron provides long-lasting structural support, while wood adds warmth and privacy. This pairing works well for both modern and classic designs, making it a versatile choice for various outdoor spaces.
Key Takeaways:
- Material Choices: Cedar and redwood resist rot and insects, while steel or aluminum ensures durability and stability.
- Design Options: Popular configurations include wood panels with iron posts, iron frames with wood infill, and decorative wood accents on iron fences.
- Installation Tips: Secure iron posts in concrete, use rust-resistant screws for wood panels, and apply weatherproof sealants to protect materials.
- Maintenance Needs: Re-stain wood every 2–3 years, inspect for rust on iron annually, and seal gaps to prevent moisture damage.
Combining these materials offers a practical and stylish fencing solution suitable for various climates and terrains. Whether you’re tackling a DIY project or hiring professionals, this guide provides the essential steps for planning, installation, and upkeep.
DIY Horizontal Fence Build | Modern Metal Panel & Pressure-Treated Wood Fence on a Budget!
sbb-itb-d1d0a96
Planning and Designing Your Fence
Careful planning before you buy can save you both time and money.
Assess Your Garden’s Needs
Start by identifying your main goal. Are you looking for privacy, security, or a decorative touch? For privacy, solid wood panels without gaps work best. If security is your focus, iron or steel frames are more effective. For a stylish look, consider ornamental ironwork paired with wood accents to add personality.
Next, evaluate the conditions of your site. Factors like sandy or loose soil, sloping terrain (which may require stepped panels and closer post spacing), or areas prone to strong winds will influence your design. These conditions might call for deeper footings and closer spacing between posts to ensure stability.
Once you’ve nailed down your fence’s purpose and addressed site challenges, it’s time to choose the right materials.
Choose Wood and Iron Materials
Pick materials that align with your climate and your willingness to handle maintenance. Cedar and redwood are excellent wood options because they naturally resist rot and insects without needing heavy chemical treatments. Pressure-treated pine is a more budget-friendly choice upfront, but it requires regular sealing to maintain its durability over time.
For metal components, steel posts and frames provide unmatched structural strength, lasting over 40 years with minimal upkeep. On the other hand, wood posts are prone to rotting at the soil line, often failing within 5 to 15 years – a common issue that can be expensive to fix. If your fence is near a pool or in a coastal area, aluminum is a smart choice since it resists rust in humid and salty conditions.
Once you’ve selected the materials, focus on creating a design that complements your home.
Define Fence Style and Layout
Your fence style should harmonize with your home’s architecture. For modern or ranch-style homes, horizontal cedar slats framed in black steel are a sleek option. Traditional or craftsman-style homes pair well with ornamental iron combined with vertical wood pickets. At this stage, you’ll also need to decide on the fence’s height, spacing, and gate placement.
Gate posts require special attention – they should be one size larger (e.g., 5×5 instead of 4×4) and set 6 inches deeper in concrete to support the extra weight. Before finalizing your design, check local building codes. In many U.S. municipalities as of 2026, fences taller than 6 feet require permits, with fees typically ranging from $100 to $500. If you live in an area with a homeowner’s association (HOA), confirm their rules early, as they may have restrictions on height, color, or materials.
Popular Wood and Iron Fence Configurations
Once you’ve decided on materials and designs, it’s time to explore how to combine wood and iron. Here are three popular configurations to consider.
Wood Panels with Iron Posts
Pairing wood panels with iron posts creates a fence that’s both sturdy and easy to maintain. The iron posts are set in concrete at 6–8-foot intervals, with wood panels – often cedar or redwood – attached using stainless steel screws or U-shaped brackets. The iron posts take on the structural load at ground level, where wood posts are most vulnerable to rot. Plus, if the wood panels weather over time, they can be replaced without disturbing the iron framework.
This setup is perfect for backyard and side yard privacy, offering a mix of durability and charm. Costs typically range from $10–$20 per linear foot, depending on the type of wood and the height of the fence. For a sleeker, more modern look, you can opt for an iron frame with wood infill instead.
Iron Frames with Wood Infill
In this design, a powder-coated steel frame provides the structure, while wood slats – usually arranged horizontally – are secured within the frame. This approach prevents the slats from warping or twisting, a common issue when wood is only anchored at its ends.
"A wood and metal fence exhibits more strength than a wooden fence because the metal fence posts and railing do not flex like wood." – Stand Strong Fencing
This configuration offers a sleek, modern appearance, making it ideal for contemporary homes or properties in windy areas. For added privacy, the slats can be placed tightly together with a 1/8" to 1/4" gap – enough space to allow for natural expansion without creating visible gaps. Pre-drilling the wood before attaching it helps prevent splitting.
Decorative Wood Accents on Iron Fences
If curb appeal is the goal, decorative wood accents are a great way to enhance an iron fence. Adding wood trim boards or post caps to a wrought iron framework creates a striking contrast while maintaining an open view. The iron provides the strength and security, while the wood adds a touch of warmth and visual interest.
This style works best with rot-resistant wood species since the decorative pieces are often fully exposed and more susceptible to weathering. It’s a lower-commitment way to incorporate wood into an iron fence and can significantly enhance a home’s street presence.
| Configuration | Primary Benefit | Typical Use Case |
|---|---|---|
| Wood Panels + Iron Posts | Prevents ground-level rot; high stability | Backyard and side yard privacy |
| Iron Frame + Wood Infill | Prevents warping; modern aesthetic | Contemporary homes; high-wind areas |
| Wood Accents on Iron | High curb appeal; decorative contrast | Front gardens; luxury properties |
Step-by-Step Installation Process
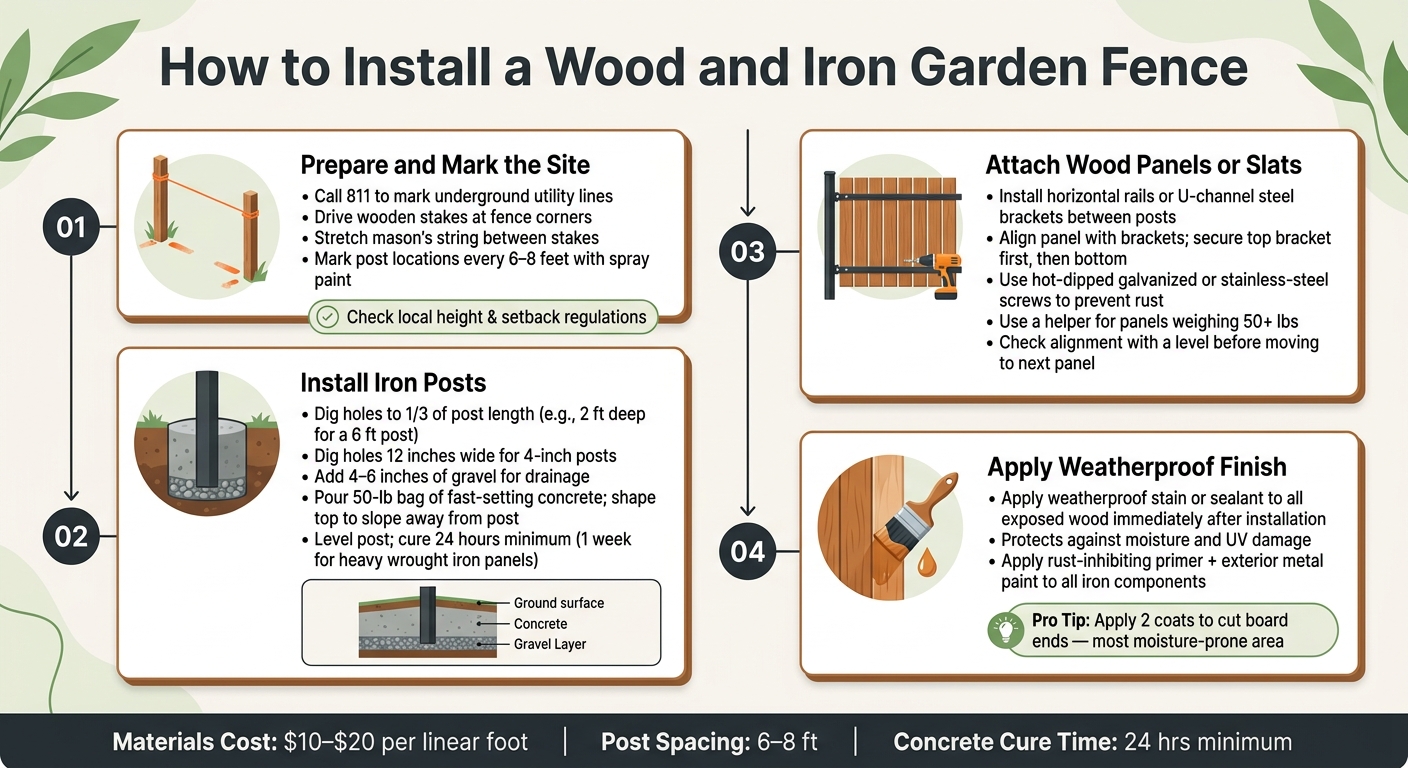
How to Install a Wood and Iron Garden Fence: Step-by-Step Guide
Building a sturdy wood and iron fence requires careful preparation and execution. Follow these steps to ensure your garden fence is both durable and visually appealing.
Prepare and Mark the Site
Before you dig, call 811 to have underground utility lines marked. This prevents any accidental damage to gas or electrical lines. Once the utilities are marked, use wooden stakes to outline your fence’s corners. Stretch a mason’s string tightly between the stakes to define the fence line. Along this string, mark the locations for each post with spray paint, keeping them spaced 6 to 8 feet apart for proper support. Make the painted marks larger than the planned hole diameter for better visibility.
"Accurate measurement is the cornerstone of a successful fence installation." – Ryan Scott, Author, WoodRio
Check local regulations for height or setback requirements before proceeding. Once the site is properly marked, you’re ready to start installing the posts.
Install Iron Posts
Dig each post hole to a depth of about one-third of the post’s total length. For instance, a 6-foot post requires a hole at least 2 feet deep. If you’re using 4-inch posts, dig a hole 12 inches wide to leave enough room for gravel and concrete. Add 4–6 inches of gravel to the bottom of each hole for drainage, then set the post in place. Pour in a 50-pound bag of fast-setting concrete and add water according to the manufacturer’s instructions. Use a level to ensure the post is plumb. Shape the top of the concrete to slope away from the post, which helps with drainage. Allow the concrete to cure for at least 24 hours before attaching wood components. For heavier wrought iron panels, wait a full week to ensure the posts are completely secure.
Attach Wood Panels or Slats
Once the posts are set, it’s time to install the wood components. Start by attaching horizontal rails or U-channel steel brackets between the posts to create a mounting surface. When hanging wood panels, align each panel with its brackets and secure the top first, followed by the bottom. Use hot-dipped galvanized or stainless-steel screws to prevent rust and staining. Since wood panels can weigh 50 pounds or more, having a helper hold the panel while you fasten it makes the process much easier. Check each panel with a level to ensure alignment before moving on to the next one.
"Line up each fence panel with the corresponding brackets on the posts. Attach each panel with the included screws, starting with the top bracket before attaching the bottom bracket." – Tony Carrick, Contributing Writer
To finish, apply a weatherproof stain or sealant to all exposed wood surfaces immediately after installation. This step protects the wood from moisture and UV damage, ensuring your fence remains strong and attractive for years.
Maintenance and Longevity Tips
Once your fence is installed, keeping it in good condition requires regular upkeep. These steps help maintain its appearance and functionality over time.
Protect and Maintain Wood
Sealing or staining wood periodically is essential. For example, staining cedar every 2–3 years can extend its lifespan to over 20 years. Without treatment, cedar may begin to rot in as little as 8 years. Pressure-treated pine needs re-staining more frequently – about every 1–2 years – to shield it from moisture damage.
Here’s a quick test to check if your wood is still protected: sprinkle water on the surface. If it beads up, the sealant is working. If the water absorbs within 10 seconds, it’s time to reapply stain. Pay extra attention to the cut ends of boards, as they are most prone to soaking up moisture. Apply two coats of stain to these areas for added defense.
For cleaning, use a solution of 1 cup of oxygen bleach per gallon of warm water. If you opt for a power washer, keep the pressure between 1,500 and 2,000 PSI to avoid damaging the wood.
While wood maintenance is crucial, don’t overlook the care needed for iron components.
Prevent Rust on Iron Components
To protect iron parts from rust, start by applying a rust-inhibiting primer followed by an exterior-grade metal paint. This creates a barrier against oxidation. Inspect the iron at least once a year for rust. If you spot any, sand the area and apply a rust converter before repainting. To further prevent moisture damage, seal any gaps between wood and iron with silicone caulk.
Seasonal Inspection Checklist
Perform a comprehensive inspection every spring to catch potential issues early. Use this checklist as a guide:
| What to Check | What to Look For |
|---|---|
| Wood panels and boards | Look for soft spots, discoloration, peeling finishes, or signs of water absorption |
| Post bases | Check for mud tubes (a sign of termites), rot, or cracked concrete crowns |
| Iron components | Identify rust spots, chipped paint, or exposed primer |
| Fasteners | Tighten or replace loose, missing, or corroded screws |
| Material junctions | Ensure caulk is intact where wood meets iron |
| Overall alignment | Look for leaning posts, sagging panels, or rails pulling away from posts |
If you live in an area with harsh winters, reapply waterproof sealant before the first freeze. This prevents moisture trapped in the wood from freezing, which can lead to cracking and splitting.
Working With Professional Installers
While tackling a fence installation yourself can be rewarding, some projects require expertise that goes beyond basic DIY skills. Knowing when to call in professionals can save you time, money, and a lot of frustration – especially with complex wood and iron hybrid fences.
When to Hire a Professional
Hybrid wood and iron fencing is classified as "Advanced" difficulty for a reason. If your project involves steep slopes, rocky terrain, or large tree roots, hiring a professional can ensure your fence is stable and free of gaps. Additionally, working with exotic hardwoods like ipe or mahogany, mounting panels on materials like brick, stucco, or concrete, or building custom iron frames with wood infill demands precision and specialized tools that go beyond the average DIY toolkit. Iron panels are particularly heavy, and coordinating tasks like allowing concrete to properly cure before installation adds another layer of complexity. Professionals also bring knowledge of local building codes and HOA regulations, which can save you from costly mistakes.
It’s worth noting that labor costs can make up as much as 50% of the total project expense. While simple designs might be more cost-efficient for DIY enthusiasts, complex builds often benefit from professional installation, ensuring structural integrity and long-term durability.
Next, let’s look at how Tend Fencing brings expertise to these challenging projects.
Tend Fencing‘s Expertise
When it comes to advanced fencing projects, professional expertise can make all the difference. Tend Fencing, based in Plano, TX, has over 15 years of construction experience and specializes in hybrid wood and iron fencing. Their portfolio includes everything from ornamental iron and cedar combinations to fully custom builds featuring masonry columns and intricate gate systems.
The process begins with a free consultation to align with your vision, followed by scheduling and expert installation. In 2023, Tend Fencing completed a standout project for Robert Wright, incorporating 16 Chicago brick columns with ornamental steel sections and double-sided board-on-board cedar panels. This required seamless coordination between masonry, ironwork, and wood finishing. In early 2024, they delivered another impressive project for Gunnar Thompson, installing an 8-foot board-on-board cedar privacy fence paired with a 6-foot ornamental iron front fence that balanced security with aesthetic appeal.
Tend Fencing boasts a 5.0/5 star rating, with customers frequently praising their efficiency – completing large sections in a single day – and thorough cleanup after the job. Beyond their craftsmanship, the company also demonstrates a commitment to sustainability by partnering with One Tree Planted to plant a tree for every fence they build.
Conclusion
Here’s a quick recap of the essentials when it comes to combining wood and iron for garden fencing.
This blend brings together the natural warmth of wood and the sturdy resilience of iron. Iron provides the structural backbone, while wood adds privacy and a textured aesthetic. The result? A fence that’s not only strong but also visually appealing.
Some useful pointers: materials typically cost between $10 and $20 per linear foot, wood requires re-staining every 2–3 years to maintain its look, and sealing the joints is critical to fend off moisture damage. The steps outlined in this guide – from planning to installation – will help ensure your fence stays durable and attractive for years to come.
"Mixing wood and metal is a great way to make your fence stand out." – KD Fencing
If you encounter challenges like uneven ground or intricate designs during your DIY efforts, it might be time to call in the pros. Companies like Tend Fencing in Plano, TX, specialize in hybrid designs, offering everything from cedar and ornamental iron combinations to fully customized gate systems. For a flawless result, professional installation can make all the difference. Be sure to refer back to this guide for detailed steps on installation and maintenance.
FAQs
What’s the best way to prevent wood from rotting where it meets the ground?
To keep wood from rotting at ground level, it’s crucial to minimize contact with soil and moisture. Opt for treated or naturally rot-resistant wood, and when setting posts, use concrete or gravel to create a barrier. Applying a waterproof sealant adds an extra layer of protection. Slightly elevating the wood above ground and ensuring proper drainage around the base are also effective strategies. Additionally, keep the area free of overgrown plants to prevent moisture buildup and help the wood last longer.
How do I attach wood to iron without causing rust or wood splitting?
To attach wood to iron securely while avoiding rust and splits, follow these steps:
- Opt for rust-resistant fasteners such as stainless steel or galvanized screws to prevent corrosion.
- Drill pilot holes in the wood beforehand to reduce the risk of splitting.
- Use spacers or rubber washers to create a barrier and prevent direct contact between the wood and iron.
- Apply protective coatings to both materials and ensure there’s proper drainage to keep moisture at bay and reduce potential damage.
How do I handle slopes or uneven ground with a wood-and-iron fence?
To fit a wood-and-iron fence to sloped or uneven ground, you can use stepped panels or adjustable posts to match the terrain. Begin by installing posts at different heights to align with the slope. Attach the wood panels securely to the iron framework, ensuring each section is properly aligned by checking with a level as you go. Adjusting the height of each panel allows the fence to stay sturdy, look polished, and follow the natural contours of the ground seamlessly.